STM32MP1 CubeMX Tutorial for OSD32MP15x
Published On: June, 14, 2019 By: Eshtaartha Basu | Updated: December 7, 2022 by Greg Sheridan
Introduction
 This application note will help to configure STM32CubeMX to work with the OSD32MP15x, the STM32MP1 System-in-Package.
Get updates to this STM32MP1 CubeMX Application Note and all of our Technical Documentation
"*" indicates required fields
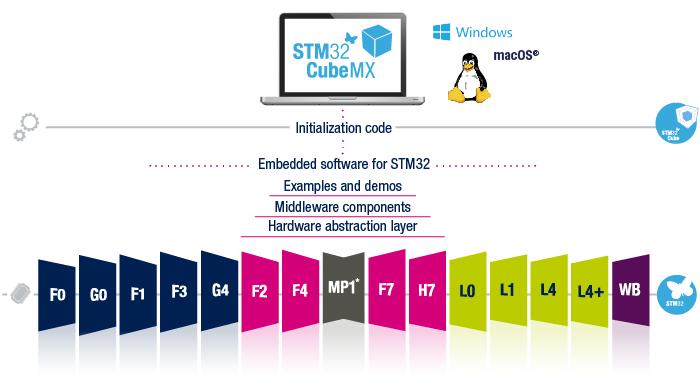
STM32CubeMX (commonly called just “CubeMX”) is a STMicroelectronics processor configuration tool with an intuitive Graphical User Interface (GUI) that helps programmers and embedded designers configure their ST microcontrollers with ease. With the launch of STM32MP15x, CubeMX tool has been extended to support the MP1 microprocessor family as well, specifically the STM32MP15x, which is integrated within the Octavo Systems OSD32MP15x SiP, the STM32MP1 System in Package. As a result, ST microcontroller users can easily apply their knowledge and experience with CubeMX to configure OSD32MP15x. Through a step-by-step process, STM32CubeMX helps generate initialization C code for the ARM® Cortex®-M4 core and partial Linux® Device Trees for ARM® Cortex®-A7 cores. Apart from code generation, CubeMX can also help perform DDR tuning, testing and power consumption estimation.
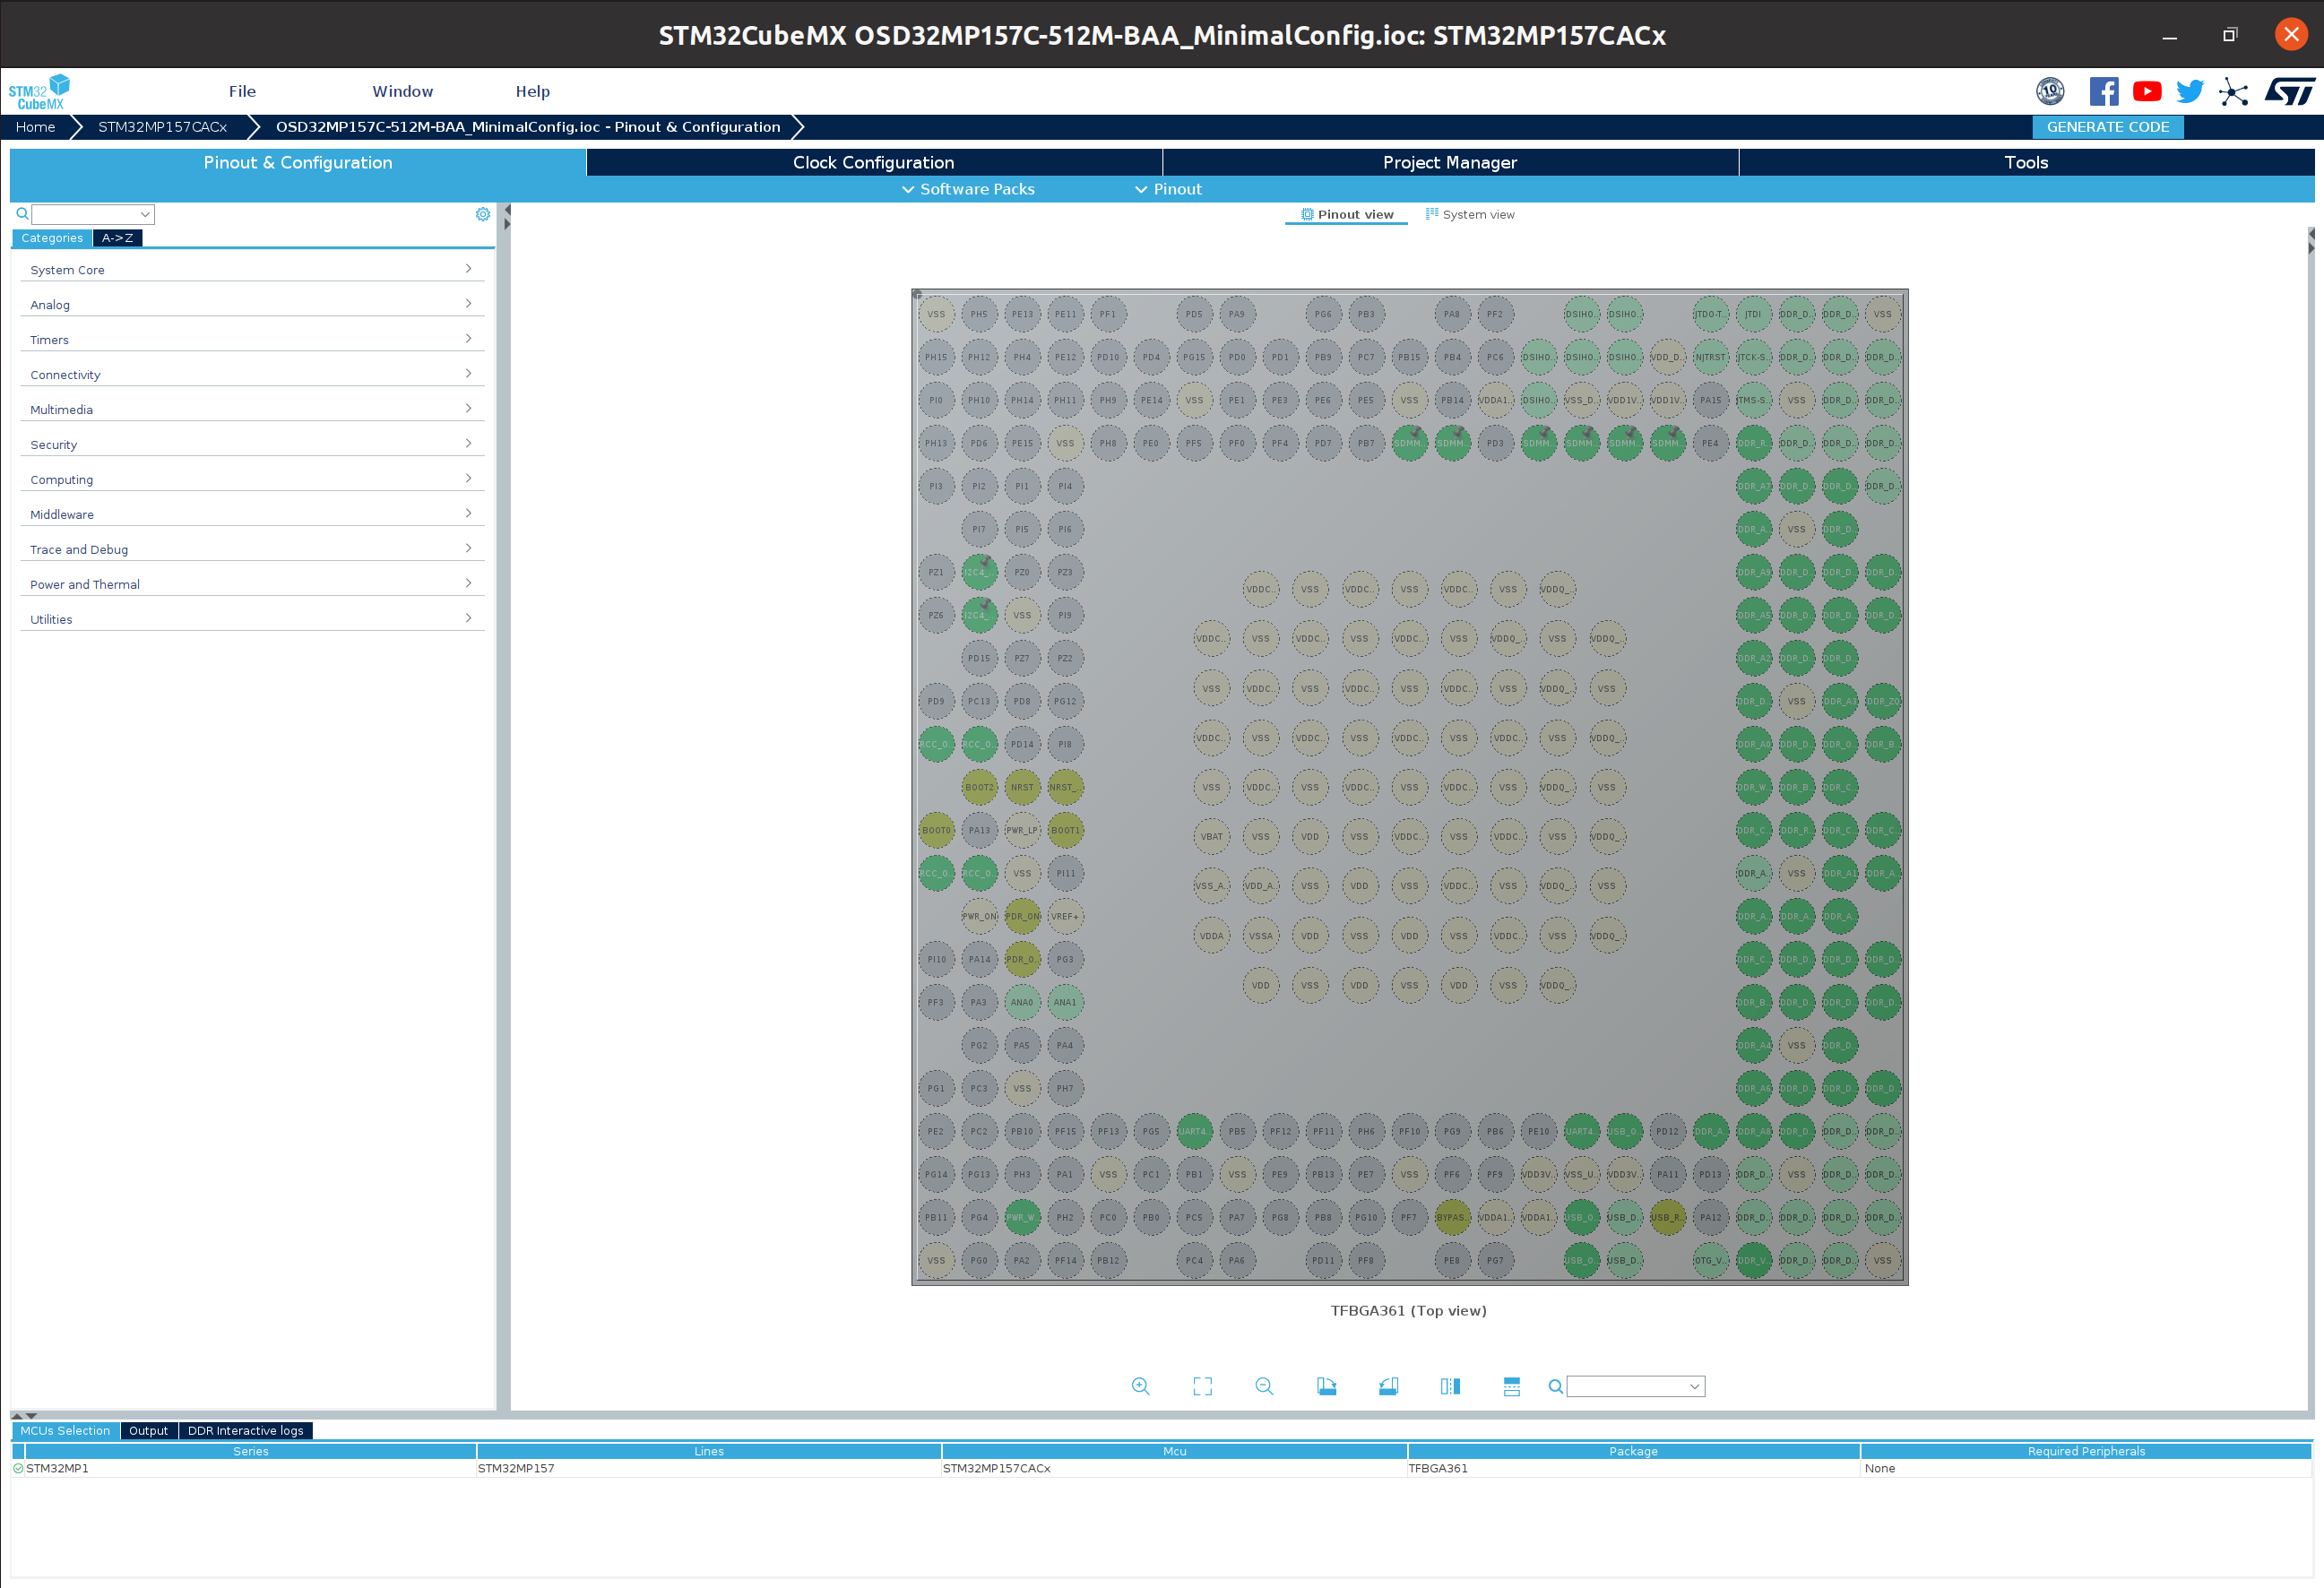
Generating initialization code for the STM32MP1 using CubeMX involves configuring Pinout, Peripherals, and Clocks. An example screenshot of the “Pinout & Configuration” window is shown in Figure 1.
This application note provides pre-configured CubeMX project files in the OSD32MP15x_MinimalConfig.zip file. The minimal pinout, peripheral and clock configuration for the OSD32MP1 is already completed in this project so that you can quickly get started with the OSD32MP15x specific SiP device. You can use these configuration settings as a starting point to make modifications for your custom design.
In addition, this app note will briefly describe the STM32MP1 CubeMX settings which you should and should not modify for the OSD32MP15x. It will also point you to important documentation and user manuals to assist you. The tutorial assumes that you are already familiar with the OSD32MP15x device and the integrated peripherals and have a basic understanding of CubeMX. If not, please use the links in Section 2 to get more information.
Notice: The information provided within this document is for informational use only. Octavo Systems provides no guarantees or warranty to the information contained.
Table of Contents
Prerequisites
- Download and install CubeMX 6.3.0:
https://www.st.com/en/development-tools/stm32cubemx.html#overview - Download OSD32MP15x_MinimalConfig.zip file:
https://octavosystems.com/files/osd32mp15x_minimalconfig/ - Unzip the file and open the <OCTAVO PART NUMBER>_MinimalConfig project file corresponding to your OSD32MP15x part number from CubeMX:
“File” > “Load Project” > Choose the <OCTAVO PART NUMBER>_MinimalConfig.ioc file. - Background Information:
- CubeMX User Manual:
https://www.st.com/resource/en/user_manual/dm00104712.pdf - STM32MP157C/F datasheet:
https://www.st.com/resource/en/datasheet/stm32mp157c.pdf - STM32MP153C datasheet:
https://www.st.com/resource/en/datasheet/stm32mp153c.pdf - STM32MP157 Reference Manual:
https://www.st.com/resource/en/reference_manual/rm0436-stm32mp157-advanced-armbased-32bit-mpus-stmicroelectronics.pdf - STM32MP153 Reference Manual:
https://www.st.com/resource/en/reference_manual/rm0442-stm32mp153-advanced-armbased-32bit-mpus-stmicroelectronics.pdf - OSD32MP15x Family Overview:
https://octavosystems.com/docs/osd32mp15x-family-overview/ - OSD32MP15x Datasheet:
https://octavosystems.com/docs/osd32mp15x-datasheet/ - OSD32MP15x Migration Guide:
https://octavosystems.com/app_notes/osd32mp1-variant-migration-guide/ - Pin Mapping between STM32MP15x and OSD32MP15x:
https://octavosystems.com/app_notes/osd32mp15x-pin-mapping-to-stm32mp1/
- CubeMX User Manual:
Minimal CubeMX Project
The minimal pinout, peripheral and clock configuration for the OSD32MP15x is provided in the CubeMX projects contained in the OSD32MP15x_MinimalConfig.zip file to help you quickly get started with OSD32MP15x using OSD32MP1-RED board. The projects were created using CubeMX v6.3.0.

While using other versions of CubeMX, it is possible they require more detailed set up that is outside the scope of this article. You can attempt to use them at your own risk.

The provided OSD32MP15x_MinimalConfig project can also be used to get started with OSD32MP1-BRK after modifying the card detect pin for MMC1 interface and Low Speed Clock(LSE) settings in RCC subsystem to match the micro-SD card configuration of OSD32MP1-BRK as described in section 10 of this tutorial.
Project Naming Conventions
The files within the OSD32MP15x_MinimalConfig.zip file follow the naming convention:
“<OCTAVO PART NUMBER>_MinimalConfig.ioc”
The OSD32MP15x_MinimalConfig.zip will only contain CubeMX projects for commercial temperature part numbers. Since the functionality of OSD32MP15x industrial temperature parts are same as that of their commercial counterparts, the CubeMX project and associated device tree files for a commercial part number can be used for the corresponding industrial part number as well.
STM32MP1 CubeMX Configuration for the Octavo Systems OSD32MP15x, the STM32MP1 System in Package (SiP)
The CubeMX configuration that is made available for OSD32MP15x SiP as part of <OCTAVO PART NUMBER>_MinimalConfig.ioc project can be classified into two groups:
- Fixed Settings
- Customizable Settings
These settings are discussed in the following sections.
Fixed Settings
We DO NOT recommend changing the settings listed in this section.
Hardware specific settings
Since OSD32MP15x SiP integrates several components along with the STM32MP15x processor, the following CubeMX settings correspond to components within the SiP that are fixed and therefore these settings should NOT be changed. The fixed settings are also part number specific. Make sure to use the CubeMX project that corresponds to the exact part number of OSD32MP15x device you are using in your design. The fixed settings in the minimal CubeMX Project are:
- DDR
- DDR Mode and Configuration settings in “System Core”
- IWDG2
- Watchdog timer used in bootloaders
- GPIO
- DDR Pin Configuration settings in “GPIO”
- I2C4_SCL/I2C4_SDA Pin Configuration settings (enables communication between processor and PMIC)
- UART4 Pin Configuration settings (enables serial debug console)
- PC14-OSC32_IN, PC15-OSC32_OUT and PH0_OSC_IN pins are reserved for clock circuitry
- RCC
- RCC Mode and Configuration settings in “System Core”
For OS32MP1-BRK, the LSE configuration needs to be changed from “Crystal/Ceramic Resonator” option to “DIGBYPASS Clock Source” option in the drop-down menu
- RTC
- RTC Mode and Configuration settings in “Timers”
- I2C4
- I2C4 Mode and Configuration settings in “Connectivity”
- UART4
- UART4 Mode and Configuration settings in “Connectivity”. UART4 is used as the default serial console interface by the processor.
Software specific settings
The Linux distributions and other software collateral provided by Octavo Systems and ST assume the following settings to function as expected. If you choose to modify the below settings, the corresponding device trees (and/or other software components) need to be updated to reflect the same to ensure proper functionality.
- SDMMC1
- SDMMC1 Mode and Configuration settings in “Connectivity”.
For OSD32MP1-BRK, the card detect pin configuration in the user section of MMC1 node in the device tree needs to be changed to reflect the correct SD card interface configuration. See Section 10 for details
- USB_OTG_HS
- USB_OTG_HS Mode and Configuration settings in “Connectivity”.
Customizable Settings
All the settings that are not part of the Fixed Settings can be customized to suit your design needs. Some commonly customized settings are:
- GPIO – except reserved pins mentioned above
- DMA
- GIC
- IPCC
- NVIC
- DTS
- GPU
- CRYP
- HASH
- I2Cx
- UARTx
- SPIx
- USBx
- BSEC
- ETZPC
- RNG1
- CRC1
See the Octavo Systems app note: Pin Mapping Between OSD32MP15x , the STM32MP1, and Other Integrated Devices, to understand how the pins of the discrete STM32MP15x processor are mapped to the OSD32MP15x System in Package (SiP).
CubeMX Project Manager
The CubeMX Project Manager can generate partial Linux Device Trees for the ARM® Cortex®-A7 cores. It also can generate initialization C code for the ARM Cortex-M4 core for several toolchains and IDEs. You are free to use any supported toolchain. However, the M4 initialization C code of the minimal CubeMX Project has only been tested on the System Workbench for STM32 IDE (i.e., SW4STM32) with the STM32Cube FW_MP1 V1.4.0 firmware package. The partial device tree output files of the minimal CubeMX Project have been tested on corresponding OSD32MP15x device running OpenSTLinux Developer Package Linux Kernel v3.0.0.
To learn more about these tools, see section 4.9 of the CubeMX manual.
CubeMX does not support the configuration/management of all the peripherals through its GUI (as indicated by WARNINGS in the GUI). It is necessary to manually inspect and modify/add to the device tree once it has been generated by CubeMX.
To learn more about Linux Device Trees, see OSD335x Lesson 2: Linux Device Tree.
Generating code using CubeMX
CubeMX is capable of generating initialization code for both the Dual Core Cortex-A7 microprocessor cores and M4 microcontroller core. Before proceeding to generate the code, make sure the Pinout & Configuration, Clock Configuration and Project settings match your expectations.
To generate initialization code for A7 core and M4 core:
- Hit the GENERATE CODE button at the top right corner of the CubeMX GUI.
- The generated device tree files for the A7 cores will be available under: <CubeMX project directory>/CA7/DeviceTree/<Device name> directory. In this directory, you should be able to see three other sub-directories: kernel, tf-a and u-boot. Each of these directories will contain device tree source files (with extensions “.dts” or “.dtsi”).:
- kernel directory will contain device tree files for the Linux kernel.
- tf-a will contain device trees files for the First Stage Boot Loader (FSBL) of trusted boot chain.
- u-boot directory will contain device tree files for the Second Stage Boot Loader (SSBL) of trusted boot chain
For your convenience, Octavo Systems also provides fully built (working) device tree binaries for the A7 cores (with extension .stm32 under tf-a, .bin under u-boot and .dtb under kernel) so that you can quickly get started instead of building device trees from scratch.
- Similar to A7 core, the generated M4 initialization code (i.e., SW4STM32 IDE project) is available under your CubeMX project directory. To make use of the generated code, first download and install the System Workbench for STM32 (also called SW4STM32) IDE. Once installed, open the IDE, go to File > Import > Existing Projects into Workspace > Browse and select the SW4STM32 directory (which was generated by CubeMX) under your CubeMX project directory > click Finish.
- Once the initialization project code is imported, you can modify it/add to it to suit your design requirements and build/deploy it on the M4 core of your OSD32MP15x using the same IDE. To learn more about SW4STM32 IDE, see Overview and Documentation of SW4STM32 at OpenSTM32 Community (registration and login required).
CubeMX v6.3.0 automatically chooses the CubeMX project file directory as the default directory for generated device tree files and SW4STM32 IDE project files. The root directory for the generated code cannot be manually set.
Flashing micro-SD card and installing Development tools
Before you can use the custom device tree files generated from CubeMX, you need to complete the following steps:
Step1: Flash a micro-SD card with Octavo OpenSTLinux Image
Flash a micro-SD card with Octavo OpenSTLinux Image using instructions from the getting started guides – OSD32MP1-RED Getting Started Guide
Flashing the SD Card with ST’s OpenSTLinux (requires CubeProgrammer)
If you decide to use ST’s OpenSTLinux Starter Package as a starting point instead of Octavo’s Starter Image, you can use the below steps to flash the micro-SD card.
- Install the STM32CubeProgrammer tool (v2.9.0 at the time of writing) on a host Ubuntu computer using the instructions in Section 5.1 of the ST Starter Package Wiki page.
- Prepare the USB serial link on the host Ubuntu computer using the instructions in Section 5.2 of ST Starter Package Wiki page.
- Download the Starter Package image on the host Ubuntu computer and flash your SD card with it using instructions given in Section 6 of ST Starter Package Wiki page.
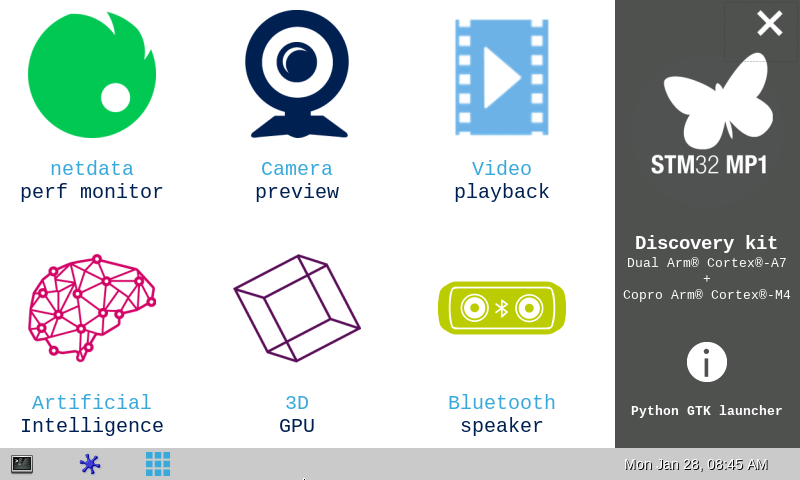
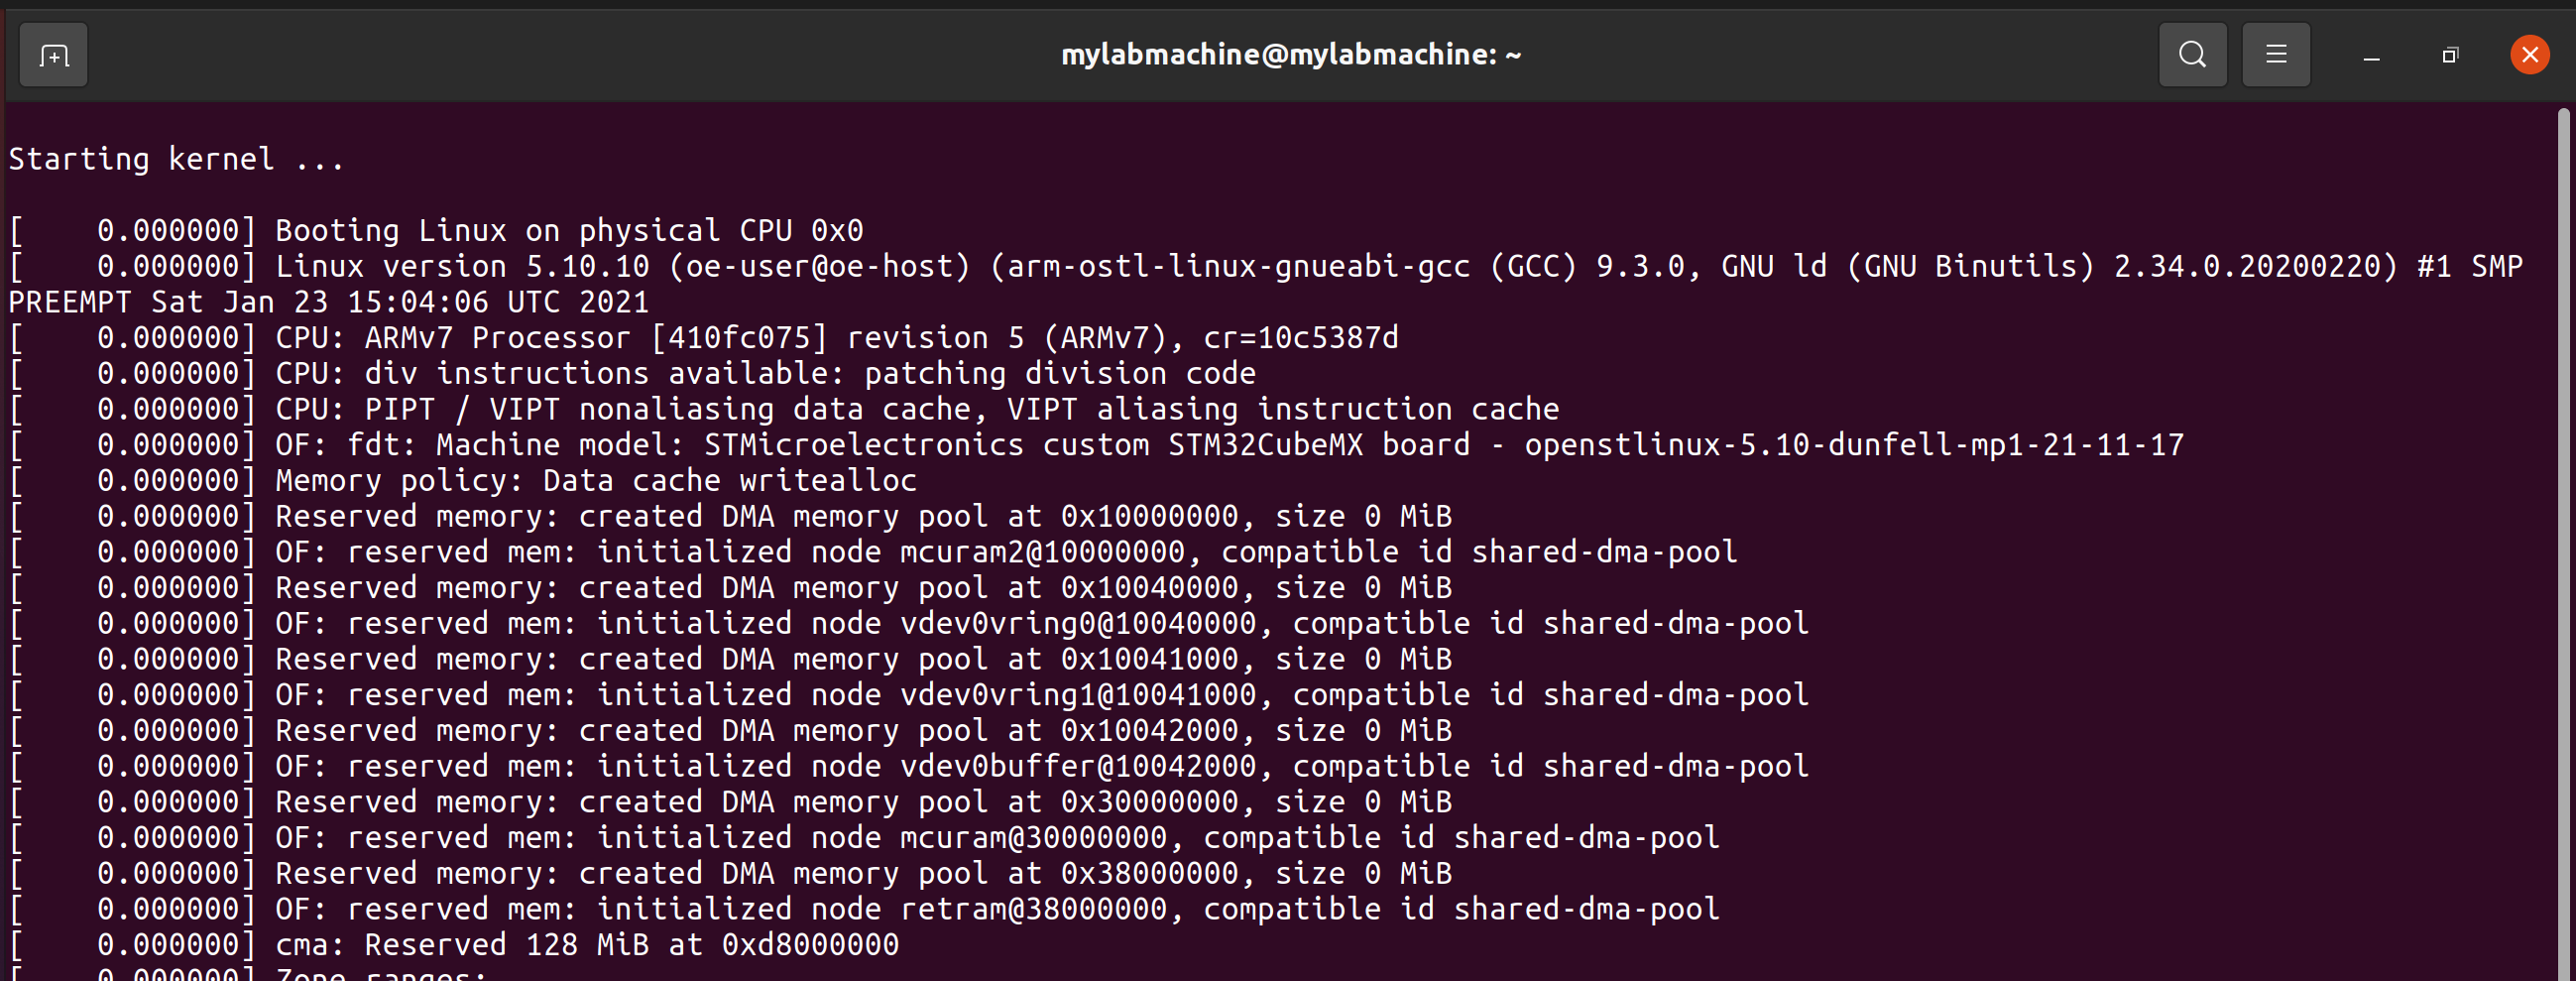
- Boot the board and check the boot sequence using the instructions given in Section 7 and 8 of the ST Starter Package Wiki page. The UART4 serial console should lead you to a login screen at the end of boot messages as shown in Figure 2 and the OSD32MP1-RED LCD screen should display a demo apps page as shown in Figure 3.
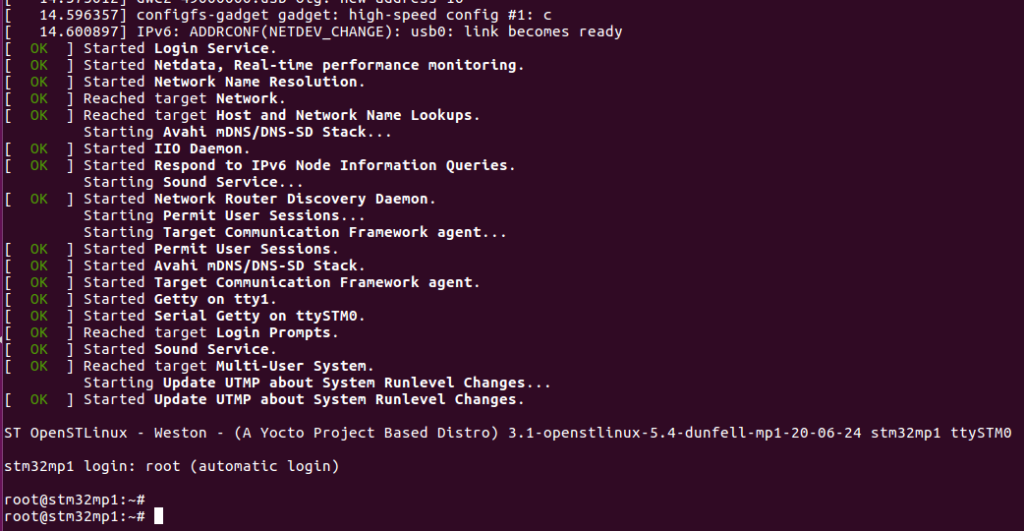

Figure 2 OSD32MP157x Starter Pack Login Screen

Step 2: Install SDK and Developer Package Linux Kernel
In order to build the custom device tree files generated from CubeMX, it is necessary to install an SDK and Developer Package Linux Kernel for cross-development on the host Ubuntu computer. To do this, please complete the following steps:
- Install the SDK (v3.0.0) on the host Ubuntu computer using the instructions given in Section 2.1 of the STM32MP1 SDK v3.0.0 Wiki page.
Install the Developer Package Linux Kernel v3.0.0 on the host Ubuntu computer using the instructions given in Section 2.1 of the STM32MP1 Developer Package Linux Kernel v3.0.0 Wiki page (see Caveat below)
- The Linux Kernel build process discussed in ST Developer Wiki Page proposes two ways to build to kernel:
- Compile and install in a build directory
- Compile and install in the current source code directory
We recommend using the first method (i.e., using a separate build directory) to enable better flexibility while making modifications to the build.
- Please follow the directory structure recommended under “proposition to organize the tools’ directory” to facilitate the steps in this guide. The instructions assume you are using the recommended directory structure.
Using the Trusted Firmware Device Tree
This section will guide you through the process of building a custom Trusted Firmware A (TF-A) that uses the custom TF-A Device Tree generated from the minimal CubeMX project. The following steps assume that you are using the OSD32MP1-RED development platform from Octavo Systems. The process of loading a custom TF-A Device Tree should be similar for your custom design.
The TF-A Device Tree generated by CubeMX consists of 3 files:
- A TF-A device tree file:
<ST SOC PART NUMBER>-<OCTAVO PART NUMBER>_minimalconfig-mx.dts
- A header file for DDR configuration: stm32mp15-mx.dtsi
- A TF-A Firmware Configuration file:
<ST SOC PART NUMBER>-<OCTAVO PART NUMBER>_minimalconfig-mx-fw-config.dts
For more information on how to configure TF-A, please take a look at the following resources:
https://wiki.st.com/stm32mpu/wiki/How_to_configure_TF-A_BL2
https://wiki.st.com/stm32mpu/wiki/How_to_configure_TF-A_SP-MIN
https://wiki.st.com/stm32mpu/wiki/How_to_configure_TF-A_FW_CONFIG
https://wiki.st.com/stm32mpu/wiki/How_to_configure_TF-A_FIP
The steps to build TF-A using a custom Device Tree are as follows:
Step 1: Download and install TF-A Developer Package on Host Computer
In order to build TF-A using a custom Device Tree, we need to first download and install TF-A Developer Package on a Host Ubuntu computer. To do so, follow the steps under section 2.1 of Developer Package TF-A v3.0.0 Wiki page.
Step 2: Building TF-A using Custom Device Trees
The TF-A developer package provided by ST supports two toolchains:
- Trusted boot chain – FSBL is Trusted Firmware-A (TF-A) and SSBL is U-Boot. OpenSTLinux images use this boot chain by default.
- OP-TEE – Secure OS, i.e. a Trusted Execution Environment. This is beyond the scope of this application note, but you can learn more about it here.
After extracting the source code for TF-A, the following steps show how to build TF-A from Custom Device Trees:
- Make sure you apply all the patches in the Developer Package to the source code (You will need to be in TF-A source code directory to apply the patches):
for p in `ls -a ../*patch`;do patch -p1 < $p; done
- Start the Developer Package SDK to cross compile TF-A if you did not already
source <SDK Installation Directory>/environment-setup-cortexa7t2hf-neon-vfpv4-ostl-linux-gnueabi
- Copy the three custom TF-A Device Tree source files (listed in the introduction of this section) to the <TF-A source code directory>/fdts/ directory of the host Ubuntu computer.
cp <CubeMX project directory>/CA7/DeviceTree/<OCTAVO PART NUMBER>_minimalconfig/tf-a/* < TF-A source code directory>/fdts/
- Navigate to TF-A source directory using the command:
cd <TF-A source directory>
- Set FIP_DEPLOYDIR_ROOT path:
export FIP_DEPLOYDIR_ROOT=$PWD/../../FIP_artifacts
- Build TF-A using the command:
make -f $PWD/../Makefile.sdk TF_A_DEVICETREE=<ST SOC PART NUMBER>-<OCTAVO PART NUMBER>_minimalconfig-mx FIP_CONFIG="trusted" FIP_BL32_CONF="tfa," TF_A_CONFIG="trusted sdcard" DEPLOYDIR=$FIP_DEPLOYDIR_ROOT/arm-trusted-firmware stm32
- You can find the newly built custom TF-A under <TF-A source code directory>/../build/sdcard
The above procedure also generates binaries that will later be used in FIP (Firmware Image Package) generation. STM32MP1 uses FIP to load boot stage binaries including u-boot after TF-A execution is done. The procedure to generate FIP binary with custom u-boot is shown in the next section.
Step 3: Update micro-SD card with your custom TF-A using steps in section 10.1.
Update micro-SD card with your custom TF-A using steps in section 10.1.
Since FSBL uses TF-A device tree and SSBL uses U-Boot device tree, make sure the compatible property of both these device trees are identical. Otherwise, the boot sequence may not transition from FSBL to SSBL.
Using the U-Boot Device Tree
This section will guide you through the process of building a custom U-Boot that uses the custom U-Boot Device Tree generated from the minimal CubeMX project. The following steps assume that you are using the OSD32MP1-RED development platform from Octavo Systems. The process of loading a custom U-Boot Device Tree should be similar for your custom design.
The U-Boot device tree generated by CubeMX consists of 3 files (more info on this topic here):
- A copy of the Linux device tree as the main .dts file:
<ST SOC PART NUMBER> – <OCTAVO PART NUMBER>_minimalconfig-mx.dts
- A .dtsi include file with U-Boot specific configuration:
<ST SOC PART NUMBER> – <OCTAVO PART NUMBER>_minimalconfig-mx-u-boot.dtsi
- A .dtsi include file for DDR configuration: stm32mp15-mx.dtsi
The steps to build U-boot using a custom Device Tree are as follows:
Step 1: Download and install U-Boot Developer Package on Host Computer
Before making custom edits to the U-Boot device tree or its source code, we need to first download and install U-Boot Developer Package on Host Ubuntu computer. To do so, follow the steps under section 2.1 of STM32MP1 Developer Package U-Boot v3.0.0 Wiki page
Step 2: Building U-Boot from Custom Device Trees
The U-Boot developer package provided by ST supports two boot chains (more on this topic here):
- Trusted boot chain – FSBL is Trusted Firmware-A (TF-A) and SSBL is U-Boot. The Starter OpenSTLinux image uses this boot chain by default.
- OP-TEE – Secure OS, i.e. a Trusted Execution Environment. This boot chain is beyond the scope of this application note but you can learn more about it here.
To build U-Boot from Custom Device Trees, follow the below steps:
- Make sure you apply all the patches in the Developer Package to the source code (You will need to be in U-Boot source code directory to apply the patches):
for p in `ls -a ../*patch`;do patch -p1 < $p; done
- Start the Developer Package SDK to cross compile U-Boot if you did not already
source <SDK Installation Directory>/environment-setup-cortexa7t2hf-neon-vfpv4-ostl-linux-gnueabi
- Copy the three Custom U-Boot Device Tree source files corresponding to your device (listed in the introduction of this section) to the <U-Boot source code directory>/arch/arm/dts/ directory on the host Ubuntu computer.
cp <CubeMX project directory>/CA7/DeviceTree/<OCTAVO PART NUMBER>_minimalconfig/u-boot/* < U-Boot source code directory>/arch/arm/dts/
- Navigate to U-Boot source directory using the command:
cd <U-Boot source directory>
- Set FIP_DEPLOYDIR_ROOT path:
export FIP_DEPLOYDIR_ROOT=$PWD/../../FIP_artifacts
- Compile U-Boot device tree using the command
make -f $PWD/../Makefile.sdk all UBOOT_CONFIG=trusted UBOOT_DEFCONFIG=stm32mp15_trusted_defconfig UBOOT_BINARY=uboot.dtb FIP_CONFIG="trusted" FIP_BL32_CONF="tfa," DEVICE_TREE=<ST SOC PART NUMBER>-<OCTAVO PART NUMBER>_minimalconfig-mx
- You can find the newly built custom U-Boot binary at:
<U-Boot source code directory>/../../FIP_artifacts/fip
Step 3: Update micro-SD card with your custom U-Boot using steps in section 10.2.
Update micro-SD card with your custom U-Boot using steps in section 10.2.
You should look at all the Device Tree nodes automatically generated by CubeMX to ensure the generated nodes reflect the configuration we have specified in the CubeMX GUI.
If you observe redundant nodes leading to “Reference to non-existent node or label” errors, they can be commented out using single or multi-line comments as shown below.
/*
<sound node entries1>
<sound node entries2>
<sound node entries3>
*/
//remote-endpoint = <<dc_ep1_out>;
Since FSBL uses TF-A device tree and SSBL uses U-Boot device tree, make sure the compatible property of both these device trees are identical. Otherwise, the boot sequence may not transition from FSBL to SSBL.
Using the Linux Device Tree
This section will guide you through the process of how to use the Linux Device Tree generated from the minimal CubeMX project. The following steps assume that you are using the OSD32MP1-RED development platform from Octavo Systems. The process of loading a custom Linux Device Tree should be similar for your custom design.
The Linux device tree generated by CubeMX consists of only one file (more info on this topic here): <ST SOC PART NUMBER>-<OCTAVO PART NUMBER>_minimalconfig-mx.dts. The steps to build a custom OpenSTLinux Device Tree are as follows:
Step 1: Building a Custom Device Tree
To build your custom device tree, you will need to complete the following steps:
- Make sure you apply all the patches in the Developer Package to the source code (You will need to be in Kernel source code directory to apply the patches):
for p in `ls -a ../*patch`;do patch -p1 < $p; done
- Start the Developer Package SDK to cross compile U-Boot if you did not already
source <SDK Installation Directory>/environment-setup-cortexa7t2hf-neon-vfpv4-ostl-linux-gnueabi
- Copy the custom Device Tree source file (indicated in the introduction of this section) to the <kernel source code directory>/arch/arm/boot/dts/ directory of the host Ubuntu computer.
cp <CubeMX project directory>/CA7/DeviceTree/<OCTAVO PART NUMBER>_minimalconfig/kernel/<ST SOC PART NUMBER>-<OCTAVO PART NUMBER>_minimalconfig-mx.dts <Kernel source code directory>/arch/arm/boot/dts/
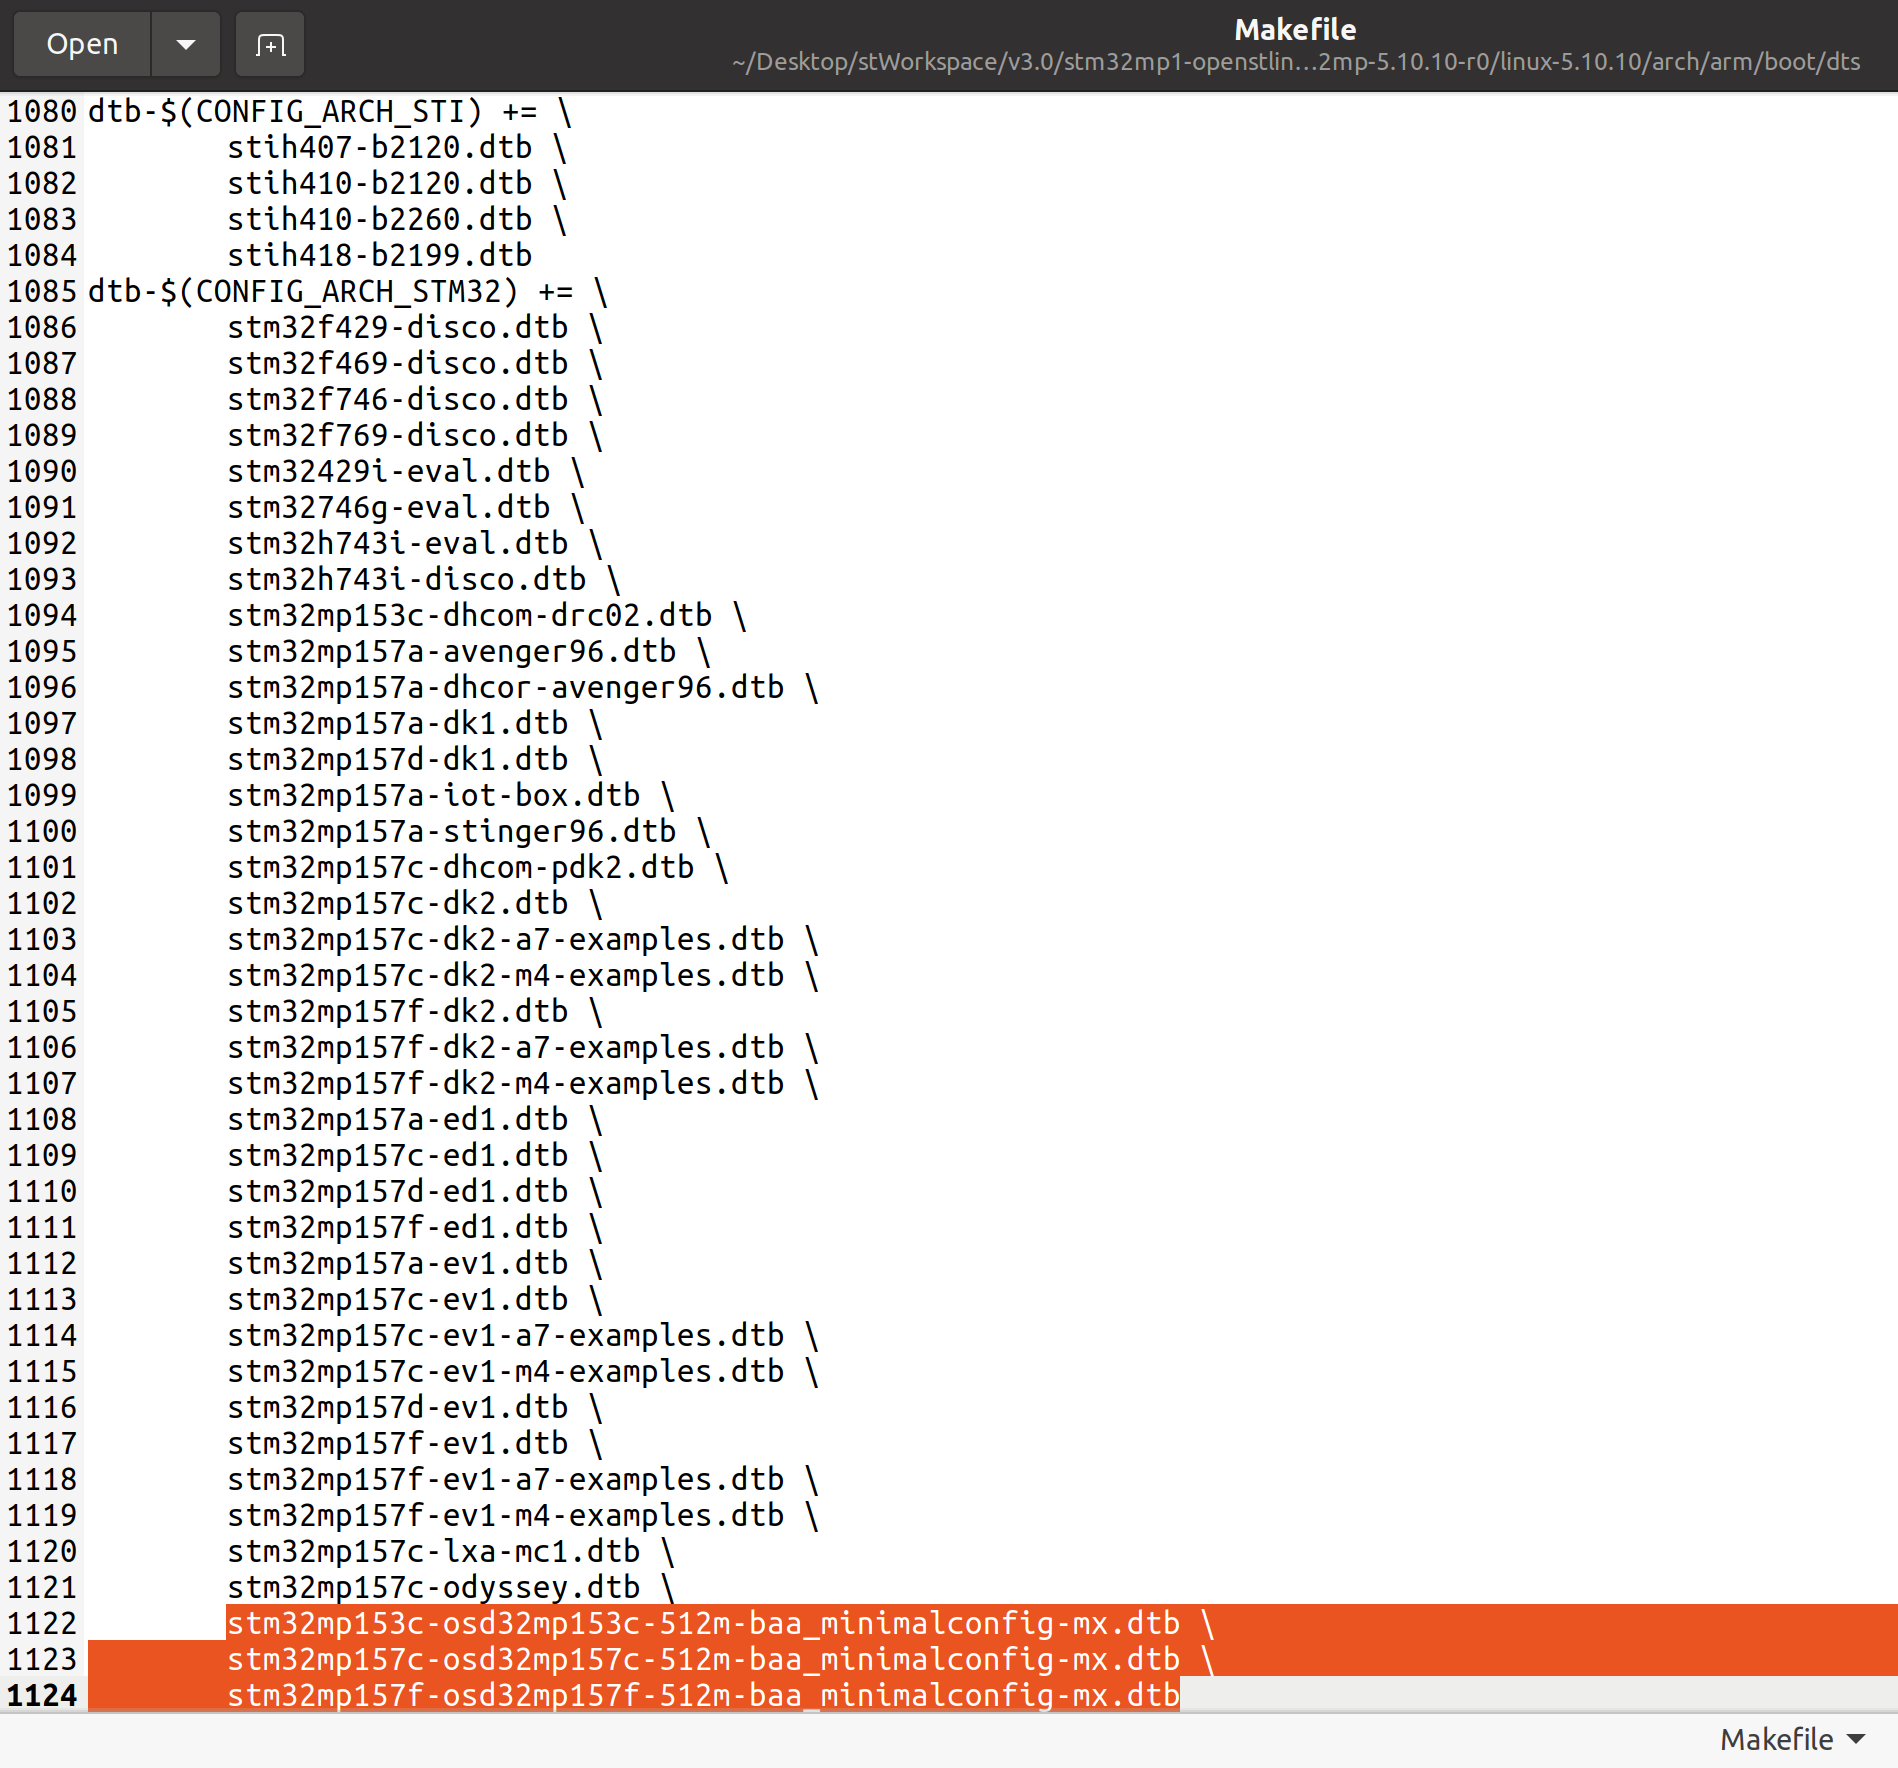
- Add the custom device tree name to the Makefile under <kernel source code directory>/arch/arm/boot/dts/ as shown in Figure 4.
- Navigate to the Linux kernel build directory using the command:
cd <Linux kernel build directory>
- Create build directory
mkdir -p ../build
- Configure the build directory
make ARCH=arm O="$PWD/../build" multi_v7_defconfig fragment*.config
- Compile the custom linux device tree using the command:
make ARCH=arm dtbs O="$PWD/../build"
- Navigate to <Linux kernel build directory>/arch/arm/boot/dts and view the contents using ls command. You should be able to see custom linux device tree blob (.dtb) file here:
<ST SOC PART NUMBER>-<OCTAVO PART NUMBER>_minimalconfig-mx.dtb
Step 2: Update micro-SD card with your custom Linux device tree using steps in section 10.3.
Update micro-SD card with your custom Linux device tree using steps in section 10.3.
You should look at all the Device Tree nodes automatically generated by CubeMX to ensure the generated nodes reflect the configuration we have specified in the CubeMX GUI.
If you observe redundant nodes leading to “Reference to non-existent node or label” errors, they can be commented out using single or multi-line comments as shown below.
/*
<sound node entries1>
<sound node entries2>
<sound node entries3>
*/
//remote-endpoint = <<dc_ep1_out>;
While trying to write to bootfs directory, you may have to use sudo or super user privileges to modify permissions of bootfs directory since it may be write protected by default.
Configuring micro-SD card
- Insert the micro-SD card (pre-flashed with Octavo OpenSTLinux Image for OSD32MP1-RED as discussed in Step1 of Section 5) to the host Ubuntu computer.
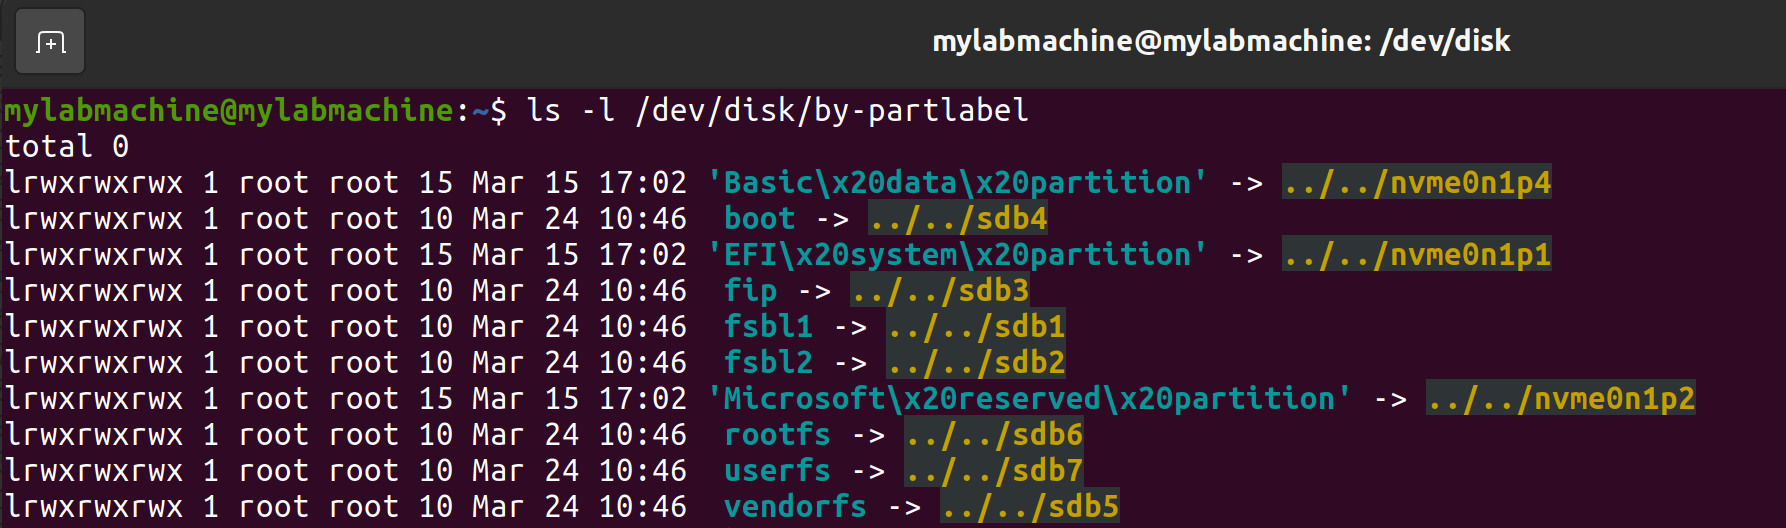
- Observe the partitions of the micro-SD card by using the command:
ls -l /dev/disk/by-partlabel/
The part labels should look like Figure 5. In this case, the part labels that start with “sdb” belong to our OpenSTLinux micro-SD card. The part labels on your computer may be slightly different (e.g., sdaX, sdcX etc)
Steps to update TF-A on micro-SD card:
- Navigate to TF-A deploy directory:
cd <TF-A source directory>/../build/sdcard - Copy only the binary (tf-a-*-sdcard.stm32) to the dedicated partition named “fsbl1” of the micro-SD card using the command:
dd if=tf-a-<ST SOC PART NUMBER>-<OCTAVO PART NUMBER>_minimalconfig-mx-sdcard.stm32 of=/dev/sdb1 bs=1M conv=fdatasync
- Safely eject the SD card from the host computer once the transfer is complete if you have no other updates to make.
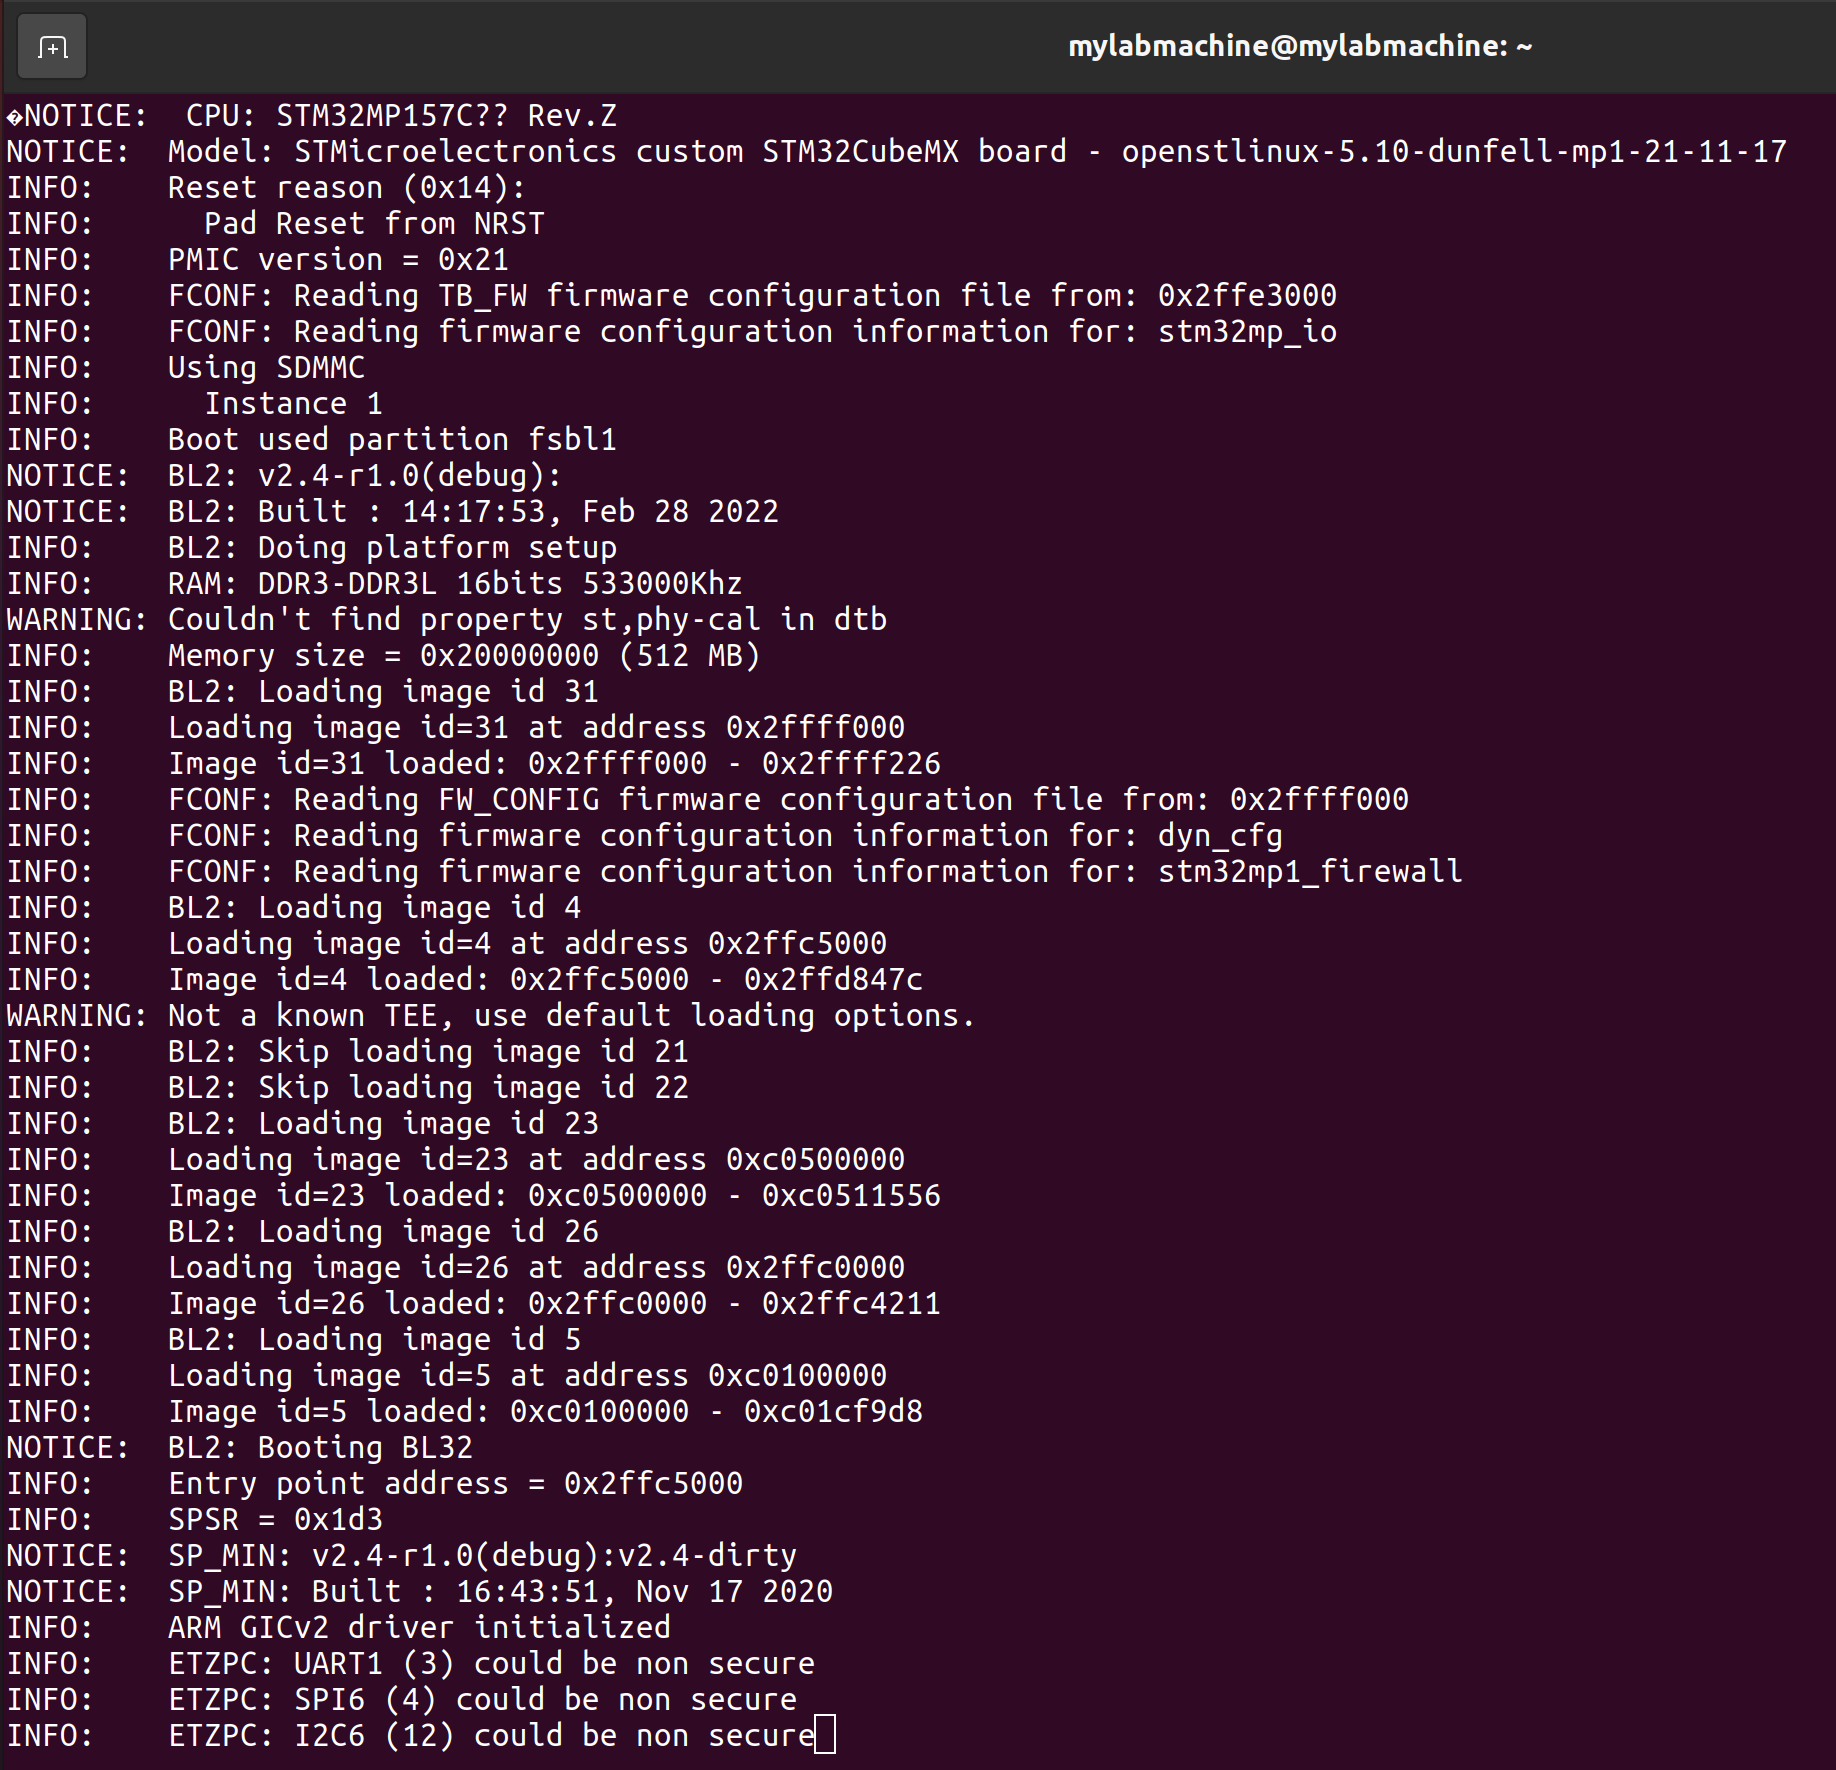
- Insert the SD card back into your OSD32MP1-RED board. Power the board. The boot log on UART4 console for TF-A should look like Figure 6.Perk
First Stage Boot Loader (FSBL) is provided by TF-A. The Second Stage Boot Loader (SSBL) is provided by U-Boot.
Steps to update U-Boot on micro-SD card:
- Navigate to FIP_artifacts directory:
cd <U-boot source directory>/../FIP_artifacts/fip
- Copy only the U-Boot binary (fip-*-trusted.bin) to the dedicated partition named “fip” of the micro-SD card using the command:
dd if= fip-<ST SOC PART NUMBER>-<OCTAVO PART NUMBER>_minimalconfig-mx-trusted.bin of=/dev/sdb3 bs=1M conv=fdatasync
- Safely eject the SD card from the host computer once the transfer is complete if you have no other updates to make.
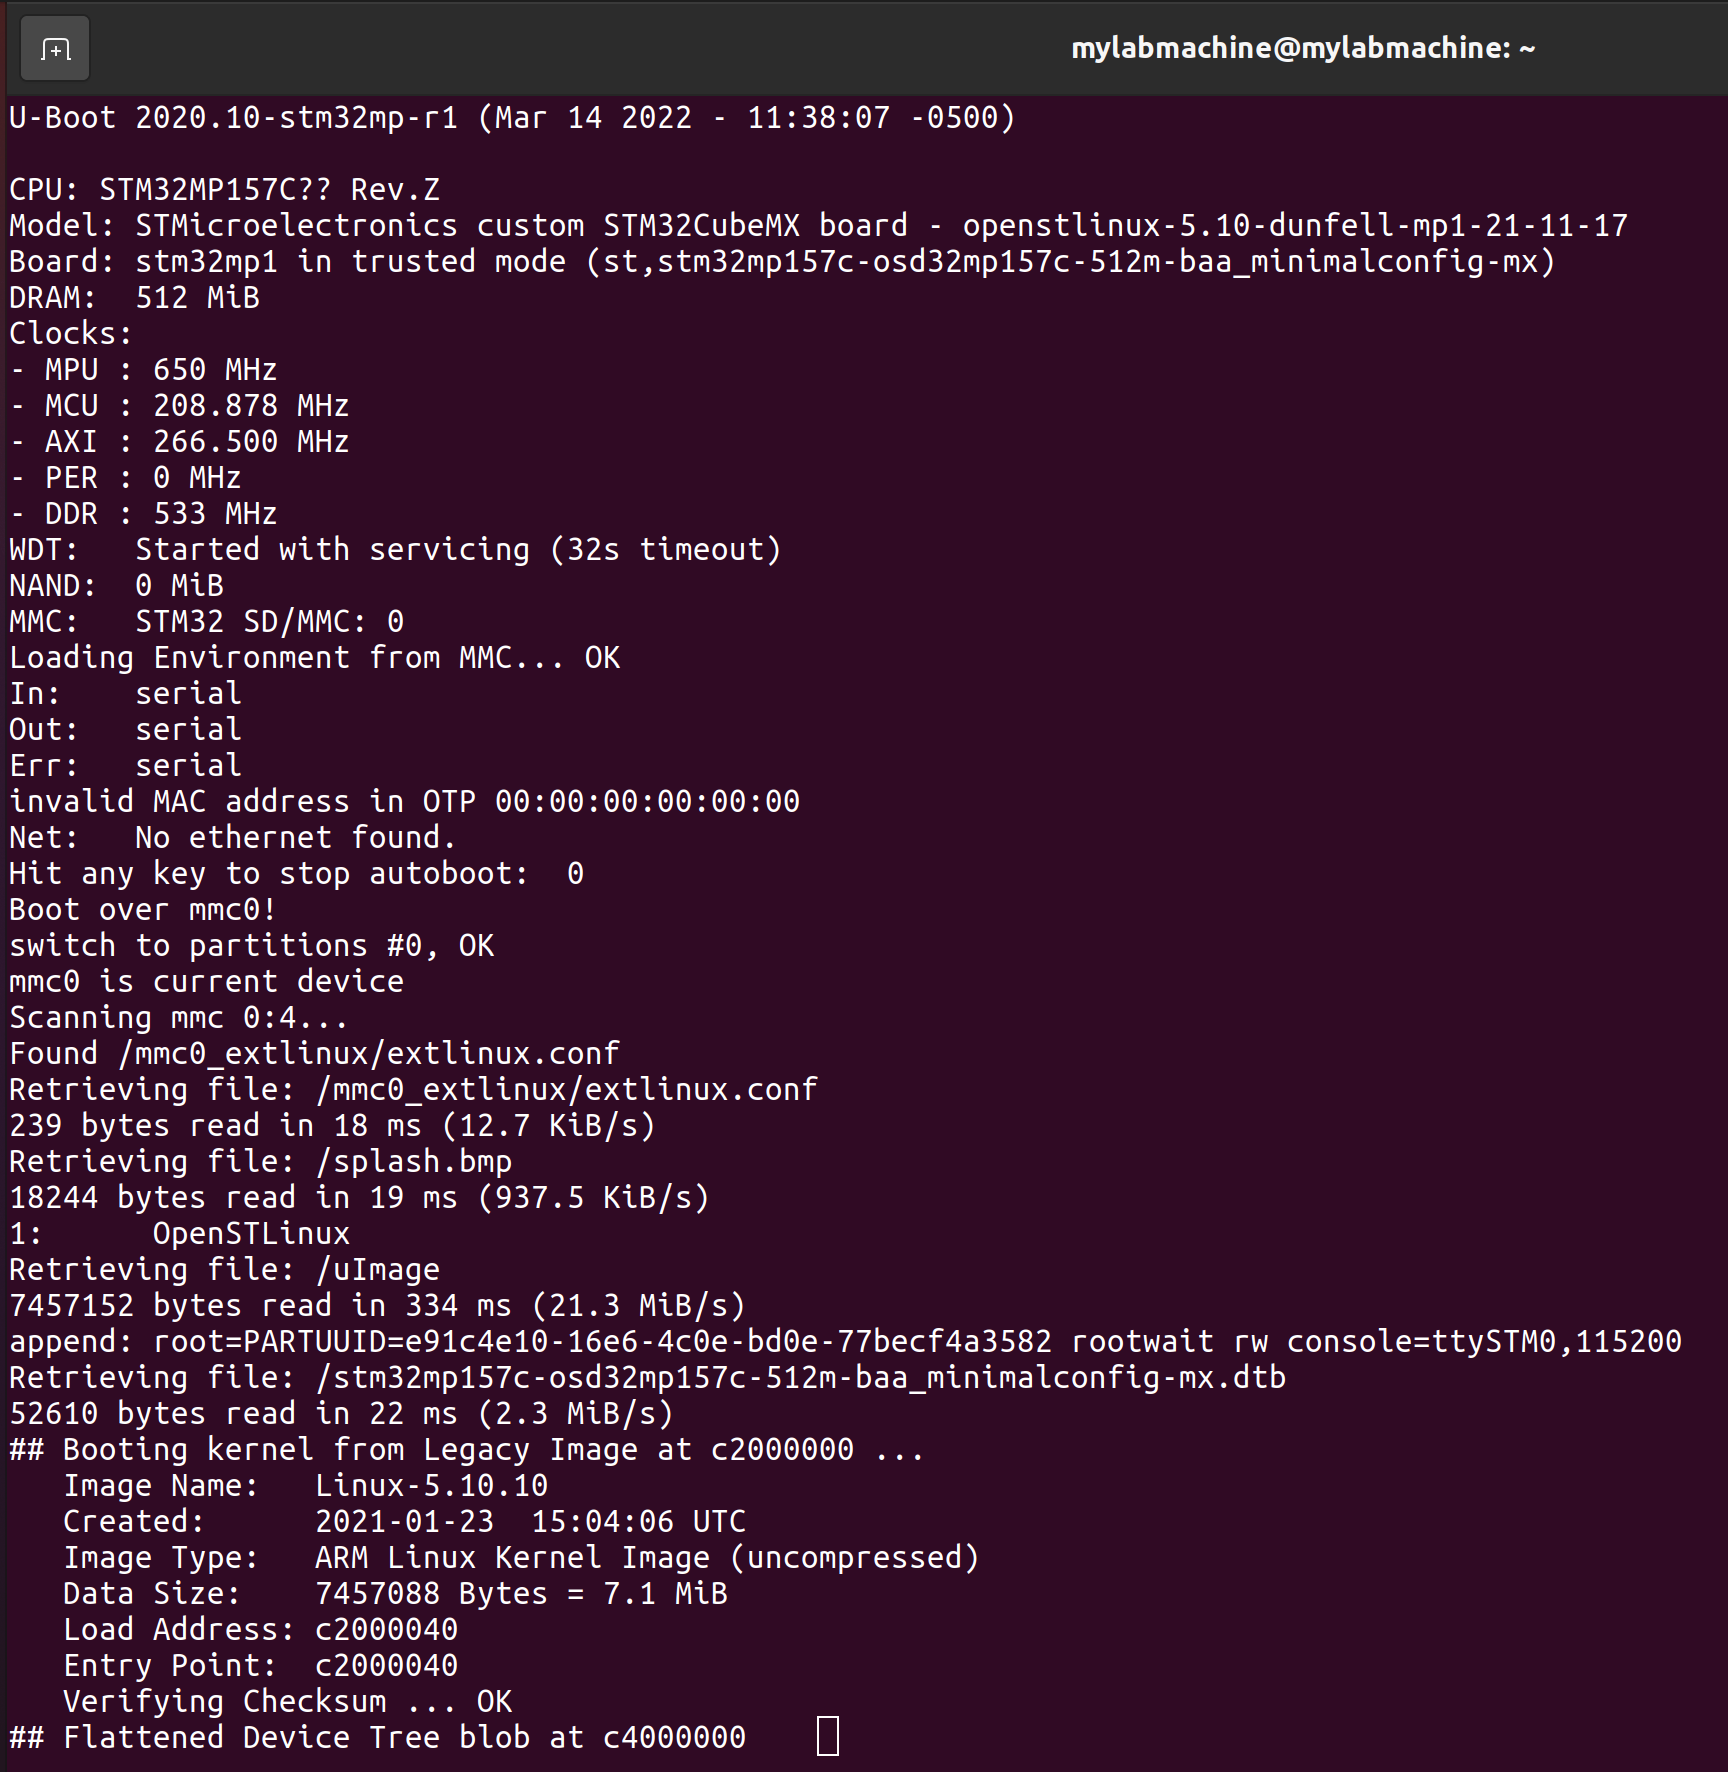
- Insert the SD card back into your OSD32MP1-RED board. Power the board. The boot log on UART4 console for U-boot should look like Figure 7.
First Stage Boot Loader (FSBL) is provided by TF-A. The Second Stage Boot Loader (SSBL) is provided by U-Boot.
Steps to update Linux device tree on micro-SD card:
- Navigate to Linux build directory:
cd <Linux kernel build directory>/arch/arm/boot/dts
- Copy the newly built Device Tree blob (*.dtb) file to the /media/<username_of_ machine>/bootfs directory of the SD card (see Perk below):
cp <Linux kernel build directory>/arch/arm/boot/dts/<ST SOC PART NUMBER>-<OCTAVO PART NUMBER>_minimalconfig-mx.dtb media/<username_of_ machine>/bootfs/
- Safely eject the SD card from the host computer once the transfer is complete if you have no other updates to make.
- Insert the SD card back into your OSD32MP1-RED board. Power the board. The boot log on UART4 console for Linux should look like Figure 8.
Modifying chip detect pin for OSD32MP1-BRK
As an example, for CubeMX project customization, let’s consider modifying the given <OCTAVO PART NUMBER>_MinimalConfig.ioc CubeMX project for OSD32MP1-BRK platform (https://octavosystems.com/octavo_products/osd32mp1-brk).
The OSD32MP1-BRK platform typically uses micro-SD card (on SDMMC1 interface) as its primary boot device. Let us verify if <OCTAVO PART NUMBER>_MinimalConfig.ioc project’s SDMMC1 peripheral configuration matches that of BRK or if any modification is necessary.
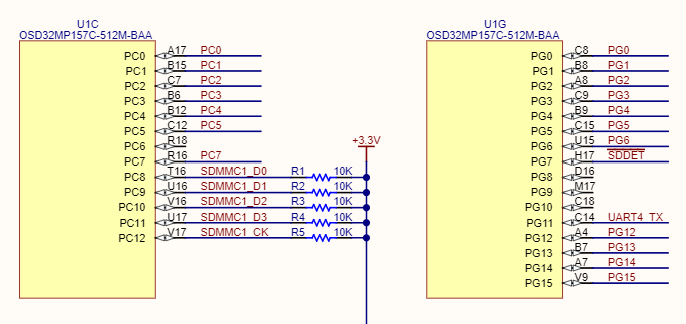
Open the SDMMC1 peripheral in CubeMX GUI and observe the pins listed under GPIO Settings of SDMMC1 as shown in Figure 9. All the SDMMC1 DATA, CLK and CMD pins of the given project match with the hardware configuration of BRK (BRK schematic snippet shown in Figure 10). However, micro-SD interface also uses a chip detect pin to detect the presence of micro-SD card in the slot.
If you would like to re-configure the SDMMC1 pins for your own custom board, you can click on the corresponding pins in the ball map to see a drop-down list of functions supported by the pins (see Figure 9) and re-assign. Once a function is assigned to a pin, that pin name will automatically appear under GPIO settings of the corresponding peripheral.
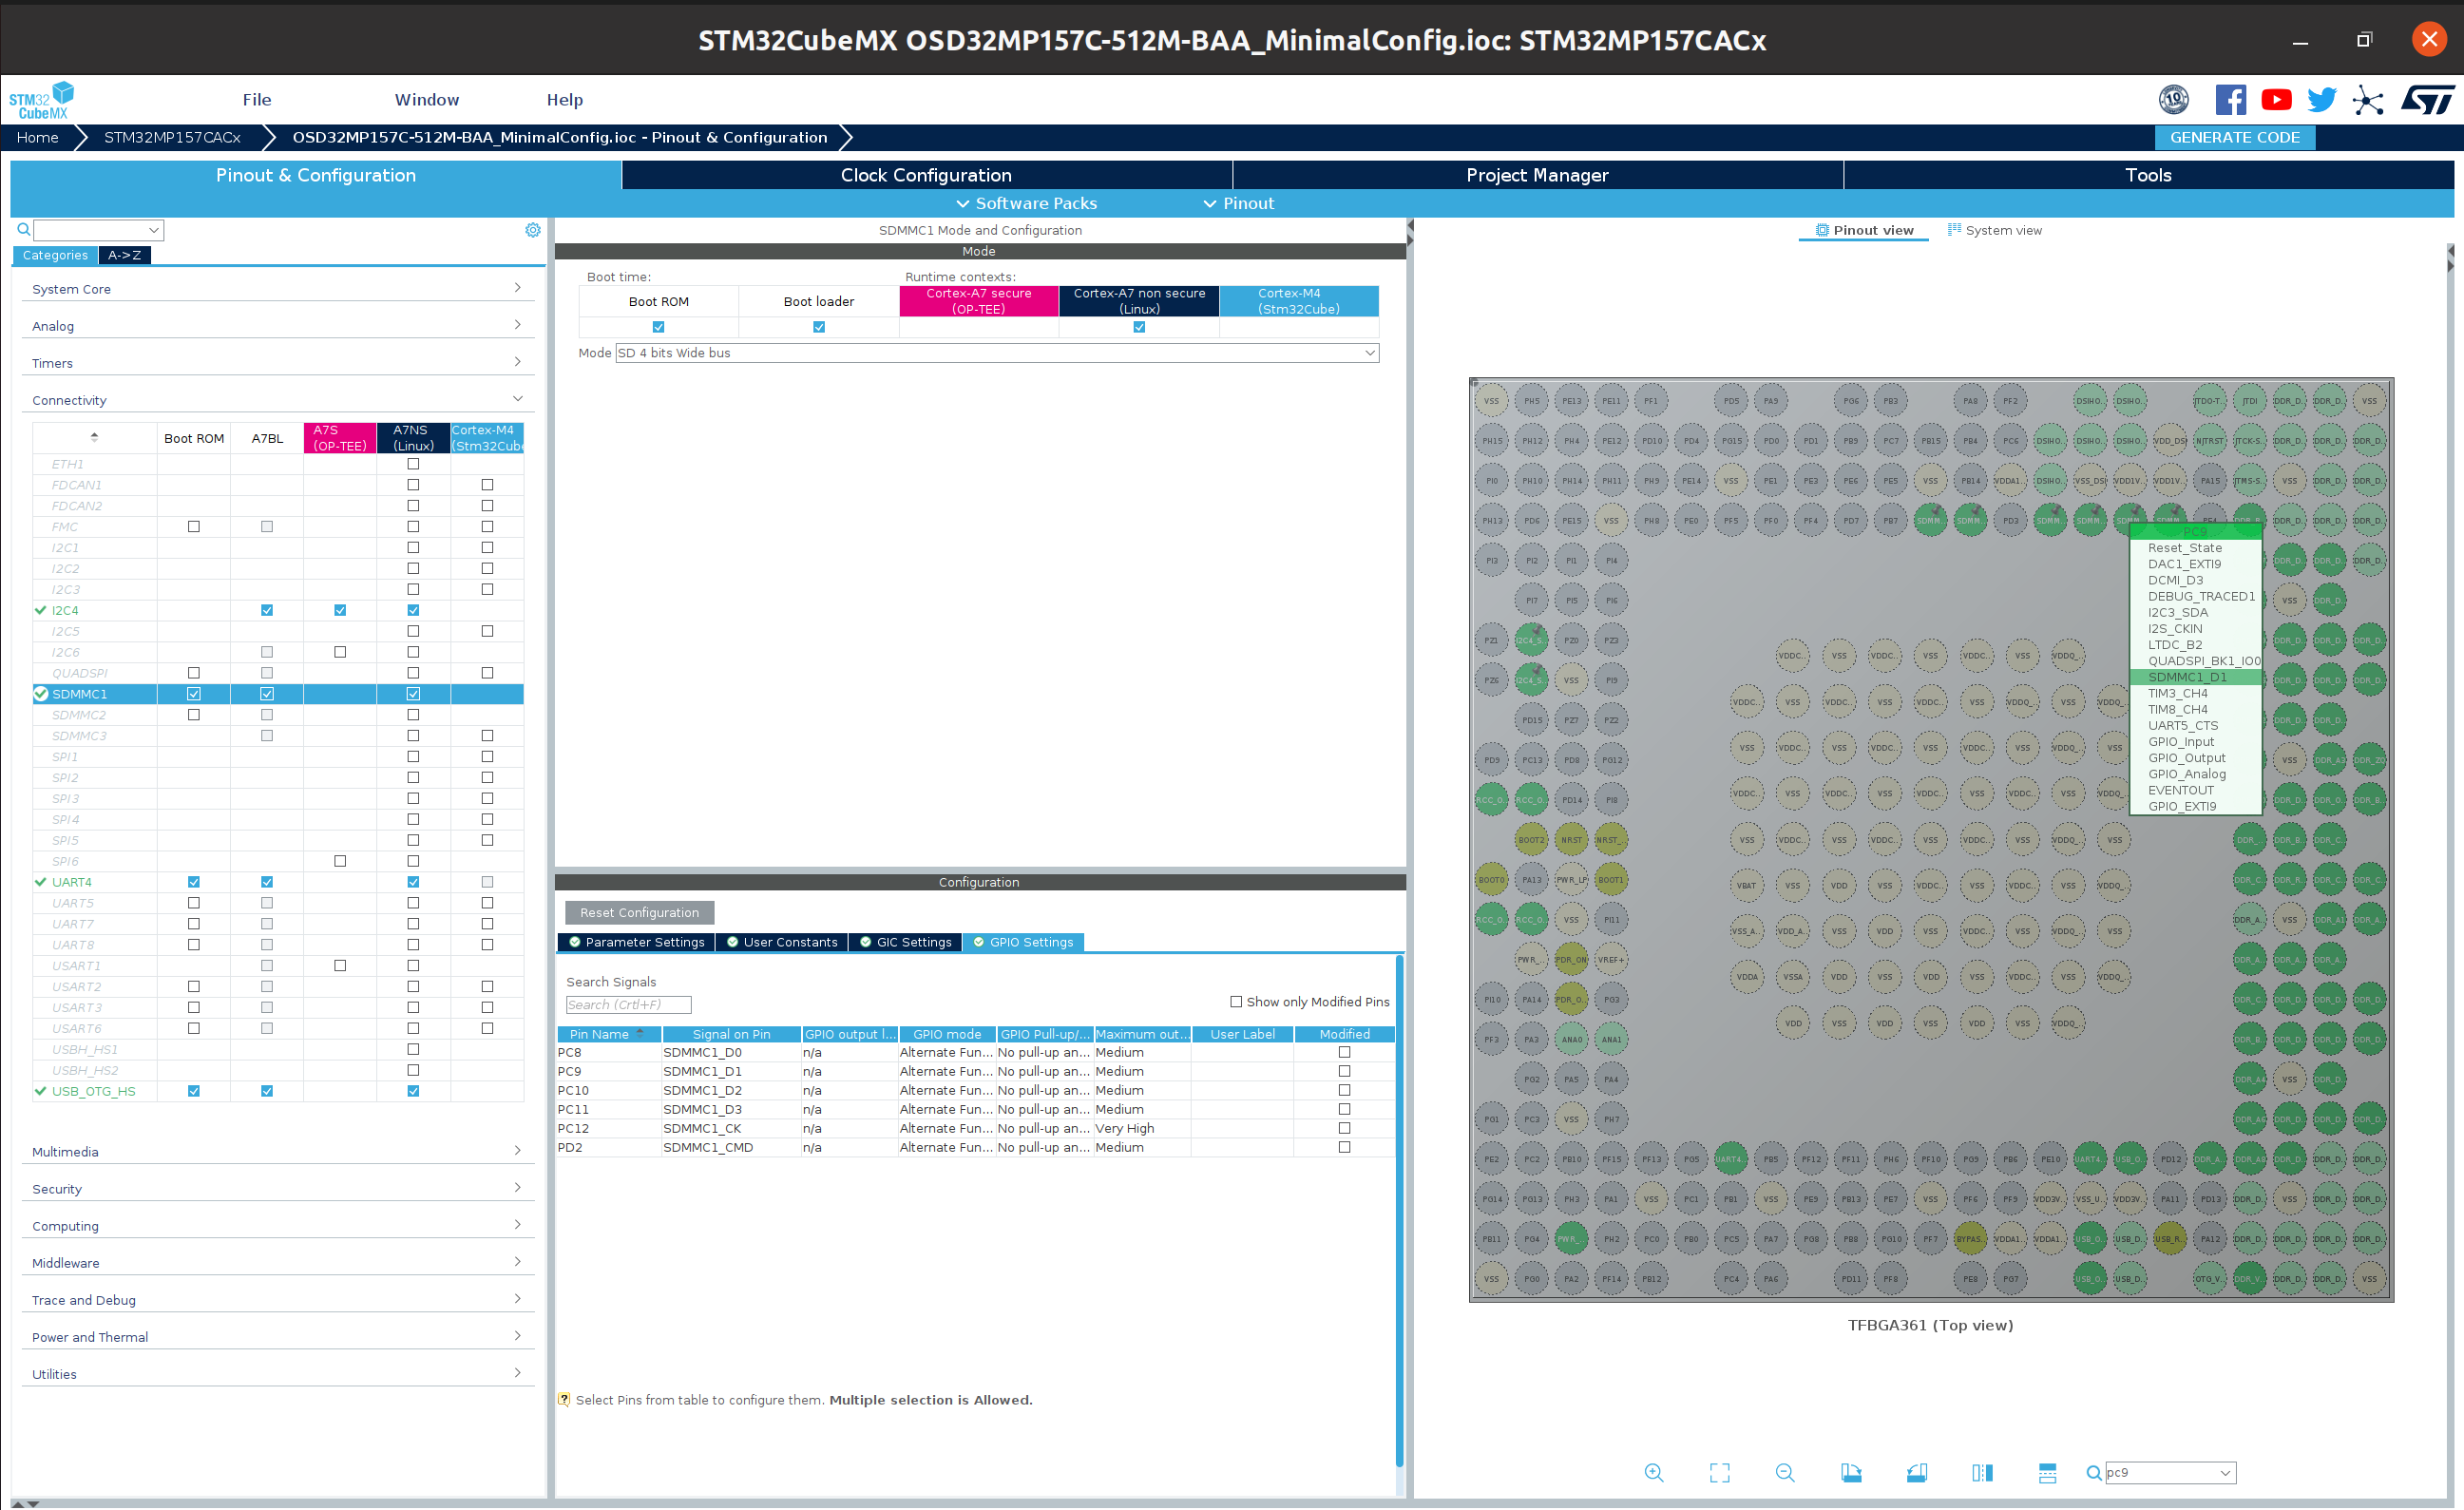
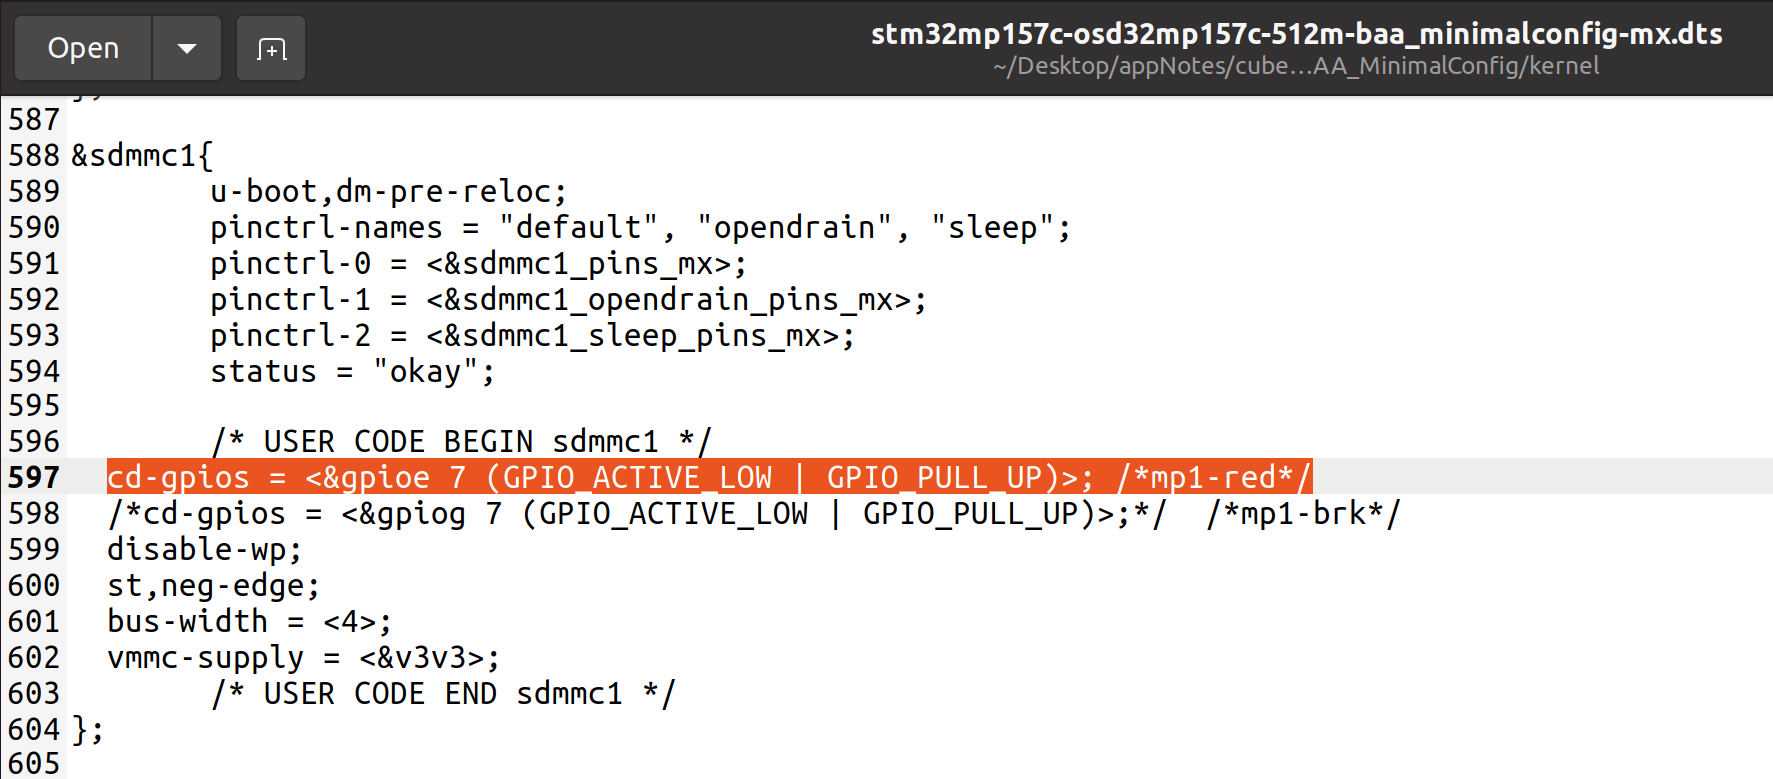
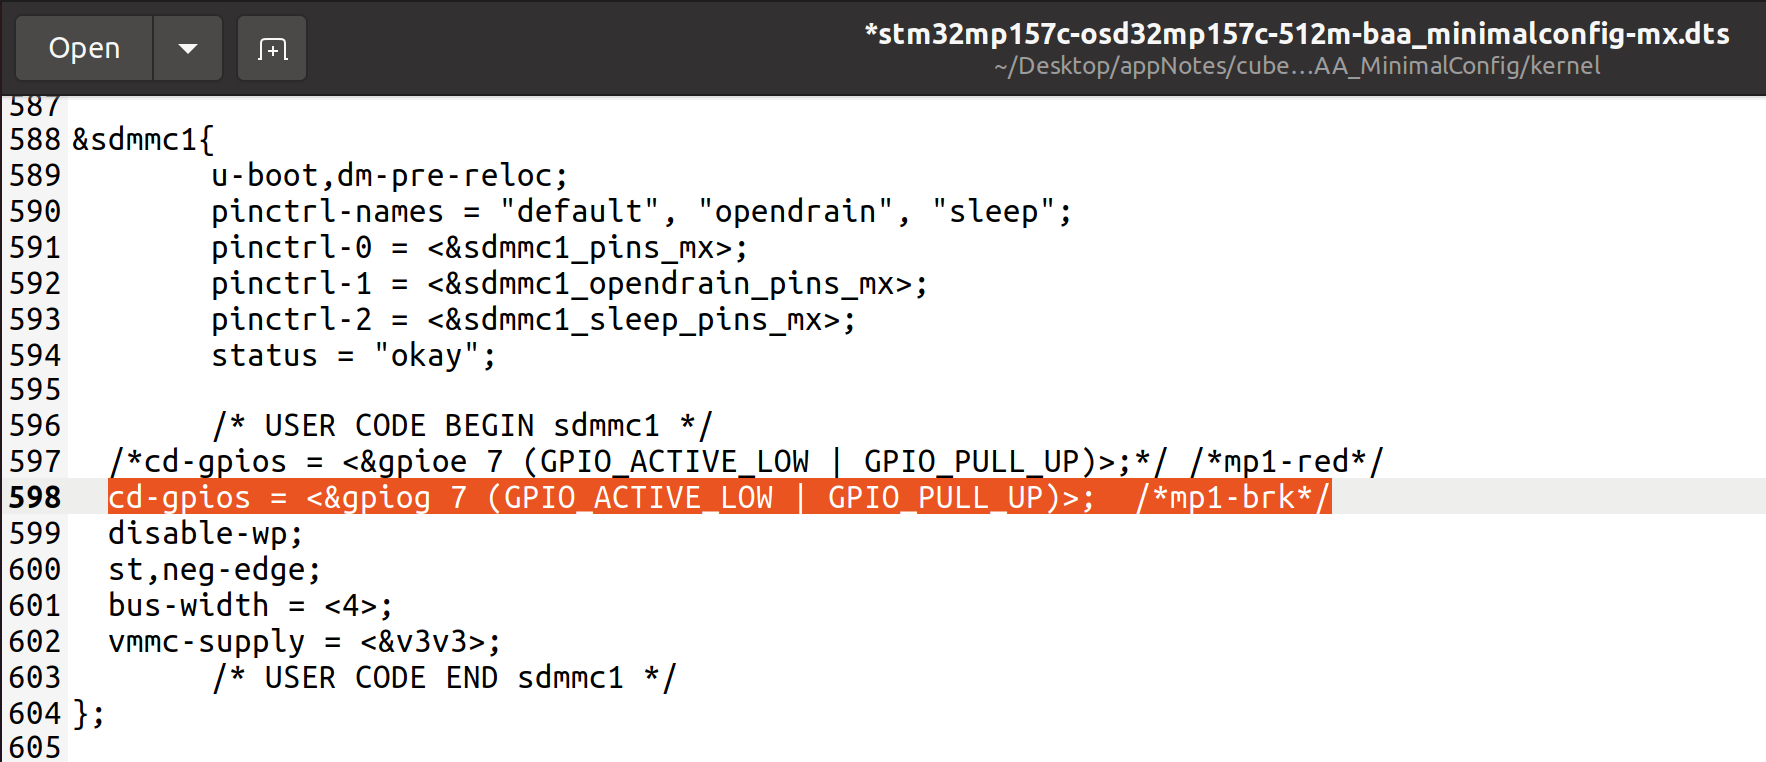
CubeMX GUI currently does not list chip detect under SDMMC1 as this is not a standard SDMMC pin. But declaration of this pin has been done for you under user code in the source Linux and U-Boot device tree files of given <OCTAVO PART NUMBER>_MinimalConfig project as highlighted in Figure 11 (Pin PE7 is used in the given project because OSD32MP1-RED platform uses the same pin)
However, the BRK platform uses pin PG7 for chip detect (named SDDET in schematic shown in Figure 10). Hence it is necessary to manually modify the chip detect pin declaration by commenting out OSD32MP1-RED chip detect pin definition and uncommenting OSD32MP1-BRK chip detect pin definition in the Linux and U-Boot device tree source files as shown in Figure 12 to match BRK’s hardware before building and deploying the device trees on the BRK platform.
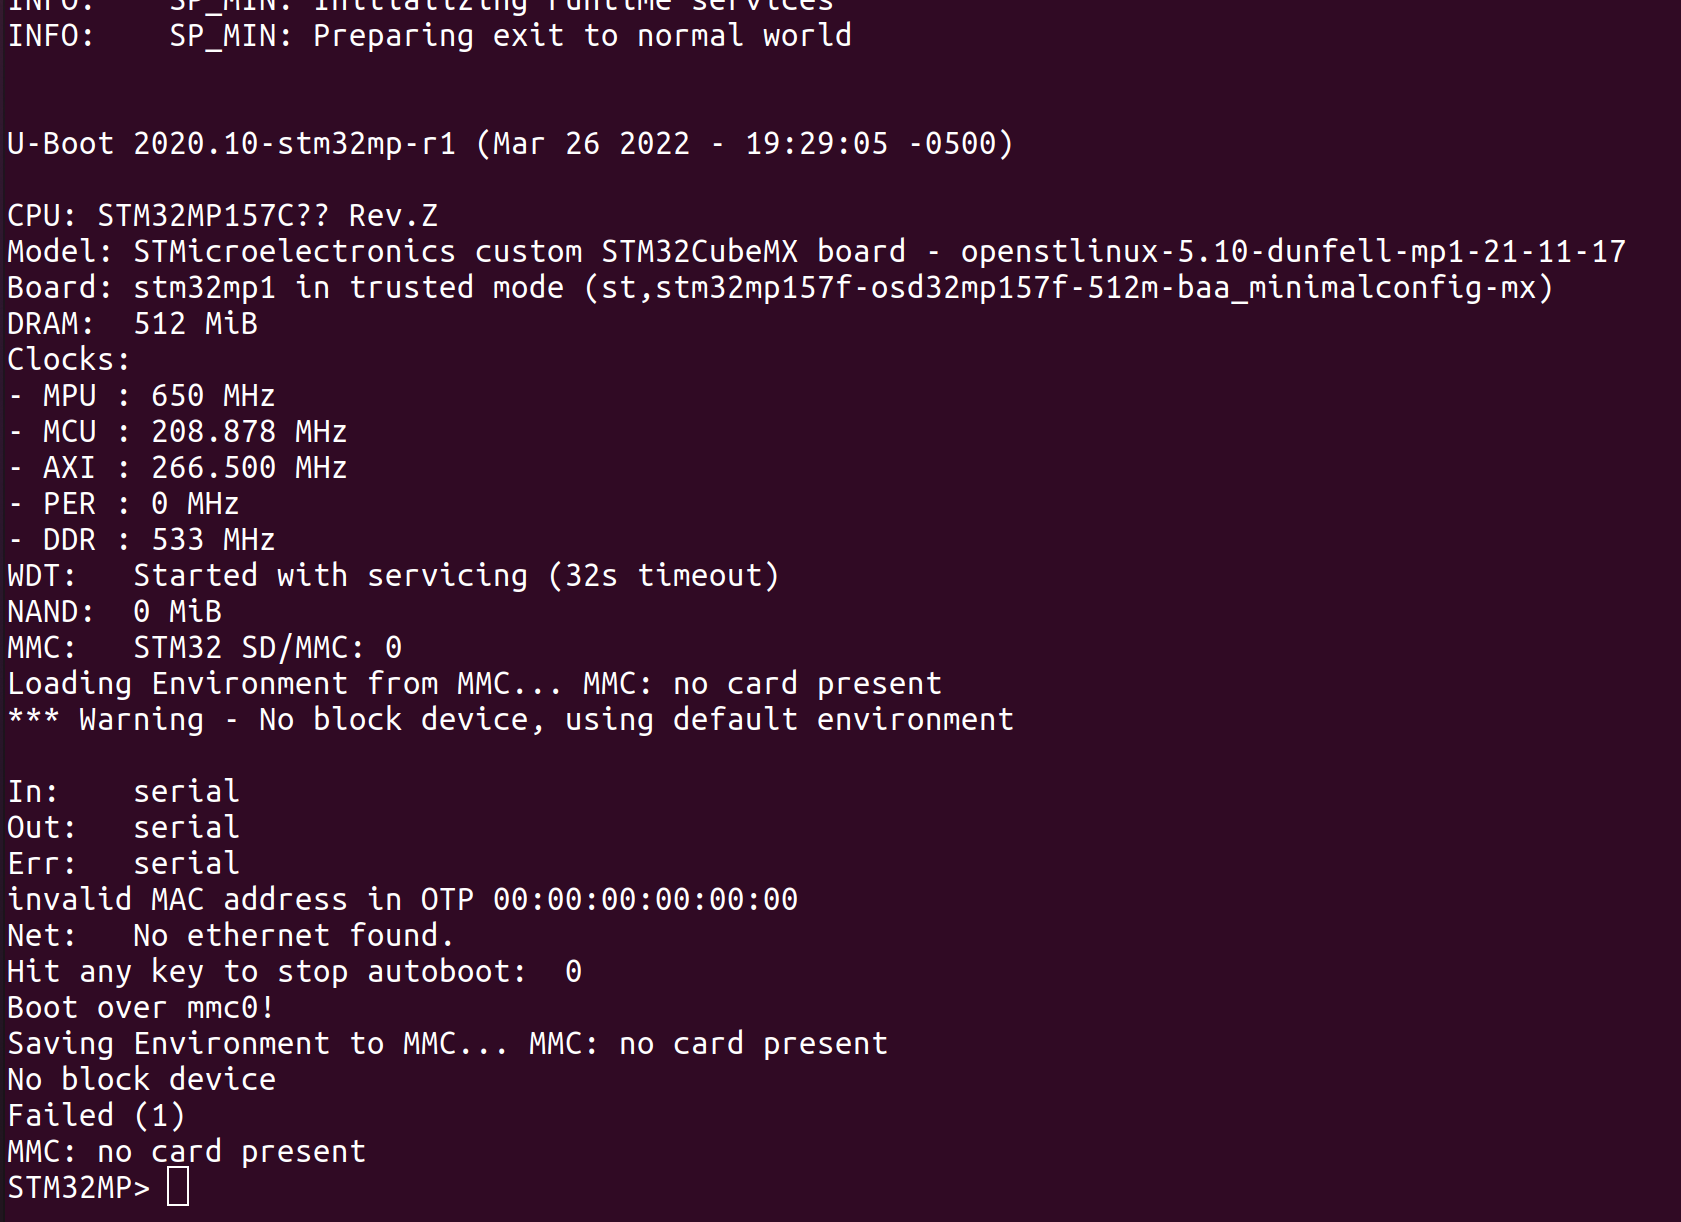
Failure to configure chip detect pin or other SDMMC1 pins properly will result in boot failure with boot log error similar to Figure 13.
CubeMX Tools
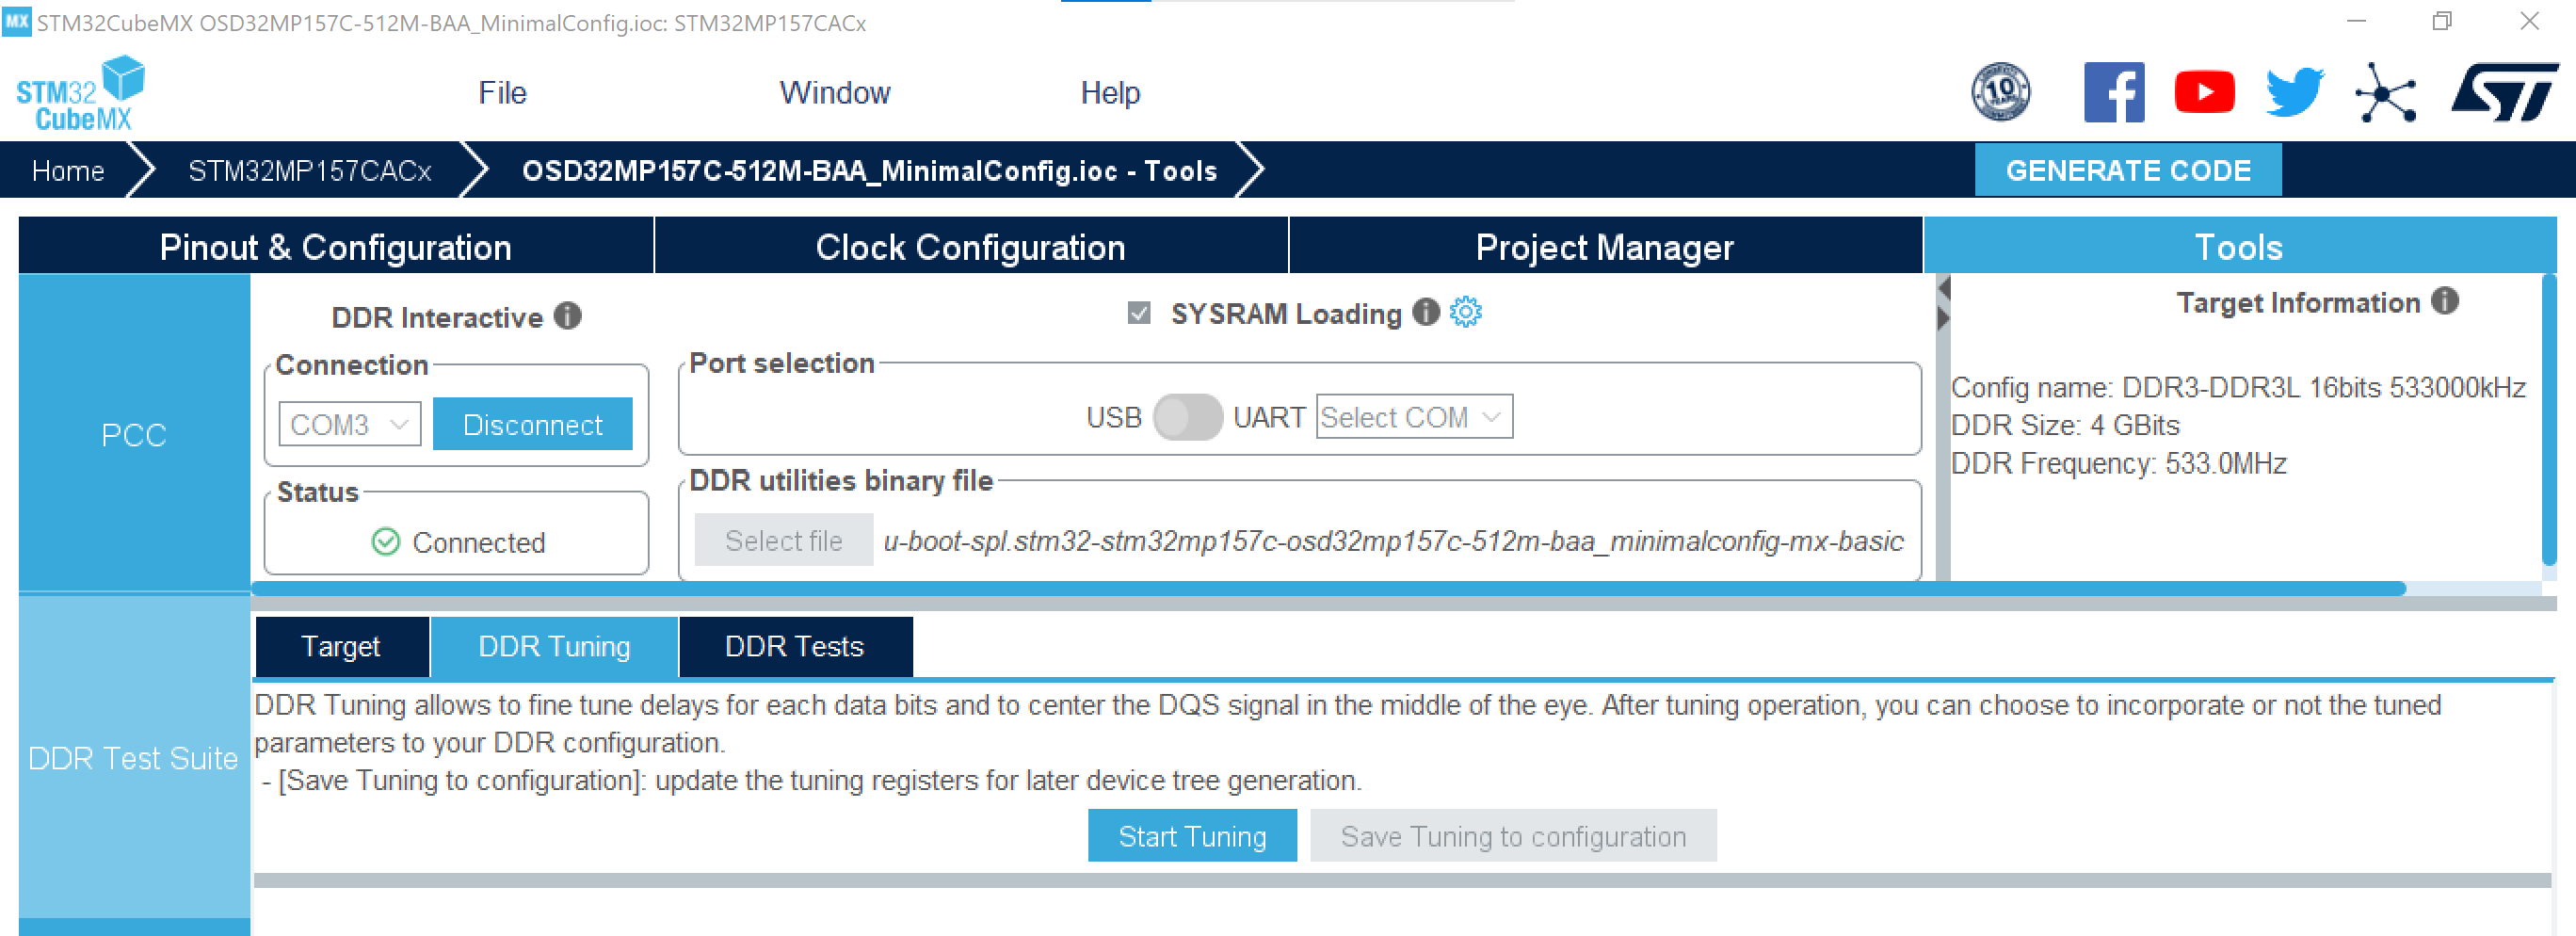
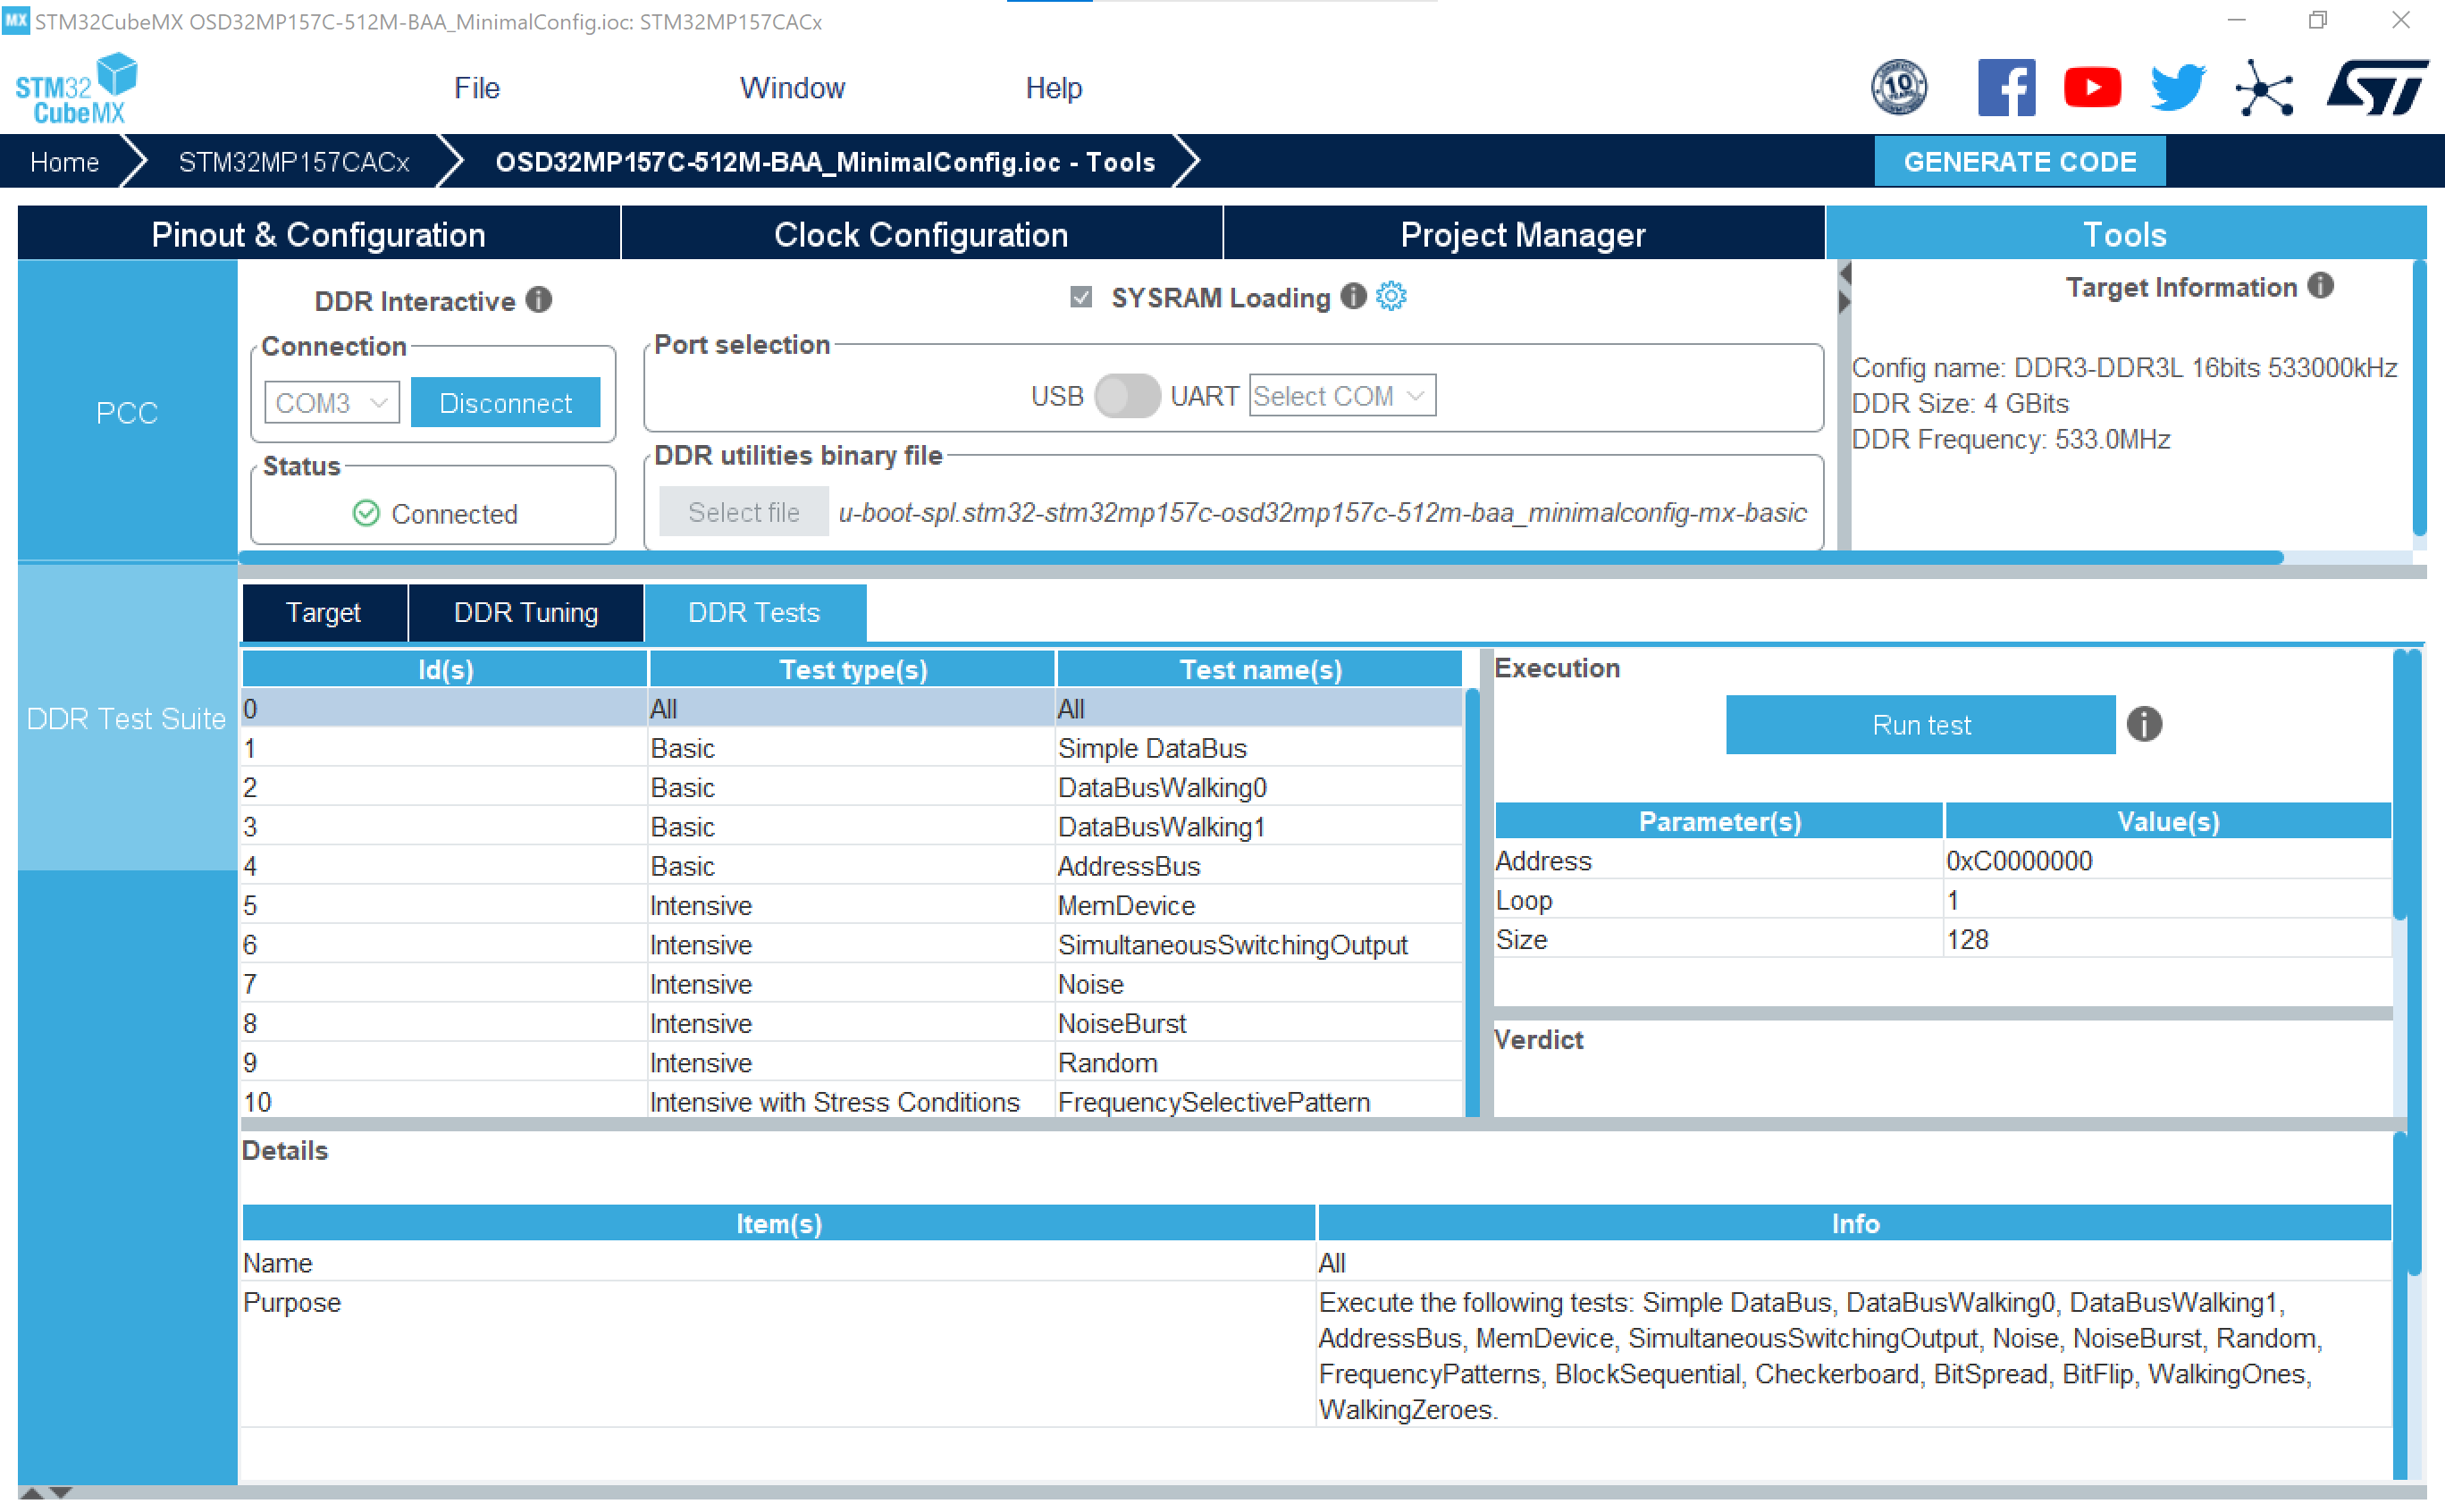
CubeMX features additional developmental tools like the DDR Test Suite and Power Consumption Calculator. These tools can also help you make your design process easier and do not require any modifications to use with the OSD32MP15x. The CubeMX DDR Test Suite window is shown in Figure 14.
Detailed information about DDR Test Suite can be found in section 5.3 of the CubeMX manual.
The pre-configured CubeMX project file provided in the OSD32MP15x_MinimalConfig.zip package is already tuned with recommended DDR parameters for OSD32MP15x family of devices. The DDR parameters are available in the GUI form under:
- Categories > System Core > DDR > DDR Mode and Configuration
The same parameters can be found in Table 1 and also in the form of a Device Tree Include File (.DTSI file) as part of pre-built CubeMX source DT files provided in OSD32MP15x_MinimalConfig.zip package:
- <CubeMX project directory>/CA7/DeviceTree/<Device name>/u-boot/stm32mp15-mx.dtsi
Reconfiguring DDR Parameters
If you need to modify the DDR parameters yourself, you can do so using the following steps:
- Run the CubeMX software on your host computer (tested on CubeMX version 6.3.0).
- Open DDR Test Suite under Tools
- Check the tick box next to SYSRAM Loading
- Set Port Selection to USB.
- Under DDR utilities binary file > Select file > Select DDR utilities binary corresponding to your OSD32MP15x version (provided by Octavo Systems as part of OSD32MP15x_MinimalConfig.zip)
- Connect the UART4 COM port of your OSD32MP1-RED board to the host computer using USB to UART cable.
- Connect the USB-C client port also to the host computer.
- Set the boot switches of the OSD32MP1-RED board to UART/USB mode (i.e., BOOT[2:0] = 1b000)
- Power ON the board (see Caveat below before proceeding).
- Select the COM port number corresponding to the board under DDR interactive and hit Connect.
- After successful connection, the Status will change to Connected in the DDR Test Suite as shown in Figure 14.
- To begin tuning, under DDR Tuning, press Start Tuning button as shown in Figure 14. The tuning process will take a few minutes. Once done, click Save Tuning to Configuration button.
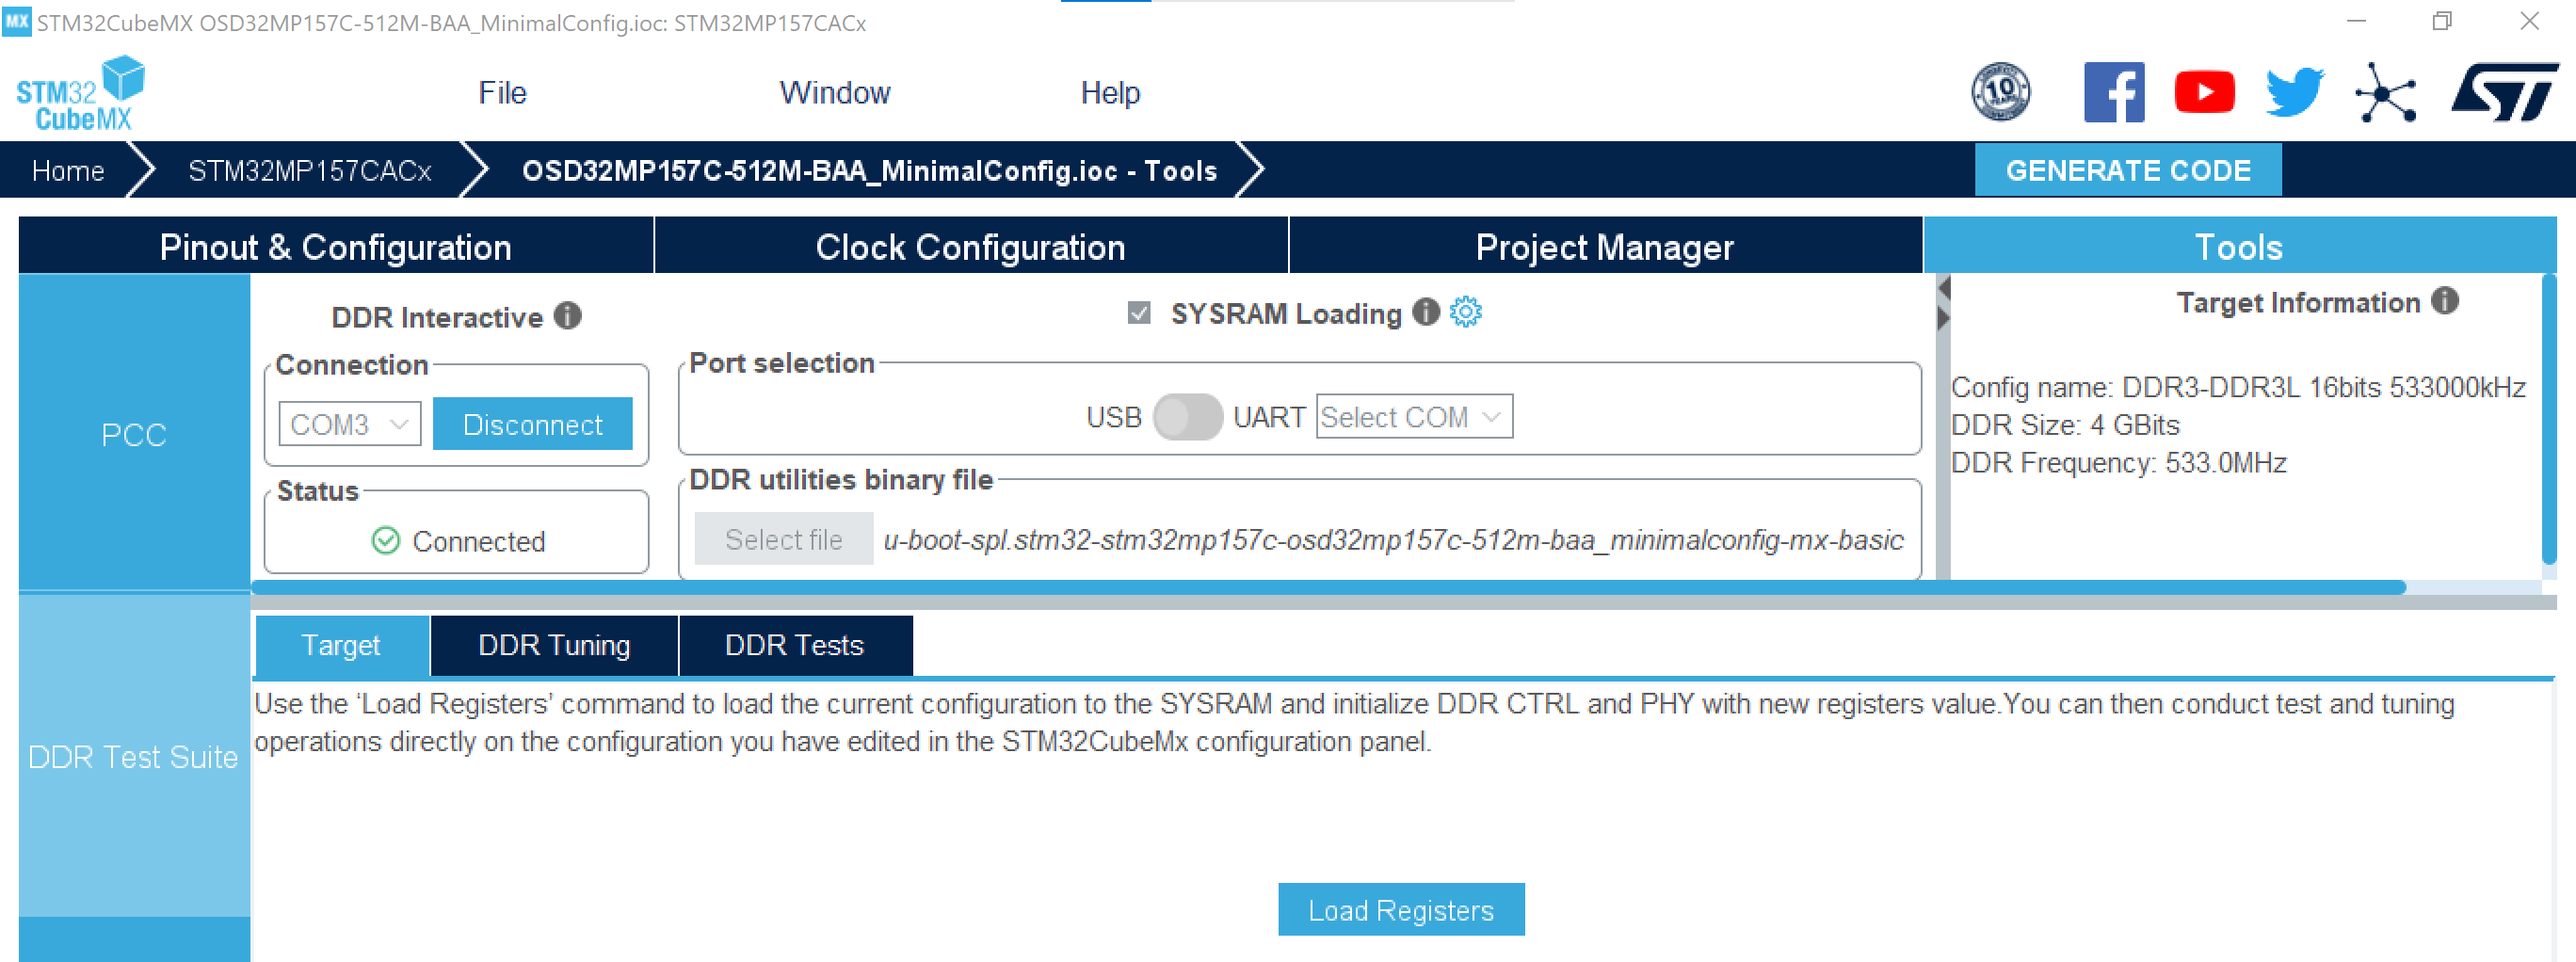
- You can now load the new DDR configuration to Target by hitting the Load Registers button as shown in Figure 15.CaveatDDR Test Suite currently supports U-Boot Basic Boot Chain only. Pre-built U-Boot binaries are made available through OSD32MP15x_MinimalConfig.zip for convenience.To learn more, see section 5.3.2 of CubeMX manual.


Figure 15 CubeMX DDR Test Suite (Target Load Registers button) - Once the new DDR configuration is loaded to the device, you can run one or more of the available DDR Tests as shown in Figure 16.
- In order to make the OSD32MP15x device use the updated DDR configuration that was saved to the CubeMX project after every reset, you need to generate new device tree source files from the updated CubeMX project, rebuild them and update micro-SD card using steps described in the previous sections of this tutorial.
To find more detailed information about CubeMX tools, see Sections 5.1, 5.2 and 5.3 of the CubeMX manual and also DDR configuration on STM32MP1 Series MPUs application note.
DDR Parameters
The following table lists the recommended DDR parameters for OSD32MP15x family of devices.
| Register Name | Recommended Value |
| DDR_MSTR | 0x00041401 |
| DDR_MRCTRL0 | 0x00000010 |
| DDR_MRCTRL1 | 0x00000000 |
| DDR_DERATEEN | 0x00000000 |
| DDR_DERATEINT | 0x00800000 |
| DDR_PWRCTL | 0x00000000 |
| DDR_PWRTMG | 0x00400010 |
| DDR_HWLPCTL | 0x00000000 |
| DDR_RFSHCTL0 | 0x00210000 |
| DDR_RFSHCTL3 | 0x00000000 |
| DDR_RFSHTMG | 0x0081008B |
| DDR_CRCPARCTL0 | 0x00000000 |
| DDR_DRAMTMG0 | 0x121B2414 |
| DDR_DRAMTMG1 | 0x000A041C |
| DDR_DRAMTMG2 | 0x0608090F |
| DDR_DRAMTMG3 | 0x0050400C |
| DDR_DRAMTMG4 | 0x08040608 |
| DDR_DRAMTMG5 | 0x06060403 |
| DDR_DRAMTMG6 | 0x02020002 |
| DDR_DRAMTMG7 | 0x00000202 |
| DDR_DRAMTMG8 | 0x00001005 |
| DDR_DRAMTMG14 | 0x000000A0 |
| DDR_ZQCTL0 | 0xC2000040 |
| DDR_DFITMG0 | 0x02060105 |
| DDR_DFITMG1 | 0x00000202 |
| DDR_DFILPCFG0 | 0x07000000 |
| DDR_DFIUPD0 | 0xC0400003 |
| DDR_DFIUPD1 | 0x00000000 |
| DDR_DFIUPD2 | 0x00000000 |
| DDR_DFIPHYMSTR | 0x00000000 |
| DDR_ODTCFG | 0x06000600 |
| DDR_ODTMAP | 0x00000001 |
| DDR_SCHED | 0x00000C01 |
| DDR_SCHED1 | 0x00000000 |
| DDR_PERFHPR1 | 0x01000001 |
| DDR_PERFLPR1 | 0x08000200 |
| DDR_PERFWR1 | 0x08000400 |
| DDR_DBG0 | 0x00000000 |
| DDR_DBG1 | 0x00000000 |
| DDR_DBGCMD | 0x00000000 |
| DDR_POISONCFG | 0x00000000 |
| DDR_PCCFG | 0x00000010 |
| DDR_PCFGR_0 | 0x00010000 |
| DDR_PCFGW_0 | 0x00000000 |
| DDR_PCFGQOS0_0 | 0x02100C03 |
| DDR_PCFGQOS1_0 | 0x00800100 |
| DDR_PCFGWQOS0_0 | 0x01100C03 |
| DDR_PCFGWQOS1_0 | 0x01000200 |
| DDR_PCFGR_1 | 0x00010000 |
| DDR_PCFGW_1 | 0x00000000 |
| DDR_PCFGQOS0_1 | 0x02100C03 |
| DDR_PCFGQOS1_1 | 0x00800040 |
| DDR_PCFGWQOS0_1 | 0x01100C03 |
| DDR_PCFGWQOS1_1 | 0x01000200 |
| DDR_ADDRMAP1 | 0x00070707 |
| DDR_ADDRMAP2 | 0x00000000 |
| DDR_ADDRMAP3 | 0x1F000000 |
| DDR_ADDRMAP4 | 0x00001F1F |
| DDR_ADDRMAP5 | 0x06060606 |
| DDR_ADDRMAP6 | 0x0F060606 |
| DDR_ADDRMAP9 | 0x00000000 |
| DDR_ADDRMAP10 | 0x00000000 |
| DDR_ADDRMAP11 | 0x00000000 |
| DDR_PGCR | 0x01442E02 |
| DDR_PTR0 | 0x0022AA5B |
| DDR_PTR1 | 0x04841104 |
| DDR_PTR2 | 0x042DA068 |
| DDR_ACIOCR | 0x10400812 |
| DDR_DXCCR | 0x00000C40 |
| DDR_DSGCR | 0xF200011F |
| DDR_DCR | 0x0000000B |
| DDR_DTPR0 | 0x38D488D0 |
| DDR_DTPR1 | 0x098B00D8 |
| DDR_DTPR2 | 0x10023600 |
| DDR_MR0 | 0x00000840 |
| DDR_MR1 | 0x00000000 |
| DDR_MR2 | 0x00000208 |
| DDR_MR3 | 0x00000000 |
| DDR_ODTCR | 0x00010000 |
| DDR_ZQ0CR1 | 0x00000038 |
| DDR_DX0GCR | 0x0000CE81 |
| DDR_DX0DLLCR | 0x40000000 |
| DDR_DX0DQTR | 0x12122212 |
| DDR_DX0DQSTR | 0x3DB00000 |
| DDR_DX1GCR | 0x0000CE81 |
| DDR_DX1DLLCR | 0x40000000 |
| DDR_DX1DQTR | 0x00000000 |
| DDR_DX1DQSTR | 0x3DB00000 |
| DDR_DX2GCR | 0x0000CE80 |
| DDR_DX2DLLCR | 0x40000000 |
| DDR_DX2DQTR | 0xFFFFFFFF |
| DDR_DX2DQSTR | 0x3DB02000 |
| DDR_DX3GCR | 0x0000CE80 |
| DDR_DX3DLLCR | 0x40000000 |
| DDR_DX3DQTR | 0xFFFFFFFF |
| DDR_DX3DQSTR | 0x3DB02000 |
Resources
- Octavo Systems OSD32MP15x Datasheet: https://octavosystems.com/docs/osd32mp15x-datasheet/
- Octavo Systems Application Note: Pin Mapping Between OSD32MP15x , the STM32MP1, and Other Integrated Devices: https://octavosystems.com/app_notes/osd32mp15x-pin-mapping-to-stm32mp1/
- Octavo Systems Linux Device Tree Application Note: https://octavosystems.com/app_notes/osd335x-design-tutorial/osd335x-lesson-2-minimal-linux-boot/linux-device-tree/
- STMicroelectronics Support Community for the STM32MP157: https://community.st.com/s/topic/0TO0X0000003u2LWAQ/stm32mp1
- Octavo Systems Support Forums: https://octavosystems.com/forums/
If you have any additional questions using STM32MP1 CubeMX with OSD32MP15x, you can work directly with our engineers through our Forums or Contact our sales team. .
Revision History
| Revision Number | Revision Date | Changes | Author |
| 1 | 06/11/2019 | Initial Release | Eshtaartha Basu |
| 2 | 08/20/2019 | Revised Release – U-Boot and TF Boot info added | Eshtaartha Basu |
| 3 | 07/14/2020 | Revised Release – Updated info for latest CubeMX release, DDR parameters table added | Eshtaartha Basu |
| 4 | 11/15/2020 | Revised Release - Updated info and project files for latest OpenSTLinux (v2.0.0) & CubeMX release (v6.0.1) | Eshtaartha Basu |
| 5 | 07/05/2022 | Revised Release - Updated info and project files for OpenSTLinux v3.0.0 & CubeMX release v6.3.0. CubeMX project files/instructions now revolve around OSD32MP1-RED/BRK instead of STM32MP157C-DK2. Tutorial flow has been improved for easier understanding. Added support for OSD32MP153C/157F devices. | Eshtaartha Basu/Neeraj Dantu |