Vitis AI Tutorial – Part 4
Published On: November, 17, 2023 By: Eshtaartha Basu
This tutorial will walk you through the steps required to integrate Xilinx’s DPU-TRD Acceleration PL Kernel to your Acceleration Ready Vitis Platform. The tutorial will also show you how to build and run AI demos like Face Detection and ADAS Detection directly from the Xilinx AI Model Zoo on the OSDZU3-REF platform.
This tutorial can be used standalone or as Part 4 of a 4-part Acceleration tutorial series that will help you run Vitis-AI DPU-TRD based Face Detection demo, ADAS Detection demo (and other AI demos) on the OSDZU3-REF board. An overview of the flow is shown below:
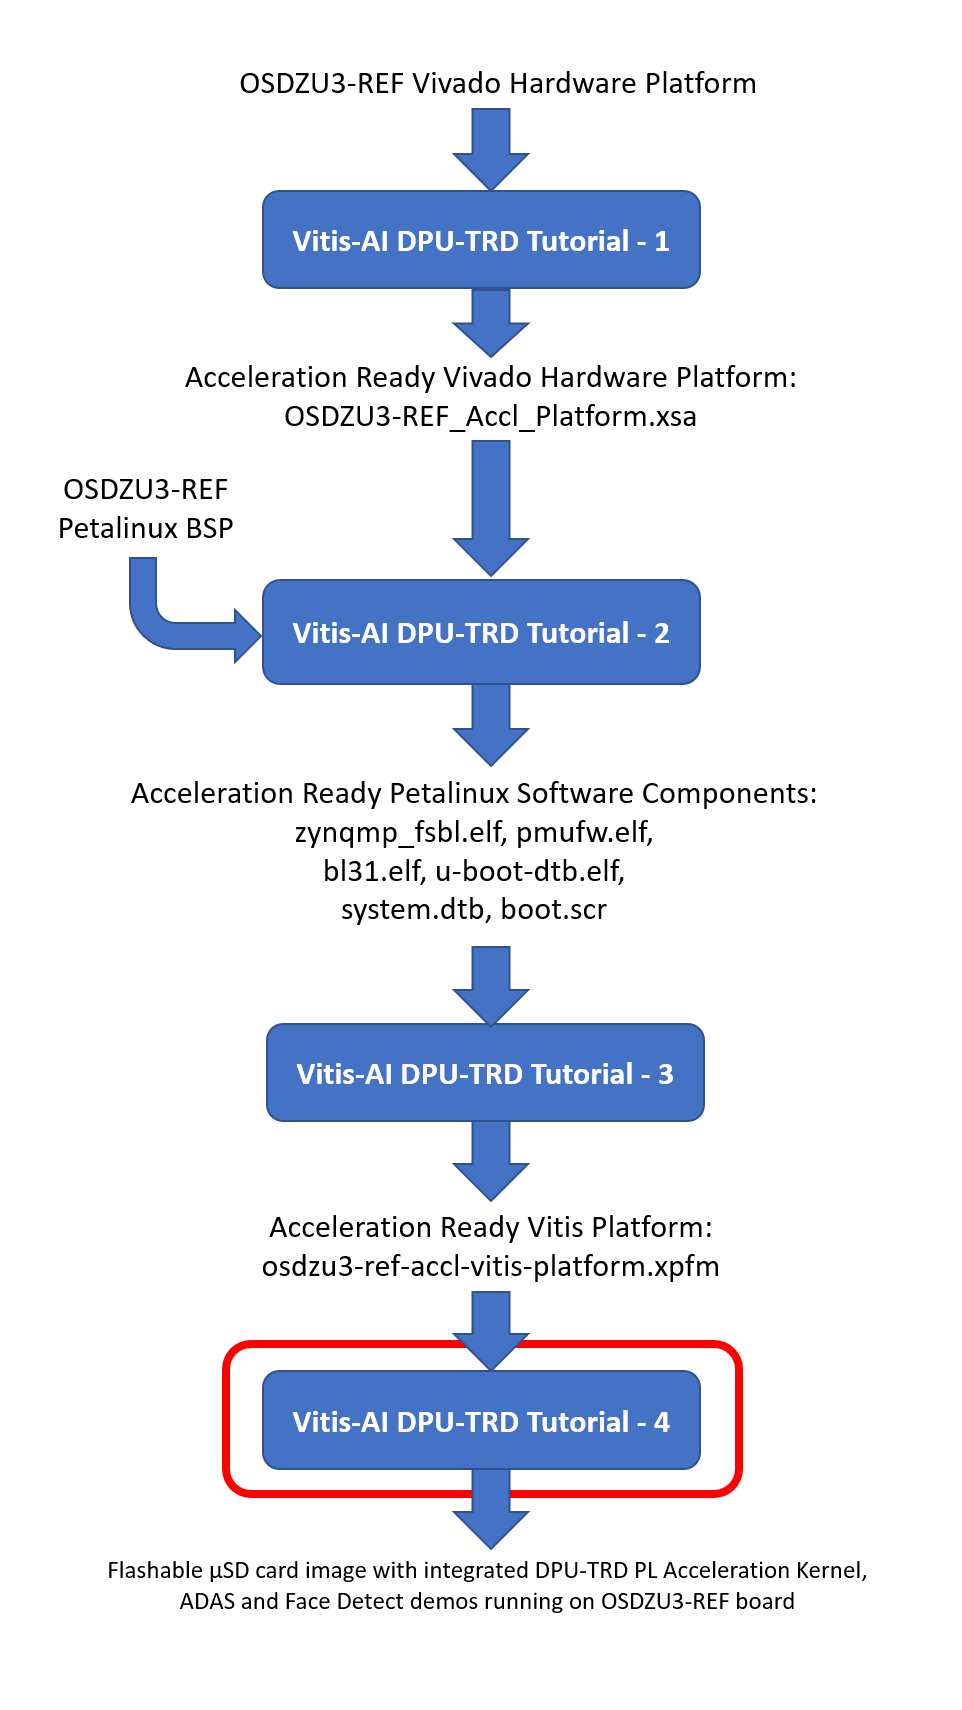
Table of Contents
Pre-requisites
This tutorial assumes the user has already gone through:
- Tutorial 1 and has generated OSDZU3-REF_Accl_Platform.xsa file.
- Tutorial 2 and has generated an Acceleration Ready Petalinux Software Components
- Tutorial 3 and has generated an Acceleration Ready Vitis Platform named “osdzu3-ref-accl-vitis-platform.xpfm” under a Vitis workspace named “osdzu3-ref-accl-vitis-pkg”
Objectives
- Integrate DPU-TRD PL Acceleration Kernel to our Acceleration Ready Vitis Platform
- Compile and build ADAS, Face Detect demos
- Run the demos on the OSDZU3-REF platform
Tutorial Requirements
This tutorial will require the following software setup.
- Docker – https://docs.docker.com/engine/install/ubuntu/
- The steps in this tutorial have been tested with Docker Version 23.0.1. A more detailed version information is shown below.
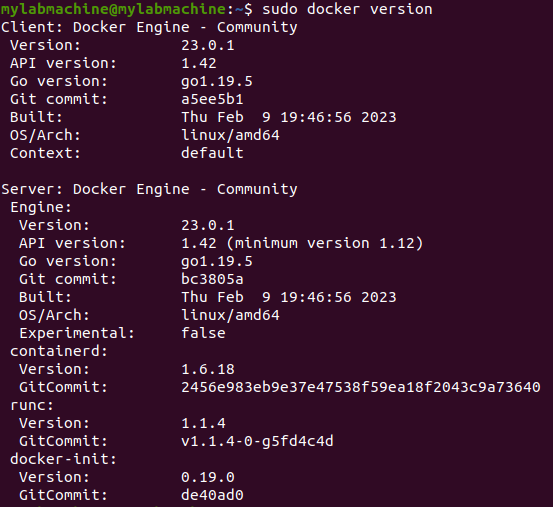

- The steps in this tutorial have been tested with Docker Version 23.0.1. A more detailed version information is shown below.
- Download the “densebox_640_360.prototxt” file provided by Octavo Systems

Integrate DPU-TRD PL Acceleration Kernel to our Acceleration Ready Vitis Platform
This section will describe the steps required to Integrate DPU-TRD PL Acceleration Kernel to our Acceleration Ready Vitis Platform.
Add Vitis AI 2.0 to Vitis IDE’s Library Repositories
- Open Vitis 2021.2 IDE
- Set the directory created as part of Tutorial 3, osdzu3-ref-accl-vitis-pkg, as your workspace directory. The workspace should already have osdzu3-ref-accl-vitis-platform created as part of Tutorial 3 under Explorer.
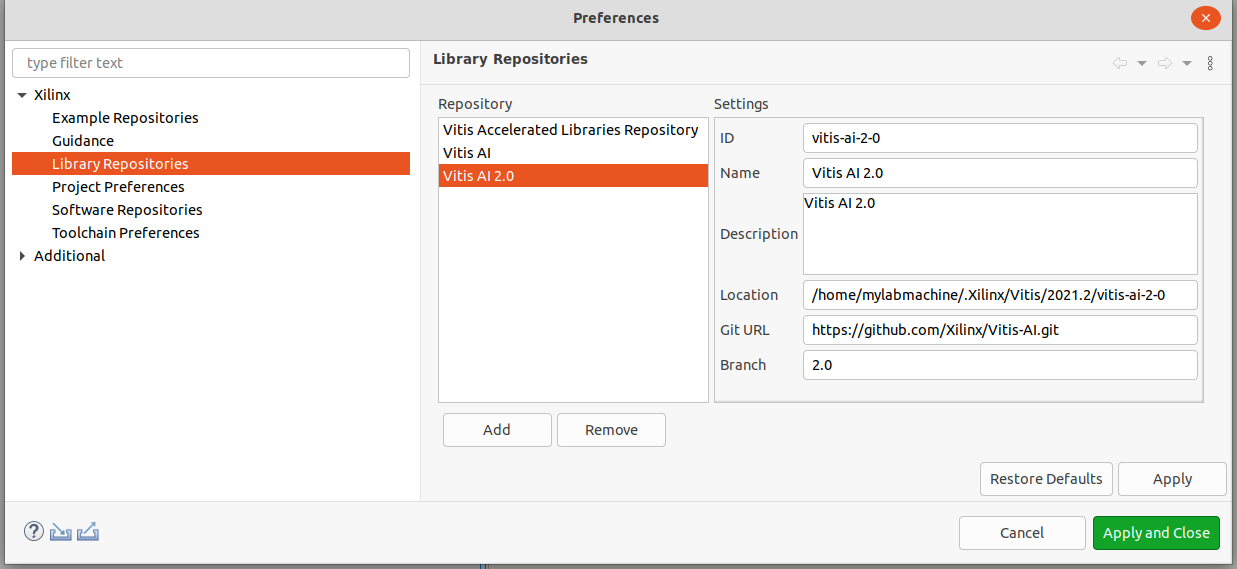
- Under Window > Preferences > Library Repositories tab > Click Add button
- Configure the settings of the Vitis AI 2.0 library as shown below. Ensure the Branch is 2.0 and not “master”.


- Press Apply and Close
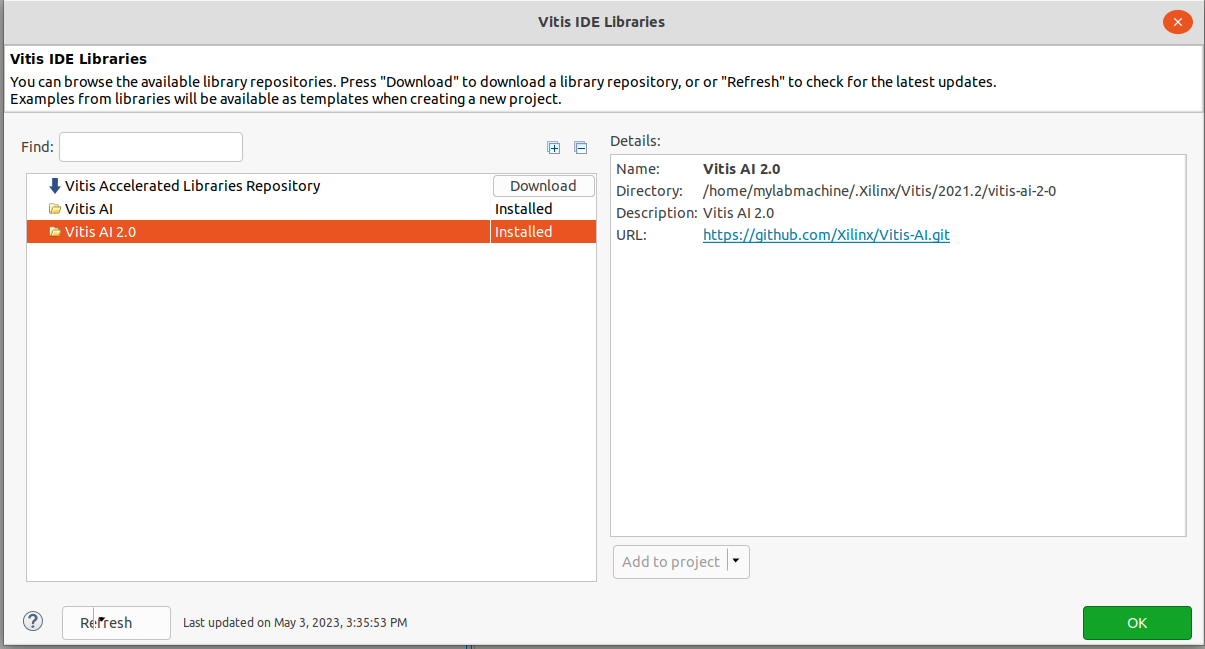
- Go to Xilinx > Libraries… > Find the Vitis AI 2.0 library we just added > Press Download. The download may take a few minutes.
- Once the download and installation finishes, the download button will say Installed as shown below. Click OK to close the window.


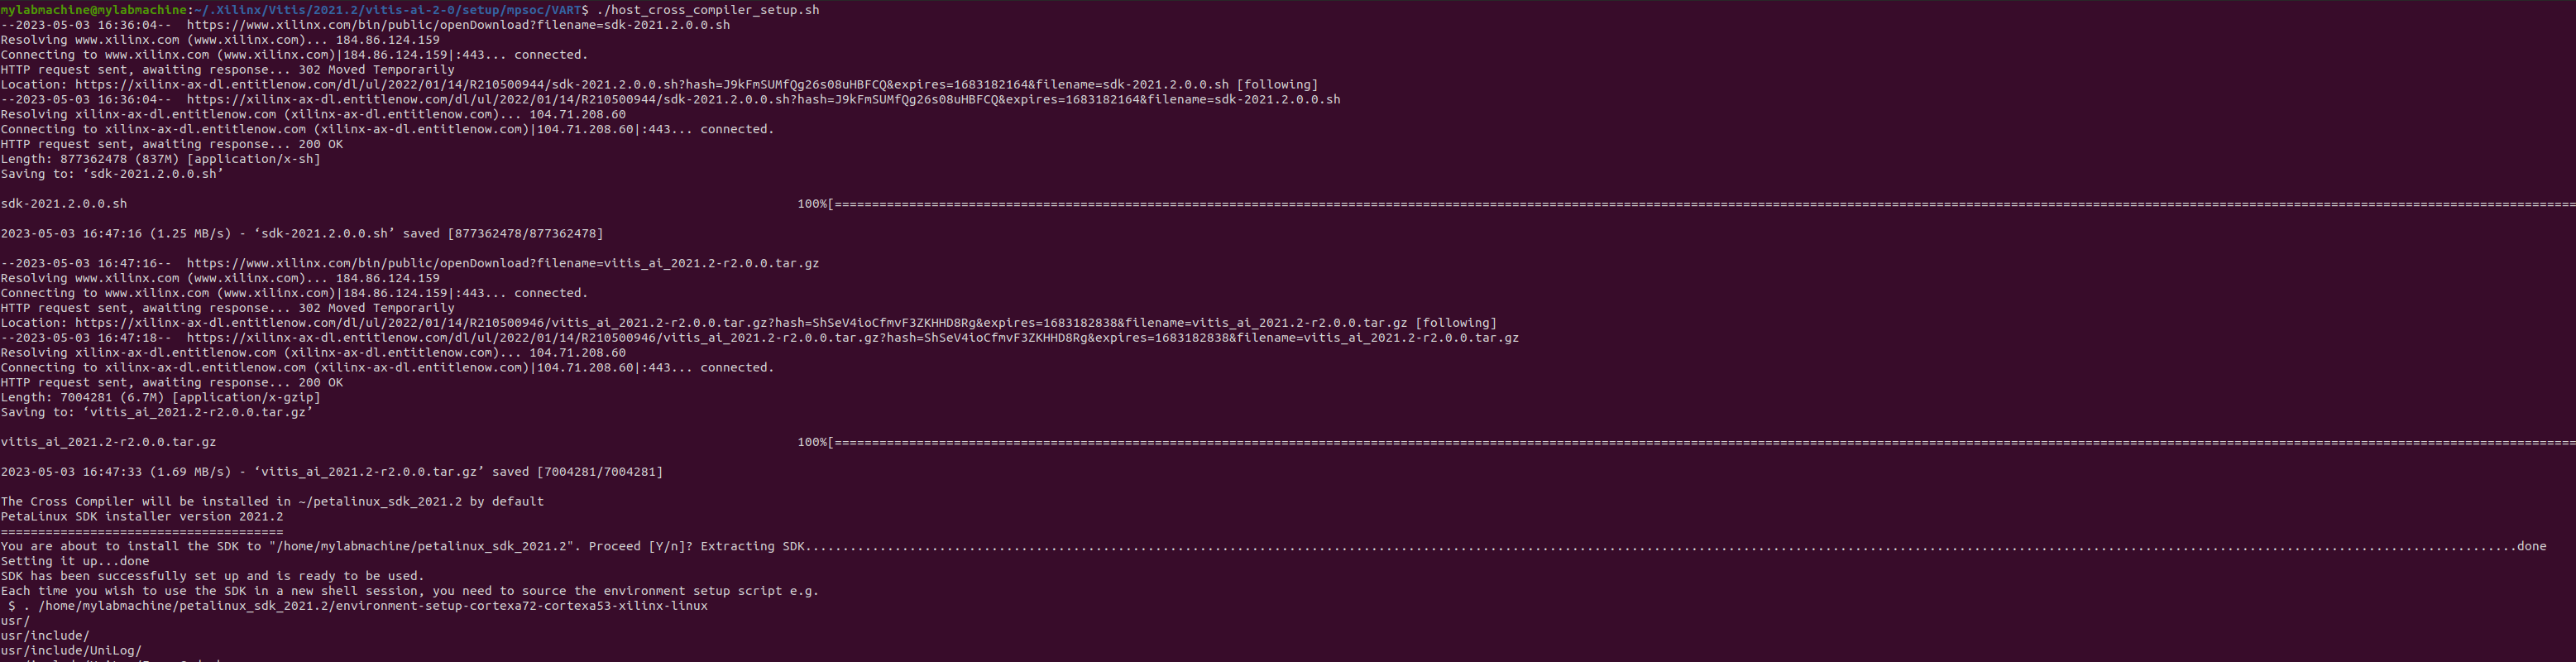
Download and install Vitis-AI specific sysroot
- Navigate to <Vitis-AI 2.0 installation directory>/setup/mpsoc/VART
Default location is: ~/.Xilinx/Vitis/2021.2/vitis-ai-2-0 - Run the host cross compiler setup script using the command
./host_cross_compiler_setup.sh
Default installation location is ~/petalinux_sdk_2021.2.
If you need sysroot installed some other place, open the script and add the full path to below line:
install_path=~/petalinux_sdk_2021.2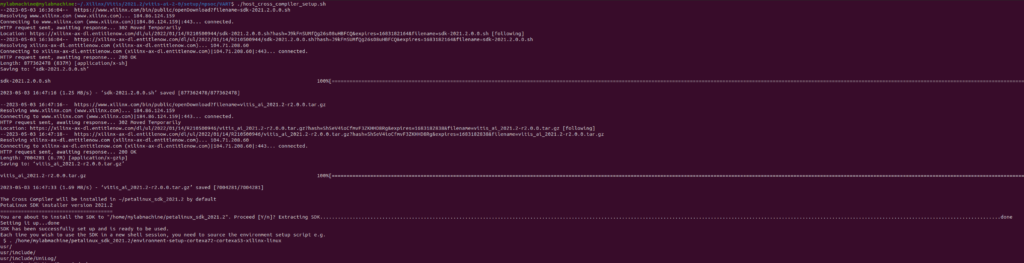


Create DPU-TRD application project
- Go to File > New > Application Project
- Click Next to skip the Welcome Page
- Select platform osdzu3-ref-accl-vitis-platform, click Next
- Name the project DPU-TRD, click Next
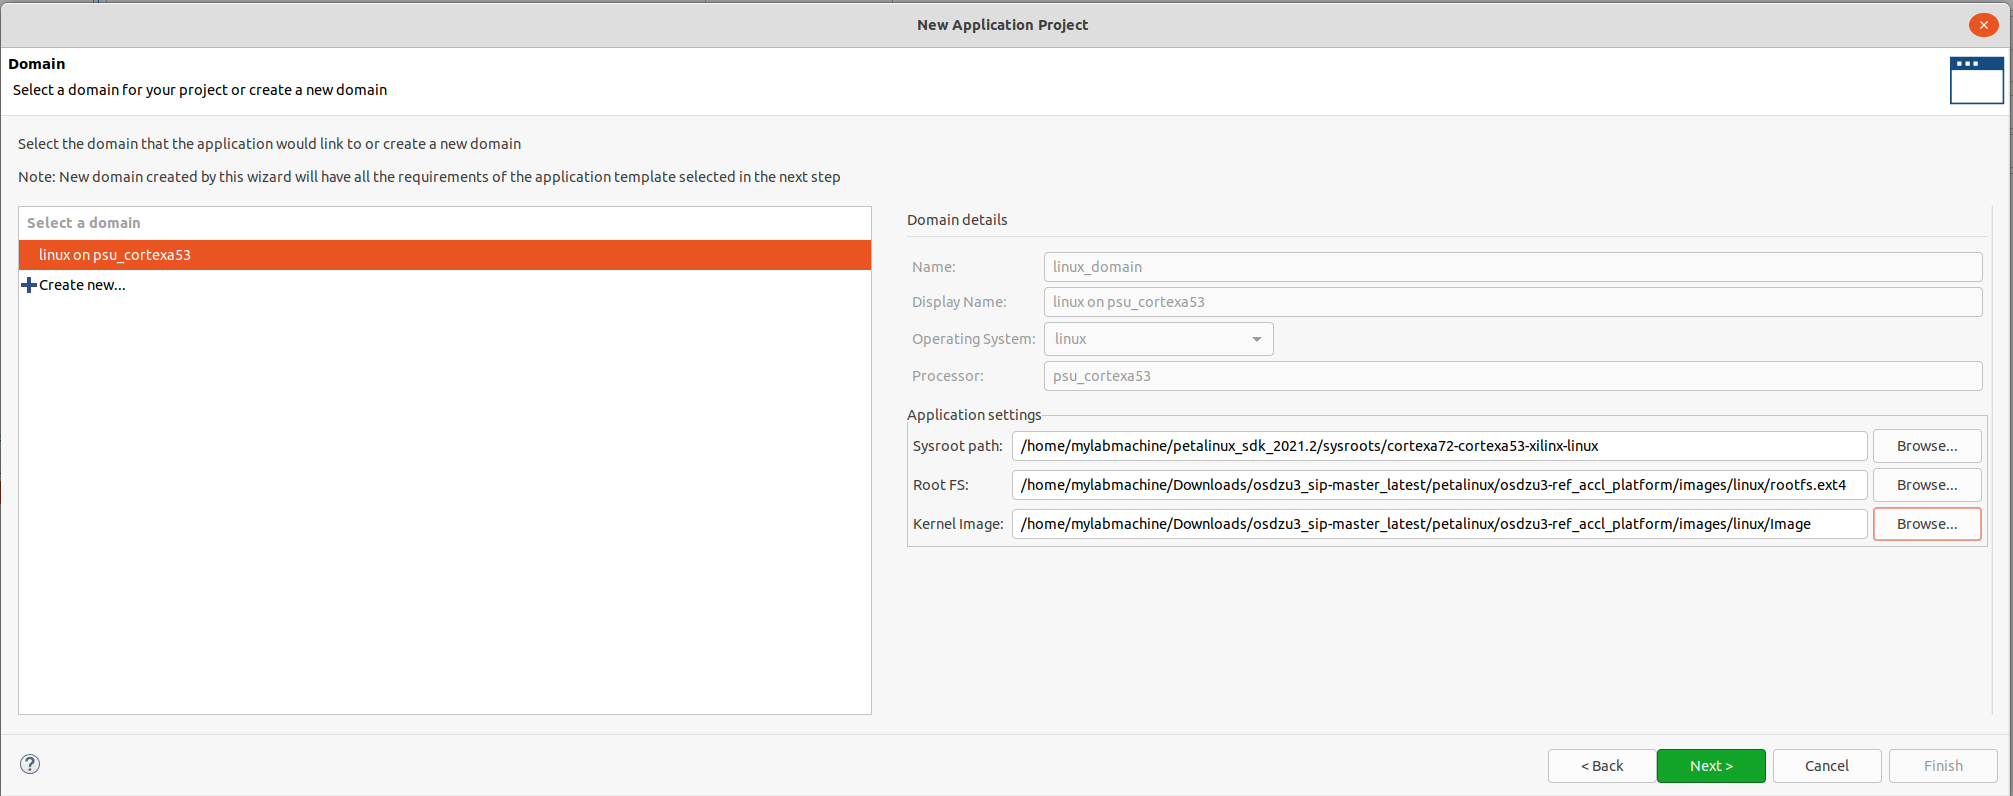
- Under domain linux on psu_cortexa53, set the paths for sysroot (generated in previous section), EXT4 Rootfs file and Kernel Image (generated as part of Tutorial 2) appropriately as shown below. Click Next.


- Under dsa > select DPU Kernel (choose the one that corresponds to Vitis AI 2.0 if you have multiple Vitis AI versions installed, similar to my case)
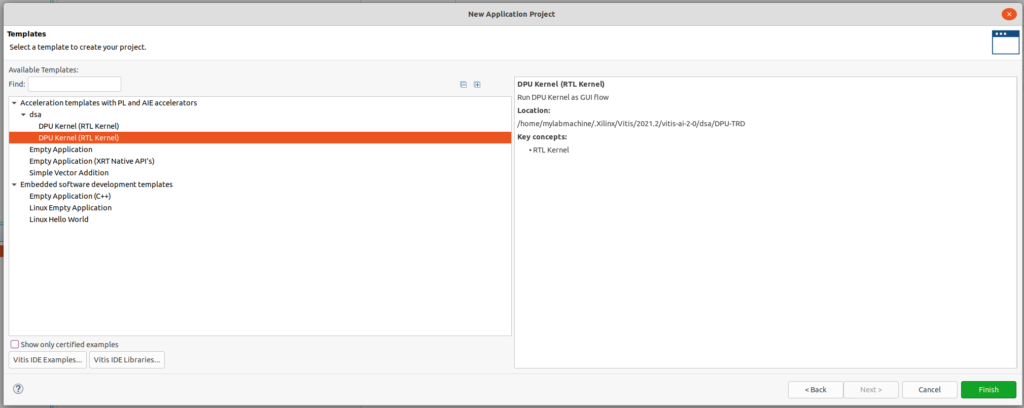

- Press Finish to generate the application project.

Configure DPU-TRD project
This section describes how to configure DPU-TRD project for OSDZU3-REF platform.
Configure Build Target
- Open system project file DPU-TRD_system.sprj
- Change Active build configuration to “Hardware”
Configure DPU Settings
- Under dpu_trd_kernels/src/prj/Vitis, open dpu_conf.vh
- Update the following settings:
- Change
`define B4096to`define B2304 - Change
`define CHANNEL_AUGMENTATION_ENABLEto`define CHANNEL_AUGMENTATION_DISABLE - Change
`define DWCV_ENABLEto`define DWCV_DISABLE - Change
`define POOL_AVG_ENABLEto`define POOL_AVG_DISABLE - Change
`define DSP48_USAGE_HIGHto`define DSP48_USAGE_LOW - Save the file.
- Change
Configure system_hw_link for proper kernel instantiation
- Double click on DPU-TRD_system_hw_link.prj
- Remove softmax IP under Hardware Functions:
- Right click on sfm_xrt_top > Remove
- Change number of DPUCZDX8G compute units to 1
Set v++ configuration
- Under Assitant View > DPU-TRD_system > DPU-TRD_system_hw_link > Hardware > Double click on dpu
- In the line of V++ configuration settings, click on the three dots (…)
- Update the configuration as follows:
[clock]
id=0:DPUCZDX8G_1.aclk
id=1:DPUCZDX8G_1.ap_clk_2

[connectivity]
sp=DPUCZDX8G_1.M_AXI_GP0:HPC0
sp=DPUCZDX8G_1.M_AXI_HP0:HP0
sp=DPUCZDX8G_1.M_AXI_HP2:HP2
- Click OK
- Click Apply and Close
Build the DPU-TRD project and deploy it on OSDZU3-REF board
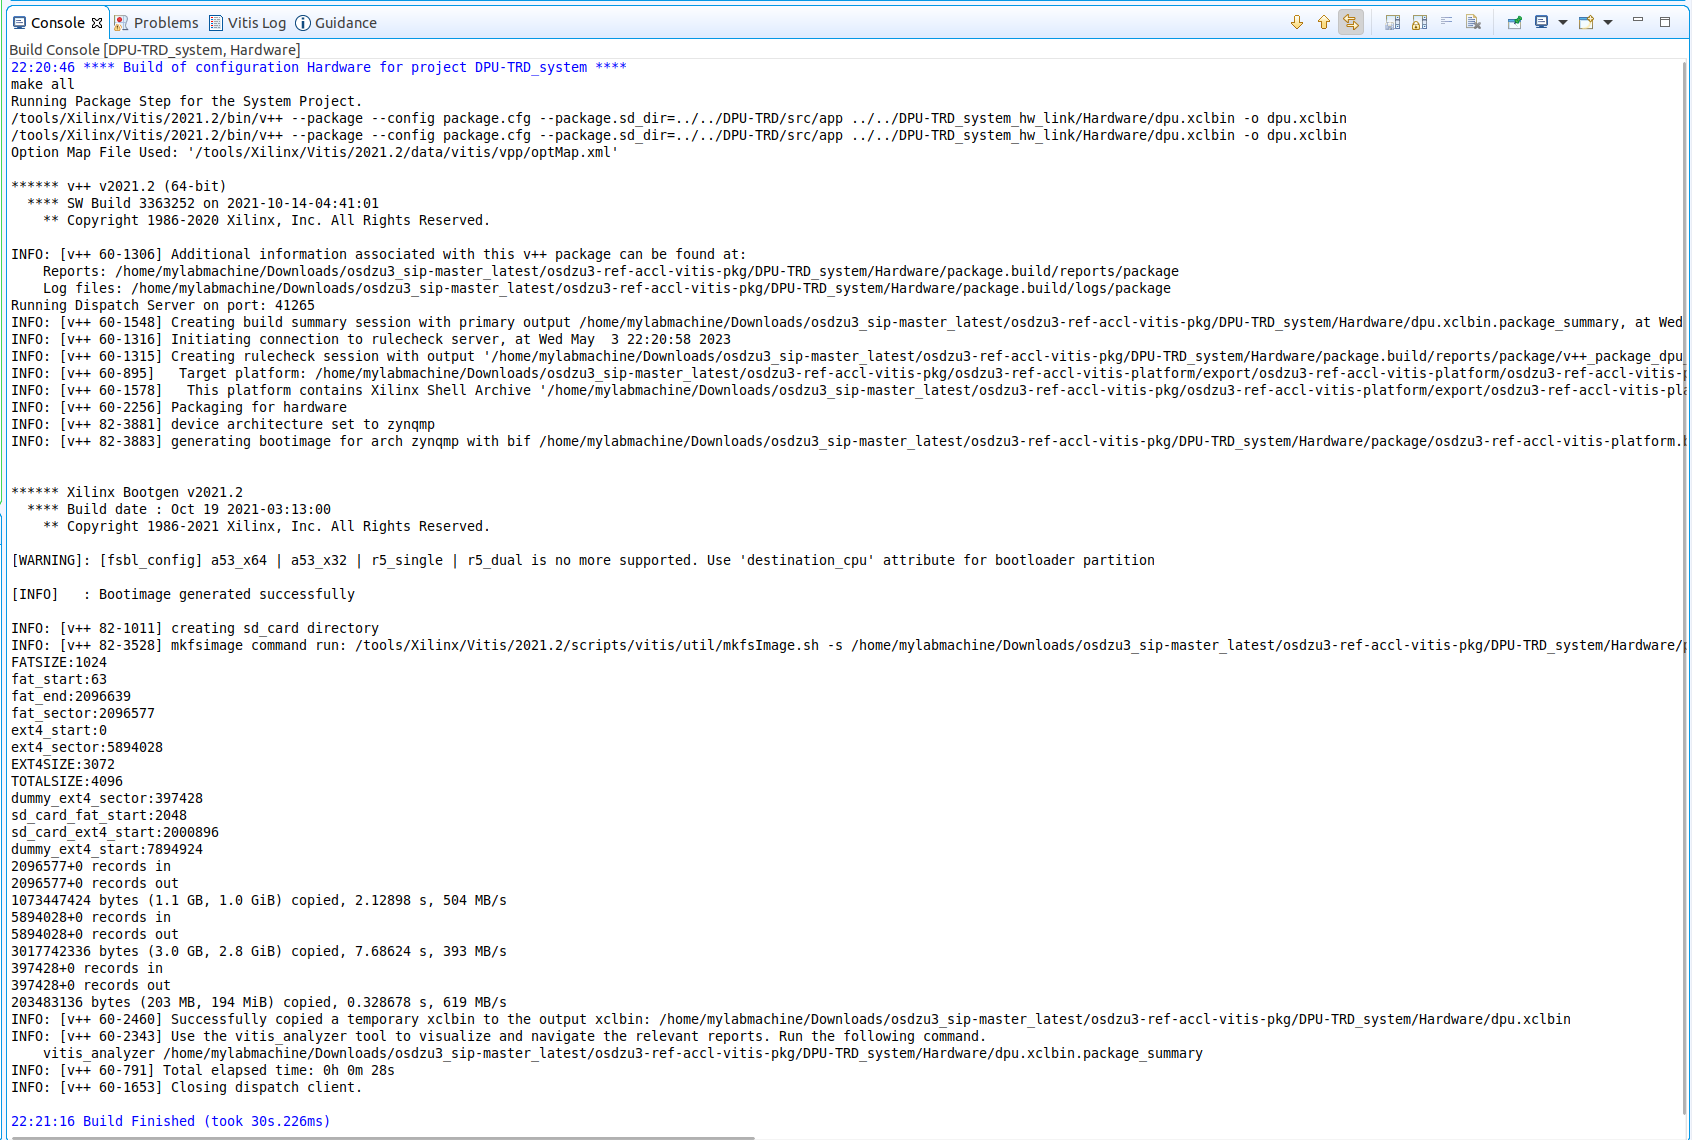
- Select the DPU-TRD_system project > Right click > Build Project
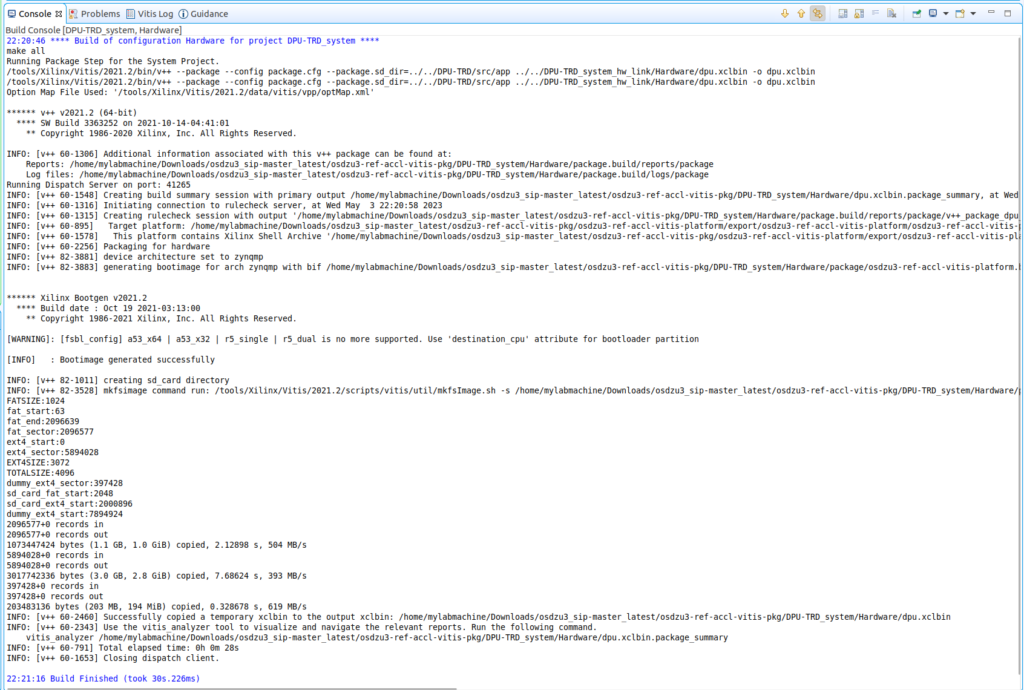

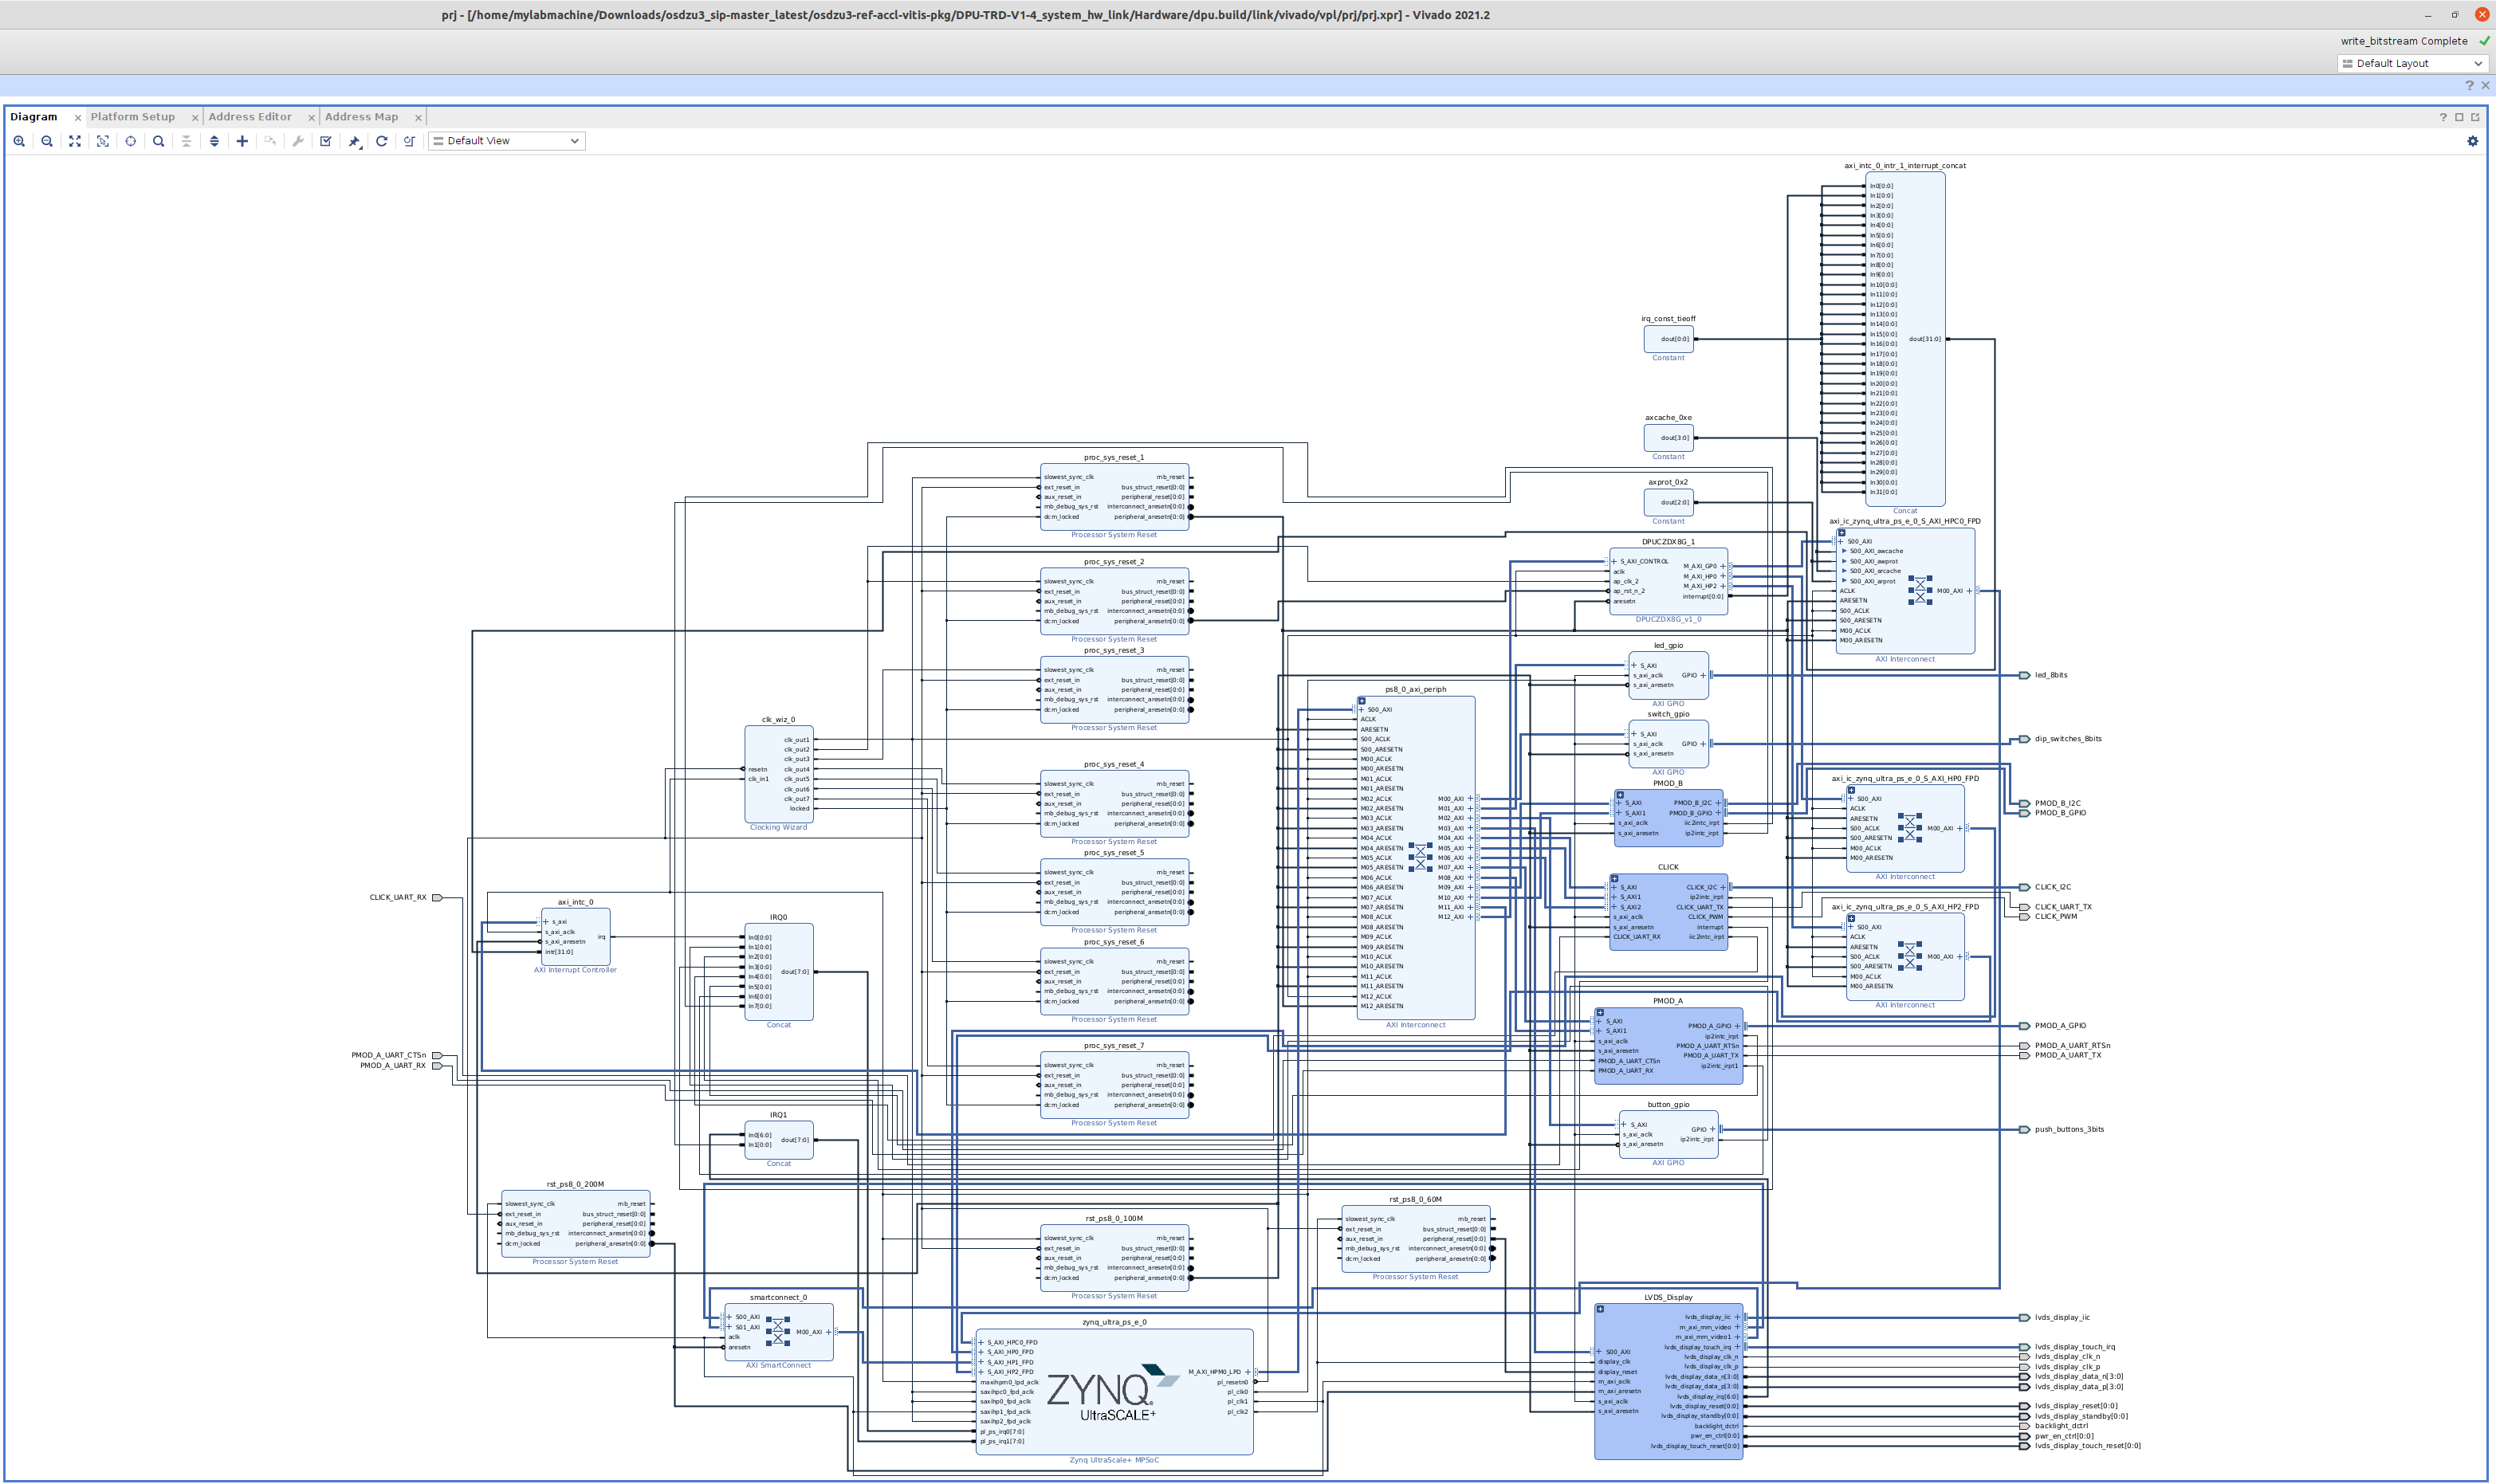
- Once the build finishes, you should be able to find the updated OSDZU3-REF Vivado project with integrated DPU and its dependencies under: DPU-TRD_system_hw_link/Hardware/dpu.build/link/vivado/vpl/prj/prj.xpr
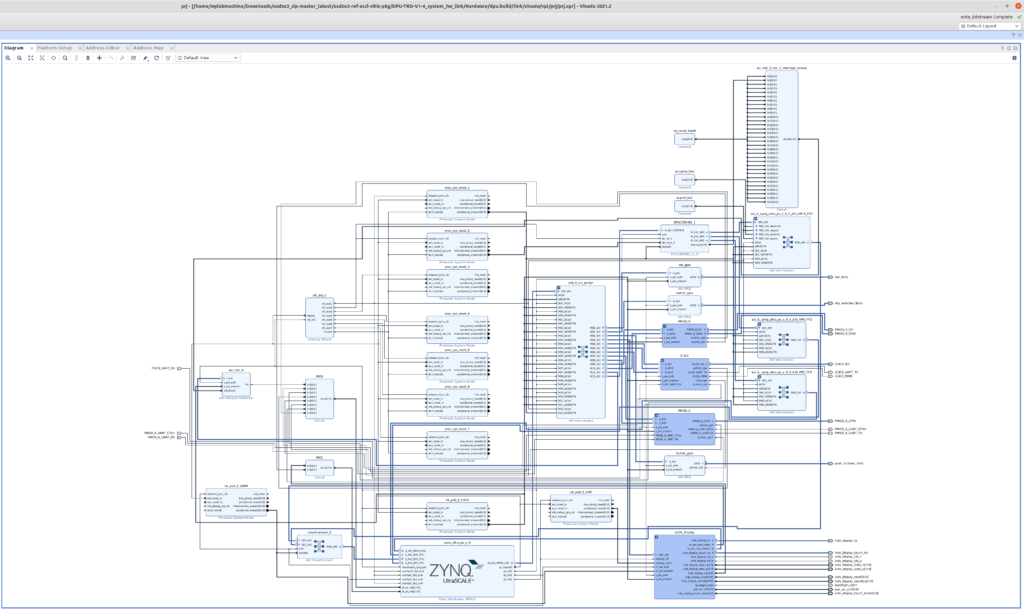
- Open the project using Vivado. The updated block design with DPU should look similar to the below figure.

- Next, you should be able to see flashable “sd_card.img” under DPU-TRD_system/Hardware/package
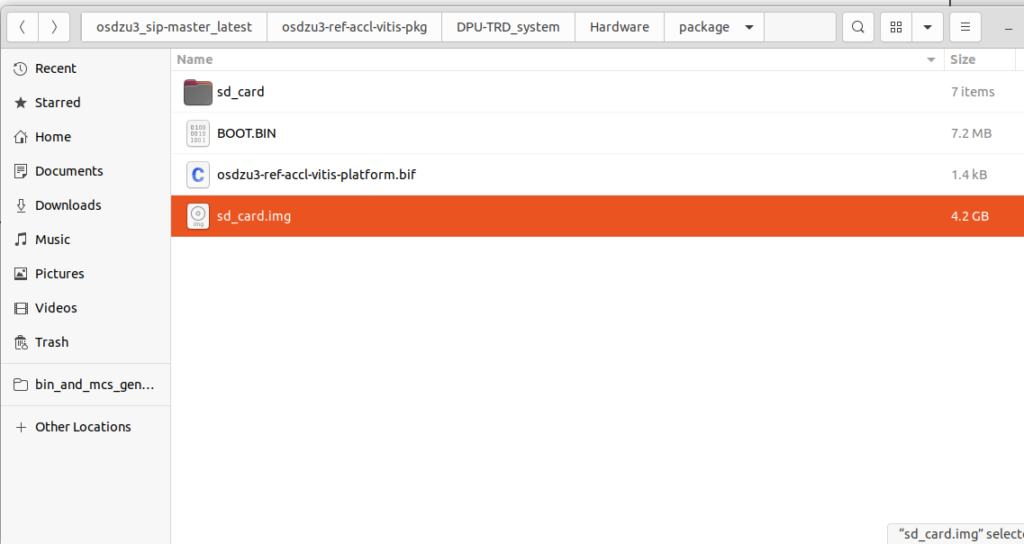

- Flash the sd_card.img file onto a µSD card using a tool like Balena Etcher
- Insert the µSD card into OSDZU3-REF board
- Set the boot mode to SD1 (i.e., 0101)
- Connect a µUSB cable between the UART port of OSDZU3-REF board and your host computer
- Open UART console on your host computer
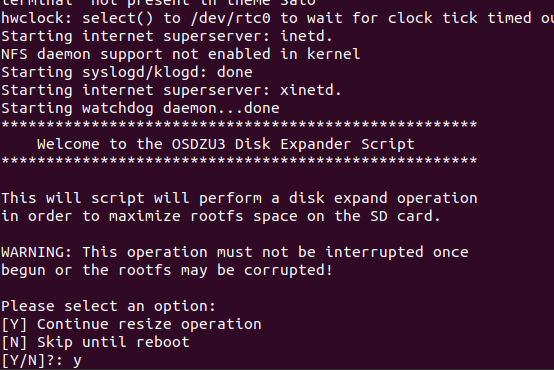
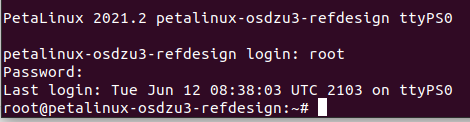
- Power on the OSDZU3-REF board. You should start seeing petalinux boot log on the UART console
- Once you reach the OSDZU3 Disk Expander Script prompt, type “y” on the keyboard and press Enter to expand the ext4 Rootfs partition to use all of the remaining µSD card space.

- Next, in the petalinux login prompt, use “root” as username and password.

- Once you successfully login, check Rootfs size again using “df . -h” command to ensure disk expansion was successful. The output may be slightly different from what is shown below depending on your uSD card size.


- Ensure VART configuration file correctly points to dpu.xclbin in the BOOT partition of the µSD card:
nano /etc/vart.conf
Make sure the contents are:
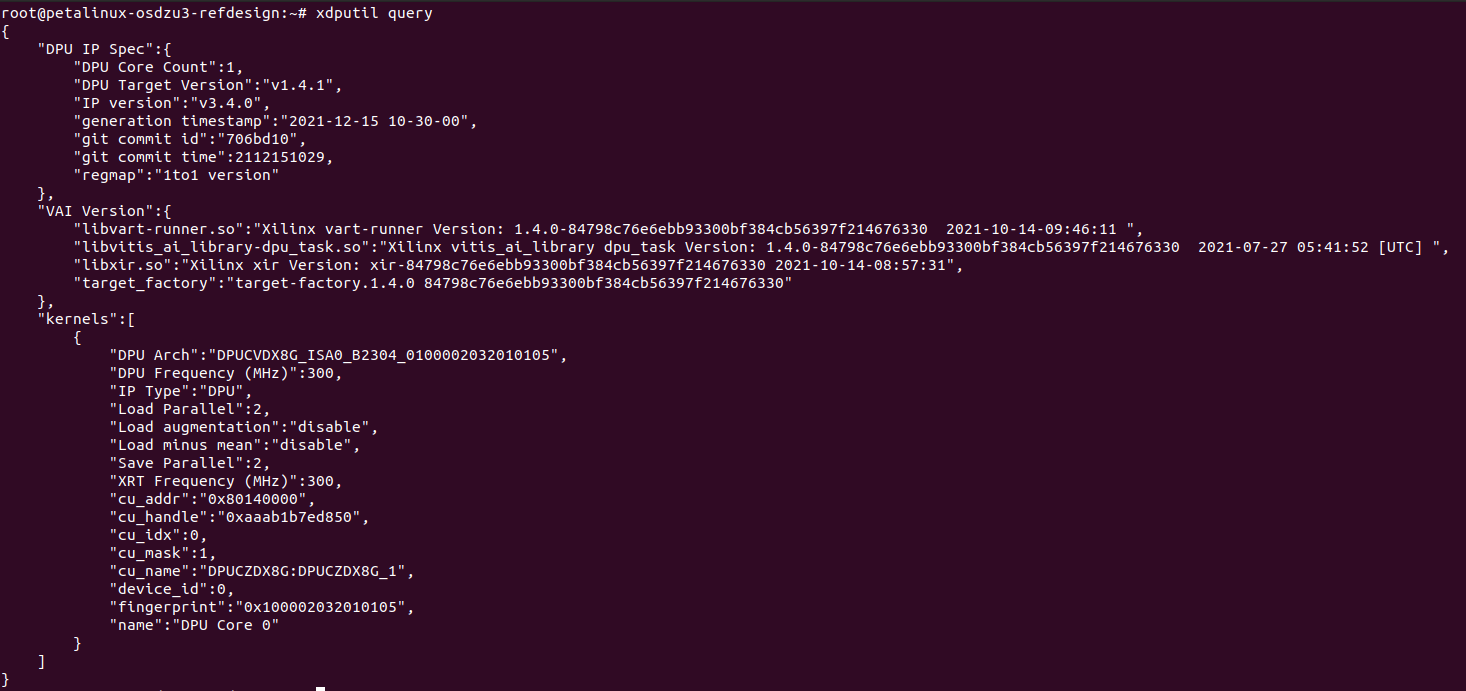
firmware: /media/sd-mmcblk1p1/dpu.xclbin - Validate Vitis-AI runtime and DPU using the command:
xdputil query
The output should look similar to what is shown below except for the DPU fingerprint. Your DPU fingerprint will certainly be different since fingerprints are unique.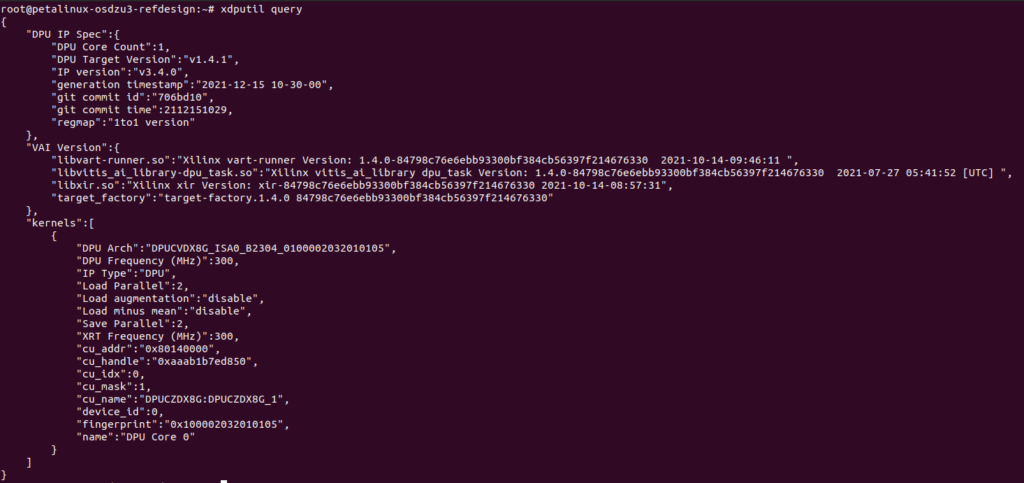


Compiling models from Vitis AI Model Zoo
The Vitis AI Model Zoo is a free repository that includes optimized, pre-trained, deep learning models to speed up the deployment of deep learning inference on Xilinx™ platforms. These models cover different applications, including but not limited to ADAS/AD, medical, video surveillance, robotics, data center, etc.
As examples, this section will show you how to manually compile the following two Café framework models from Vitis AI Model Zoo:
- Yolov3_cityscapes model for Advanced driver assistance systems (ADAS) detection from USB camera video feed
- Densebox_640_360 model for Live Face Detection from USB camera video feed
- Let’s begin by cloning the “v2.0” branch of the Vitis-AI repository:
git clone -b v2.0 https://github.com/Xilinx/Vitis-AI
cd Vitis-AI
export VITIS_AI_HOME=$PWD
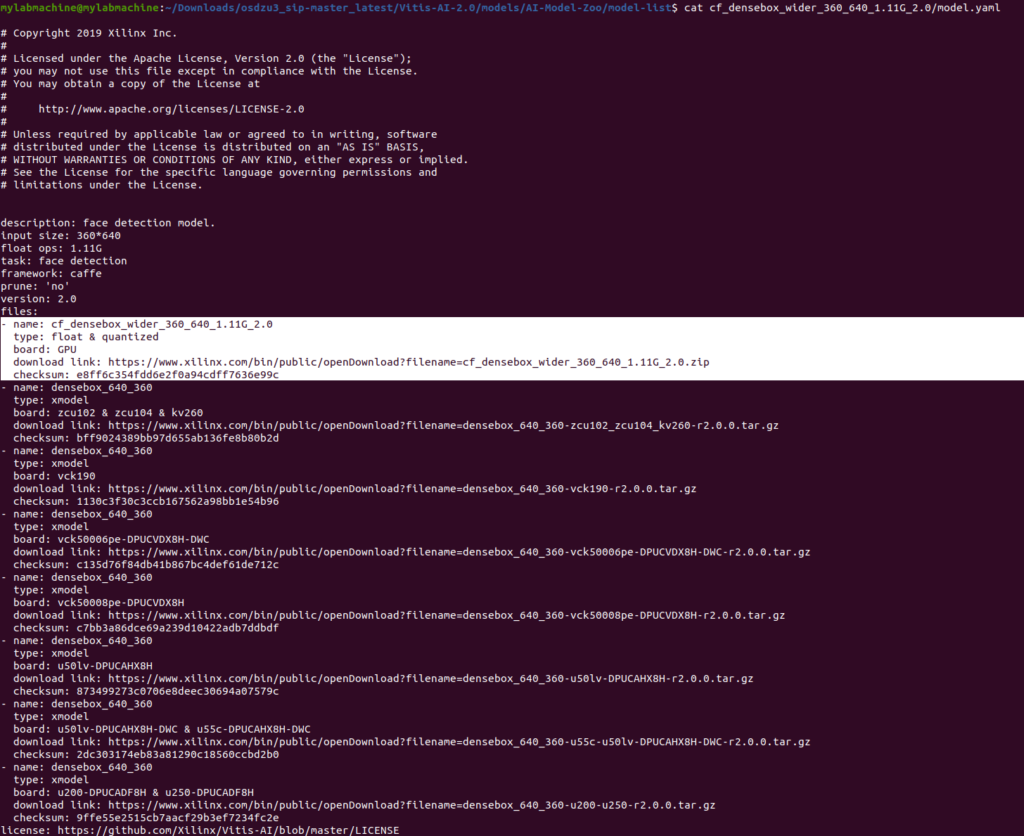
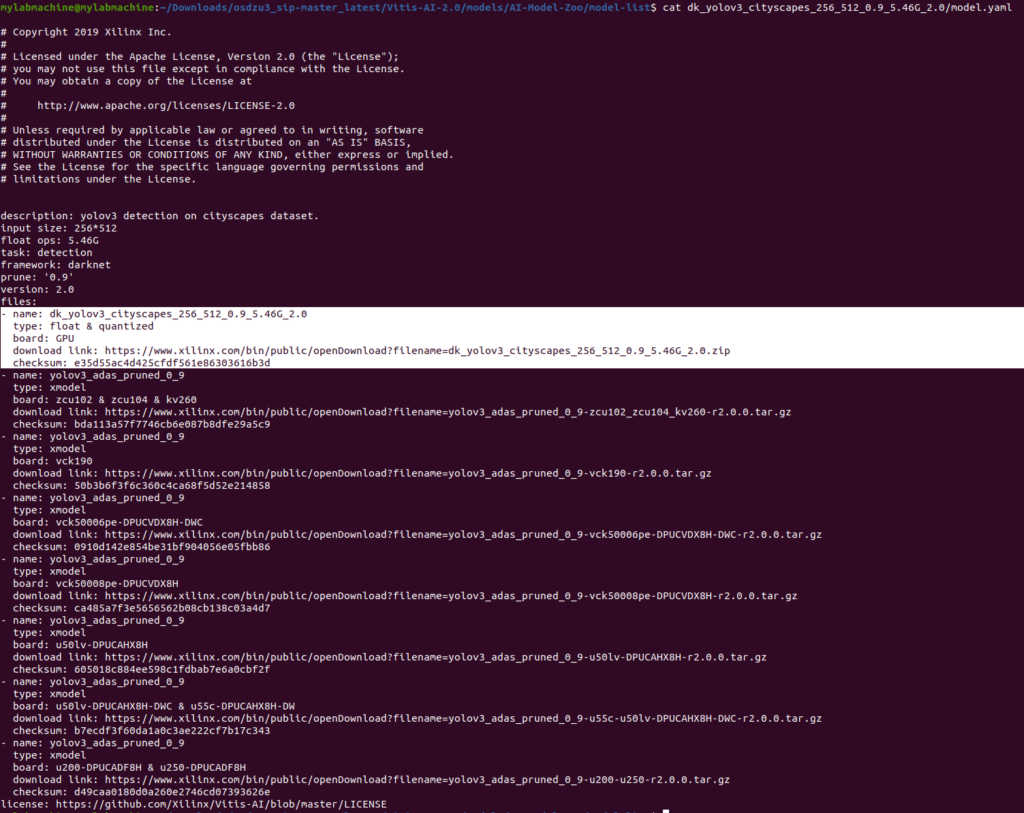
- The Vitis AI Model Zoo provides several versions of the Face Detect (Densebox_640_360) and ADAS (yolov3_cityscapes) models for different boards as listed in the model.yaml files of the respective models. The versions of the models we’re interested in are highlighted in the pictures below.
cd $VITIS_AI_HOME/models/AI-Model-Zoo/model-list
cat cf_densebox_wider_360_640_1.11G_2.0/model.yaml
cat dk_yolov3_cityscapes_256_512_0.9_5.46G_2.0/model.yaml


- Download the source archives for both models and extract them.
- Face Detect (Densebox_640_360)
- Download the model using the command:
wget https://www.xilinx.com/bin/public/openDownload?filename=cf_densebox_wider_360_640_1.11G_2.0.zip -O cf_densebox_wider_360_640_1.11G_2.0.zip - Unzip it using the command:
- Download the model using the command:
- ADAS (yolov3_cityscapes)
- Download the model using the command:
wget https://www.xilinx.com/bin/public/openDownload?filename=dk_yolov3_cityscapes_256_512_0.9_5.46G_2.0.zip -O dk_yolov3_cityscapes_256_512_0.9_5.46G_2.0.zip - Unzip it using the command:
unzip dk_yolov3_cityscapes_256_512_0.9_5.46G_2.0.zip
- Download the model using the command:
- Face Detect (Densebox_640_360)
- Copy the arch.json architecture file for our DPU based hardware platform to our current directory. The arch.json contains encrypted content, that uniquely identifies the DPU configuration for our design.The arch.json file can be found in the Vitis workspace used to build DPU-TRD project under: <vitis_workspace>/ DPU-TRD_system_hw_link/Hardware/dpu.build/link/vivado/vpl/prj/prj.gen/sources_1/bd/design_1/ip/design_1_DPUCZDX8G_1_0
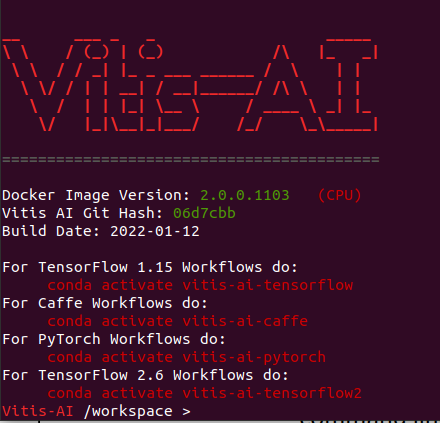
cp {path_to_arch_json}/arch.json . - Pull and launch Vitis AI docker container using the following commands:
sudo docker pull xilinx/vitis-ai:2.0.0.1103
cd $VITIS_AI_HOME
sudo sh -x docker_run.sh xilinx/vitis-ai:2.0.0.1103
- Read all the license notification messages, when prompted press ENTER to go through the terms and press “y” on the keyboard to accept the terms. Next, you should see Vitis-AI Docker command line.

- Navigate to AI Model Zoo directory and create a new directory for the compiled models
cd models/AI-Model-Zoo
mkdir compiled_output
- Let’s create a generic script for compiling Caffe model named “compile_cafe_model.sh” with the following content:
model_name=$1 modelzoo_name=$2 vai_c_caffe \ --prototxt ./${modelzoo_name}/quantized/deploy.prototxt \ --caffemodel ./${modelzoo_name}/quantized/deploy.caffemodel \ --arch ./arch.json \ --output_dir ./compiled_output/${model_name} \ --net_name ${model_name} - Activate conda environment
conda activate vitis-ai-caffe
- Compile the Densebox_640_360 model to work with our newly created DPU based Hardware Platform using the command:
source ./compile_cafe_model.sh densebox_640_360 cf_densebox_wider_360_640_1.11G_2.0


- Similarly, compile the ADAS model to work with our newly created DPU based Hardware Platform using the command:
source ./compile_cafe_model.sh yolov3_cityscapes dk_yolov3_cityscapes_256_512_0.9_5.46G_2.0/


- Under “compiled_output” directory, you should be able to see “densebox_640_360.xmodel” and “yolov3_cityscapes.xmodel”


- Exit docker with the following command:
Exit - Copy “densebox_640_360.xmodel” and “yolov3_cityscapes.xmodel” files to the BOOT partition of the µSD card.


Building ADAS and Face Detect demo applications
- Navigate to ADAS application directory under Vitis AI 2.0 repo from previous section
cd $VITIS_AI_HOME/demo/VART/adas_detection - source <path_to_your_Vitis_AI_SDK>/environment-setup-cortexa72-cortexa53-xilinx-linux. In my case it is:
source ~/petalinux_sdk_2021.2/environment-setup-cortexa72-cortexa53-xilinx-linux - Build the ADAS application:
chmod +x build.sh
./build.sh
- The newly built ADAS application is highlighted below


- Similarly, build the face detect application by navigating to samples directory:
cd $VITIS_AI_HOME/demo/Vitis-AI-Library/samples/facedetect
chmod +x build.sh
./build.sh
- The newly built face detect applications (there are more than one version) are shown below.
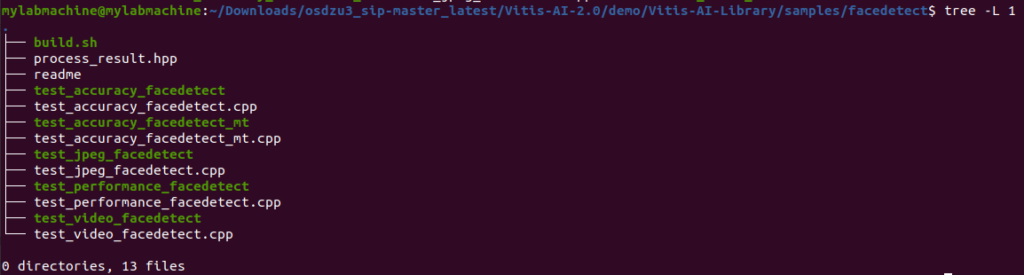

- Copy “test_video_facedetect” and “adas_detection” applications to the BOOT partition of the µSD card.
- Copy “densebox_640_360.prototxt” (downloaded in section 4) to the BOOT partition of the µSD card.

Running demos on the OSDZU3-REF board
- Connect an external monitor to the OSDZU3-REF board directly via Display Port or via Display Port to HDMI monitor
- Connect a webcam to OSDZU3-REF board directly or via a USB-C hub
- Turn on the OSDZU3-REF board. Once you get to the petalinux login prompt, use “root” for username and password
- Ensure a desktop appears on the external monitor

- Check if the USB webcam (highlighted below) is detected by running the following commands:
lsusb
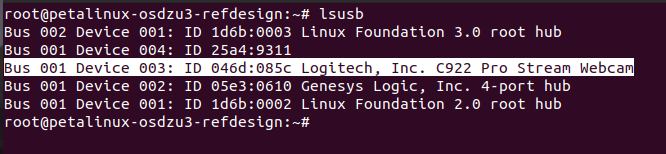

v4l2-ctl --list-devices


- Set the DISPLAY environment variable:
export DISPLAY=:0.0 - Lower the resolution of DP monitor to 640 x 480
xrandr --output DP-1 --mode 640x480 - Navigate to home directory:
cd ~ - Copy the following files from BOOT partition of the µSD card to the home directory of petalinux:
cp –r /mnt/sd-mmcblk1p1/test_video_facedetect ~
cp –r /mnt/sd-mmcblk1p1/densebox_640_360.xmodel ~
cp –r /mnt/sd-mmcblk1p1/densebox_640_360.prototxt ~
cp –r /mnt/sd-mmcblk1p1/adas_detection ~
cp –r /mnt/sd-mmcblk1p1/yolov3_cityscapes.xmodel ~
- Create “models” directory under /usr/share/vitis-ai-library
mkdir /usr/share/vitis_ai_library/models - Copy densebox_640_360.xmodel to /usr/share/vitis-ai-library/models
cp ~/densebox_640_360.xmodel /usr/share/vitis-ai-library/models - Run the Face Detect demo application using the command:
./test_video_facedetect densebox_640_360.xmodel 0
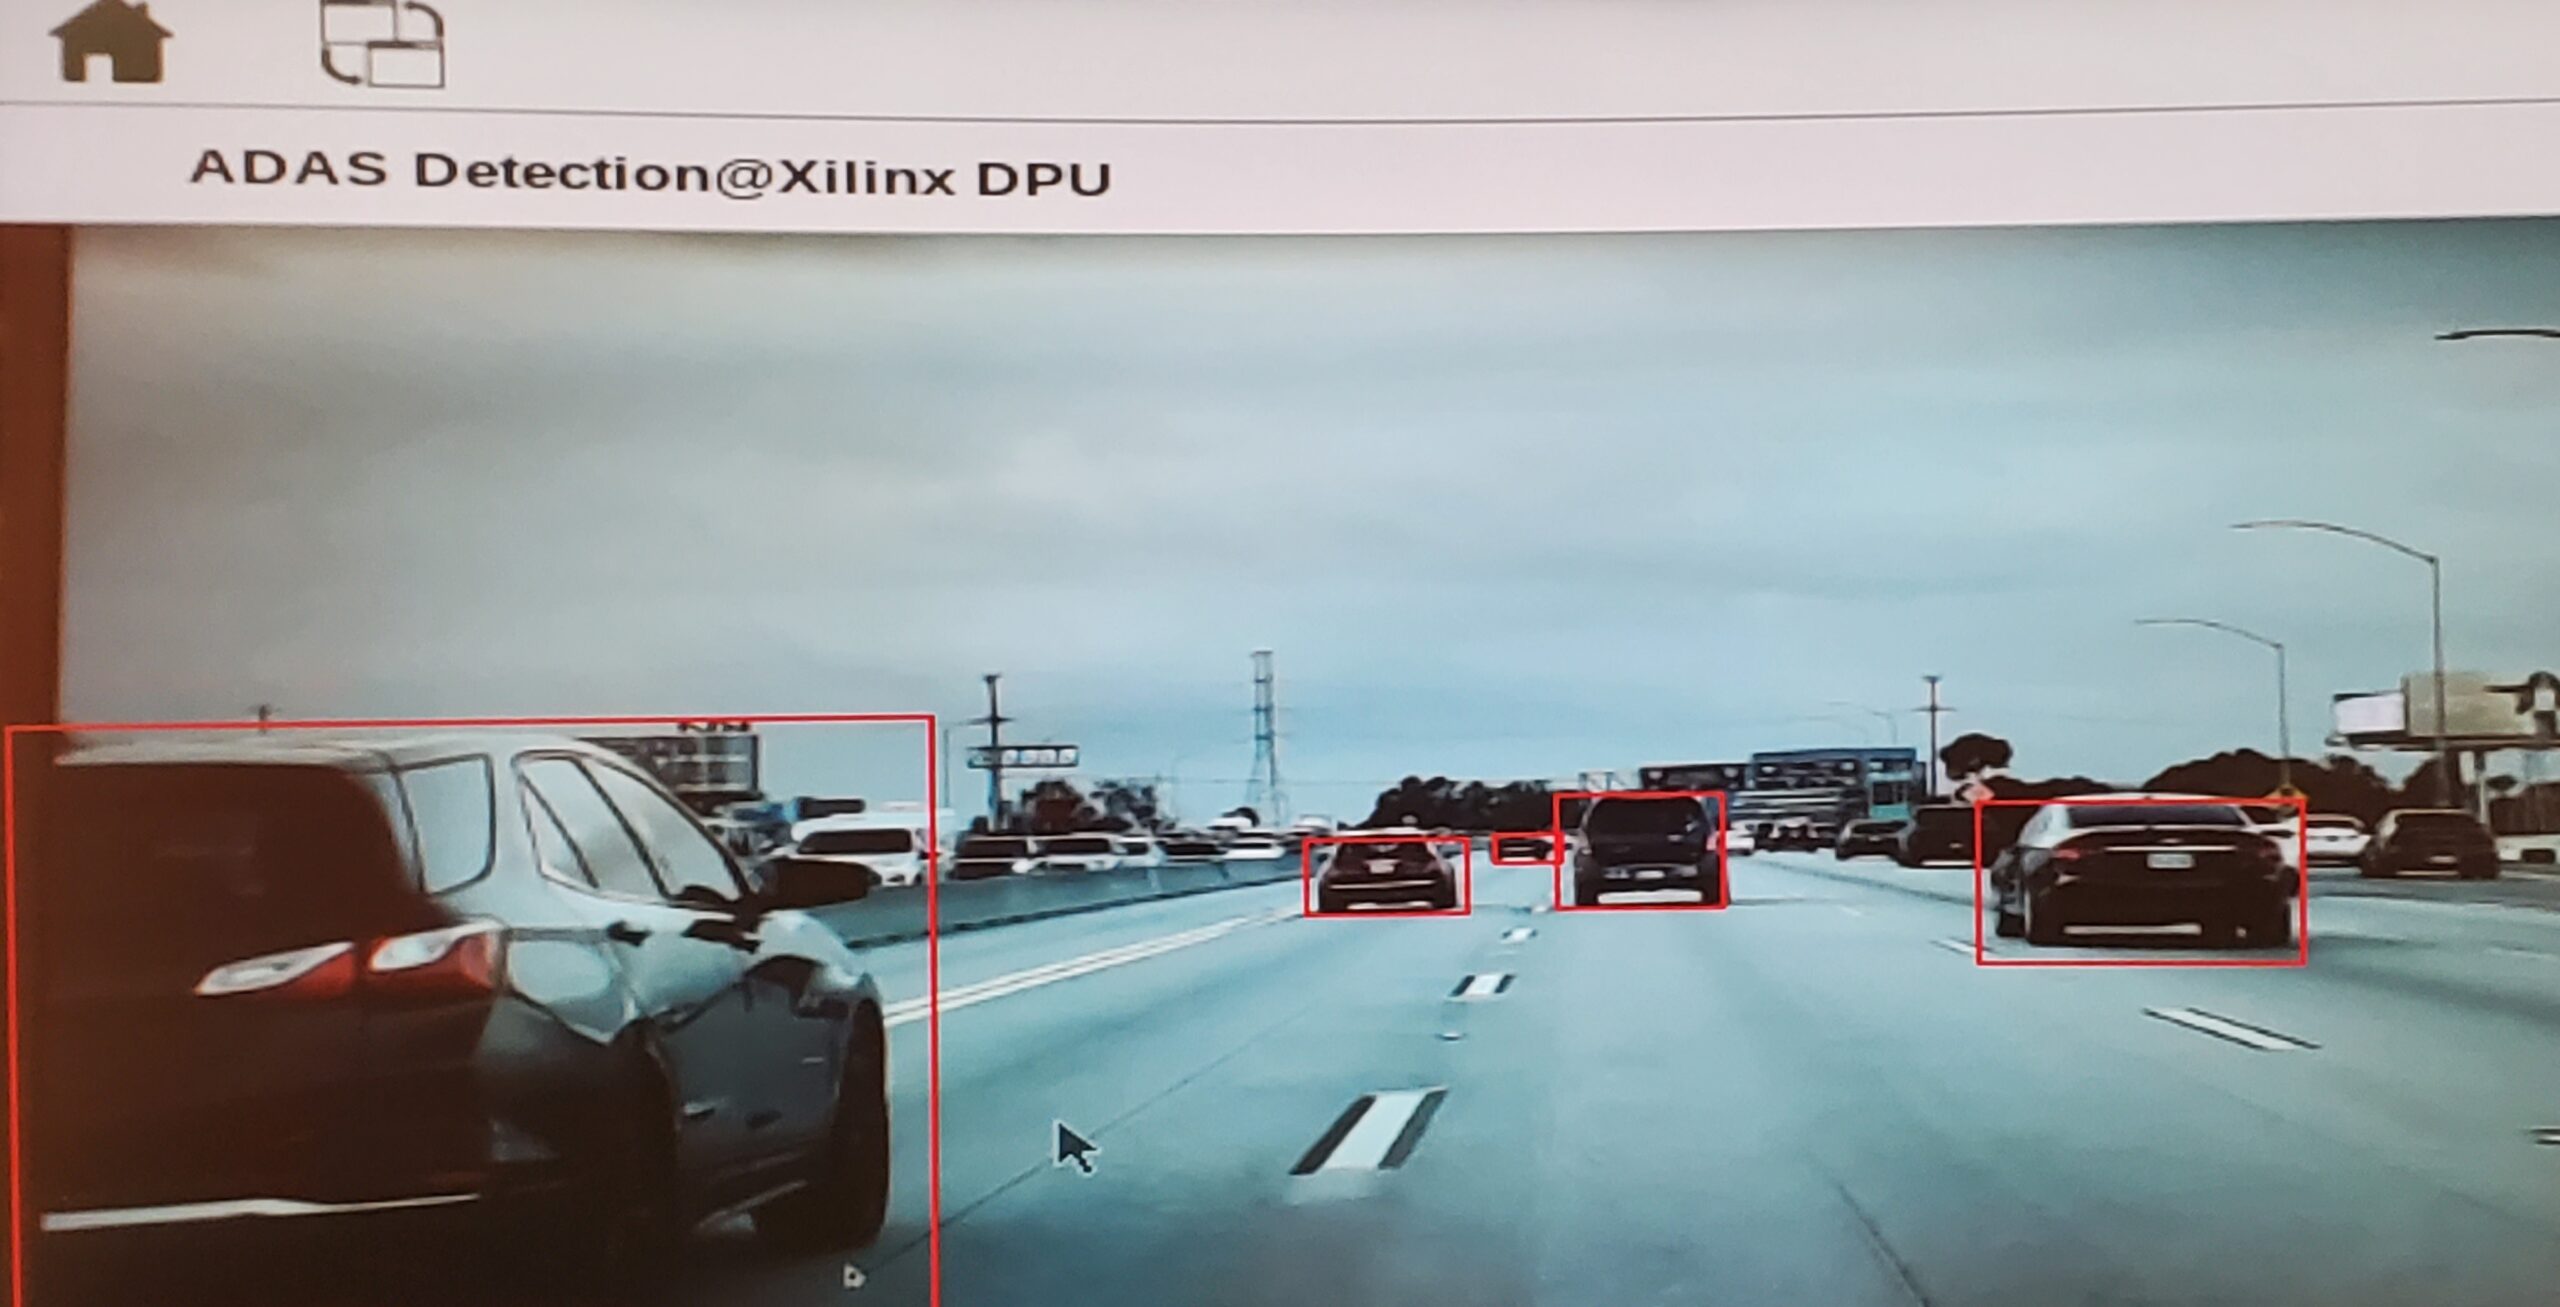
You can watch this demo in action here –https://www.youtube.com/watch?v=QxXFs8B_scU - Run the ADAS detection demo application using the command:
./adas_detection /dev/video0 yolov3_cityscapes.xmodelPoint the webcam towards live traffic on the street. You can also play dashcam traffic videos on your laptop and point the webcam towards it to observe the ADAS traffic detection in action as shown below.


Resource Utilization and Power Consumption Snapshot
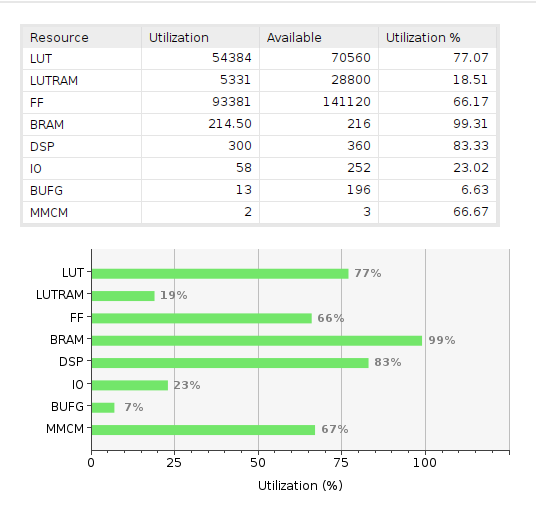
The PL resource utilization by DPU-TRD PL Kernel on OSDZU3-REF is shown by the below figure.
The average input power consumption for the demos is as follows.
| OSDZU3-REF State | OSDZU3-REF Input Power |
|---|---|
| Petalinux Idle | 9.75W |
| Running Face Detect Demo (from Vitis AI Model Zoo) | 12.15W |
| Running ADAS Detect Demo (from Vitis AI Model Zoo) | 13.2W |
Further Reading
This has completed the Vitis AI Tutorial series. Please visit any of the previous versions of this tutorial series for further information.
- Vitis AI Tutorial – Part 1
The First Part of a 4-part Acceleration tutorial series that will help you run Vitis-AI DPU-TRD based Face Detection demo, ADAS Detection demo (and other AI demos) on the OSDZU3-REF board. - Vitis AI Tutorial – Part 2
The Second Part of a 4-part Acceleration tutorial series that will help you run Vitis-AI DPU-TRD based Face Detection demo, ADAS Detection demo (and other AI demos) on the OSDZU3-REF board. It focuses on generating Acceleration Ready Petalinux Software Components with Vitis-AI 2.0 and Xilinx Real Time (XRT) support - Vitis AI Tutorial – Part 3
The Third Part of a 4-part Acceleration tutorial series that will help you run Vitis-AI DPU-TRD based Face Detection demo, ADAS Detection demo (and other AI demos) on the OSDZU3-REF board. It focuses on the steps required to generate an Acceleration Ready Vitis Platform.
Revision History
Get notified of updates to this Application Note and all of our Technical Documentation.
"*" indicates required fields
| Revision Number | Revision Date | Changes | Author |
| 1 | 11/13/2023 | Initial Revision | Eshtaartha Basu |
