Vitis AI Tutorial – Part 3
Published On: November, 15, 2023 By: Eshtaartha Basu
This tutorial will walk you through the steps required to generate an Acceleration Ready Vitis Platform. We will be using the OSDZU3-REF Petalinux BSP as an example starting point.
This tutorial can be used standalone or as Part 3 of a 4-part Acceleration tutorial series that will help you run Vitis-AI DPU-TRD based Face Detection demo, ADAS Detection demo (and other AI demos) on the OSDZU3-REF board. An overview of the flow is shown below:
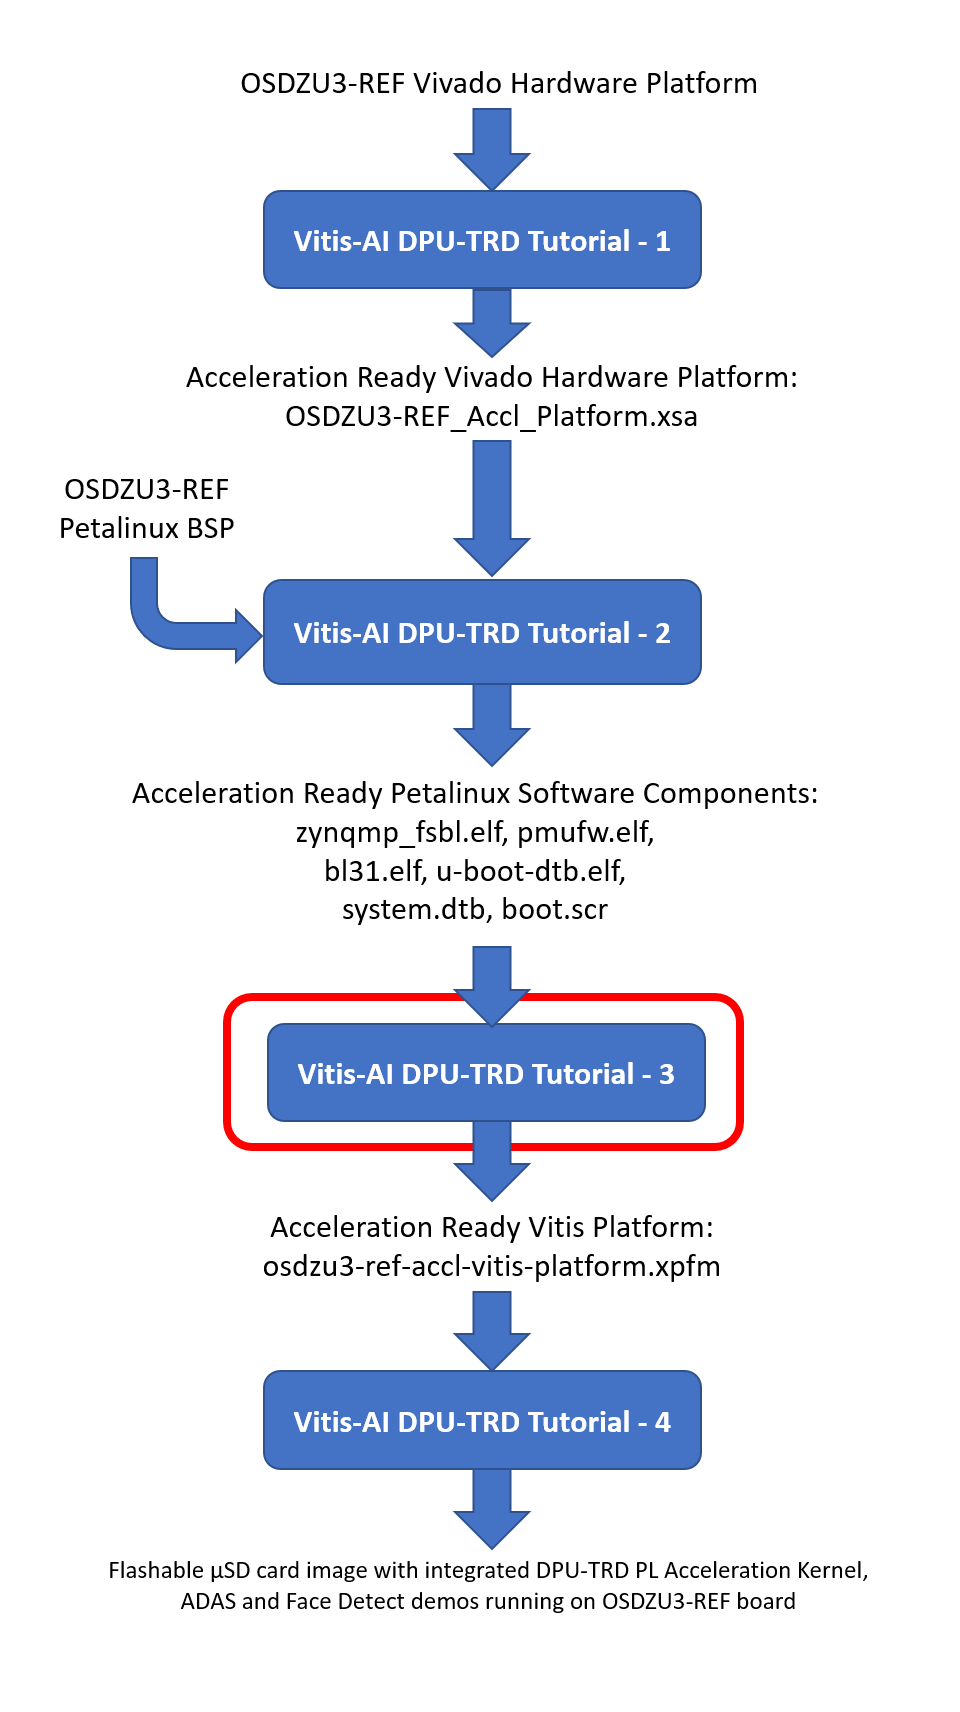
Table of Contents
Pre-requisites
This tutorial assumes the user has already gone through:
- Tutorial 1 and generated OSDZU3-REF_Accl_Platform.xsa file.
- Tutorial 2 and generated an Acceleration Ready Petalinux Software Components
Objectives
Create an Acceleration Ready Vitis Platform using Vivado Hardware Platform file (OSDZU3-REF_Accl_Platform.xsa) and Petalinux Software Components already created as part of Tutorials 1 and 2 respectively.
Tutorial Requirements
This tutorial will require the following software setup.
- Xilinx Vitis v2021.2 (Xilinx account and licenses may be required)
- When running the installer, ensure the Install Cable Drivers option is enabled.
- Ensure this Xilinx patch is applied to your Vitis installation before proceeding further with this app note: https://support.xilinx.com/s/article/76960?language=en_US
- OSDZU3-REF_Accl_Platform.xsa file from Tutorial 1
- The following Acceleration Ready Petalinux Software Components from Tutorial 2


Set Directory Structure
In this section we set a good directory structure for all the Petalinux software components to ease the process of Acceleration Ready Vitis Platform creation.
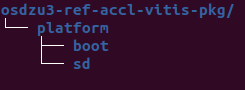
- Create a directory named “osdzu3-ref-accl-vitis-pkg”
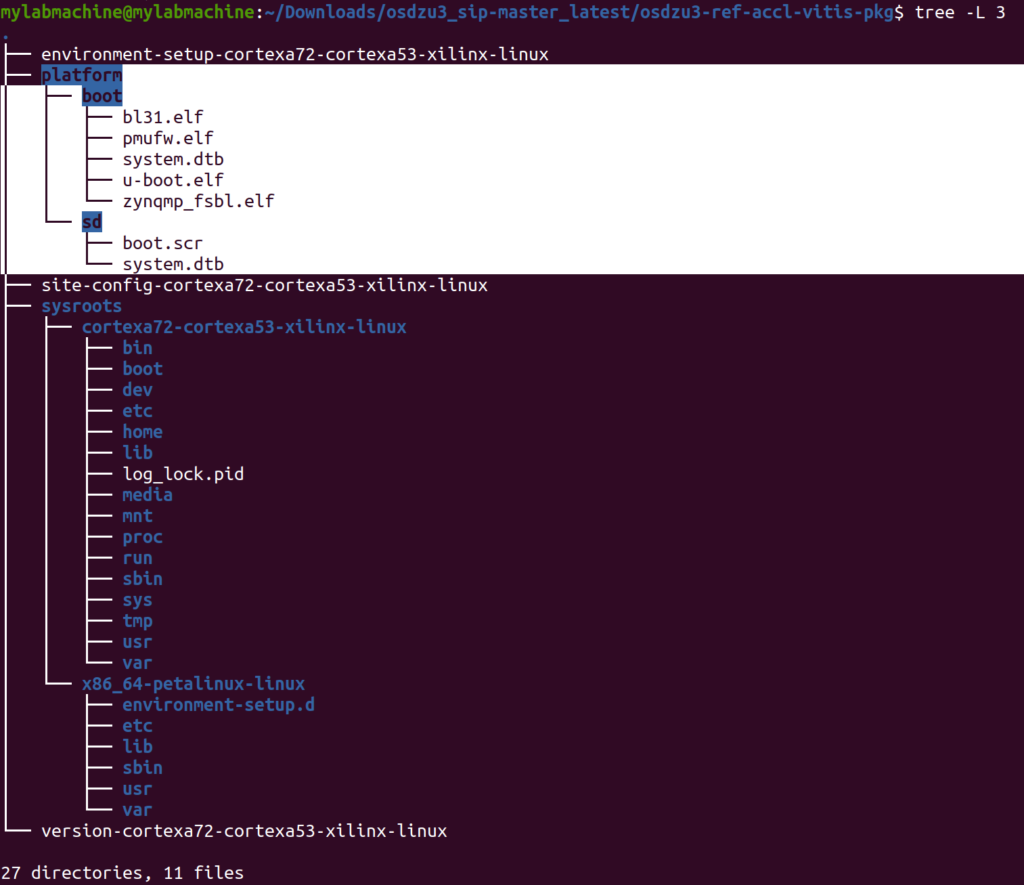
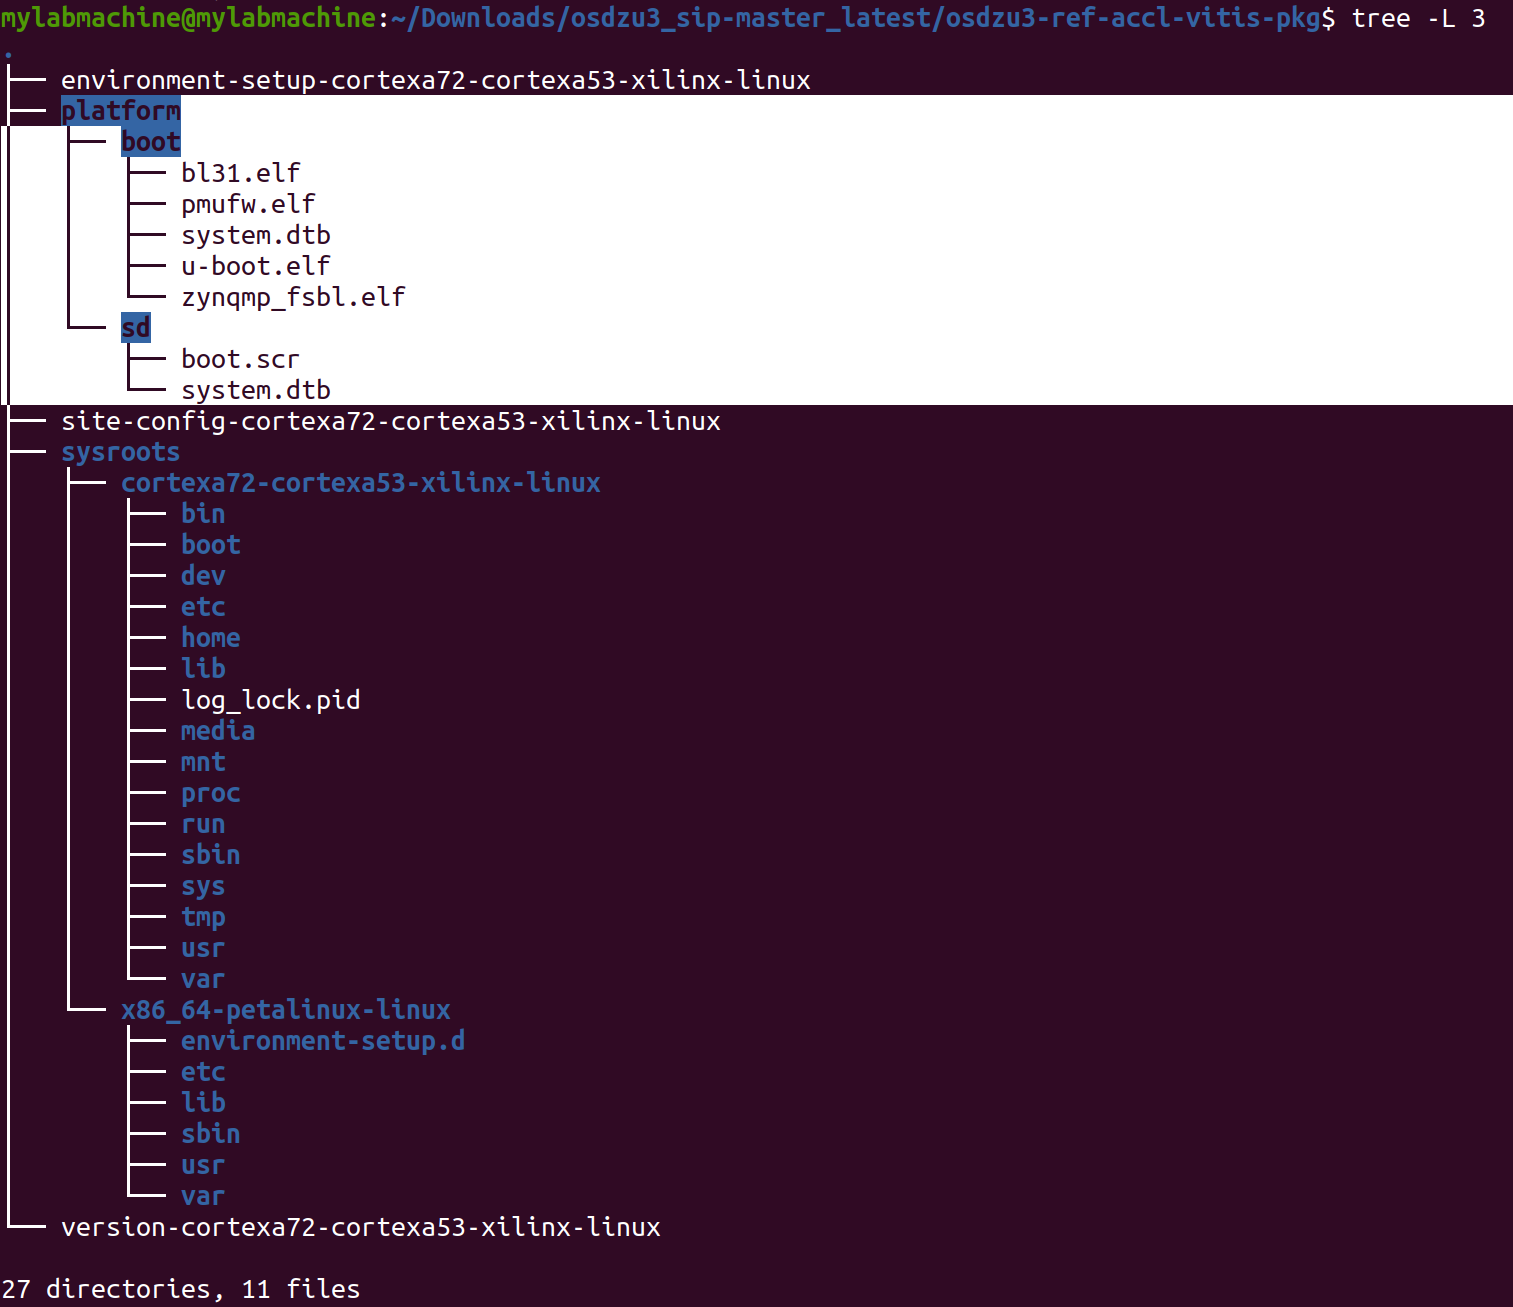
- Under osdzu3-ref-accl-vitis-pkg directory, create a directory named “platform”. Under platform directory, create 2 other directories named “sd” and “boot” as shown below.

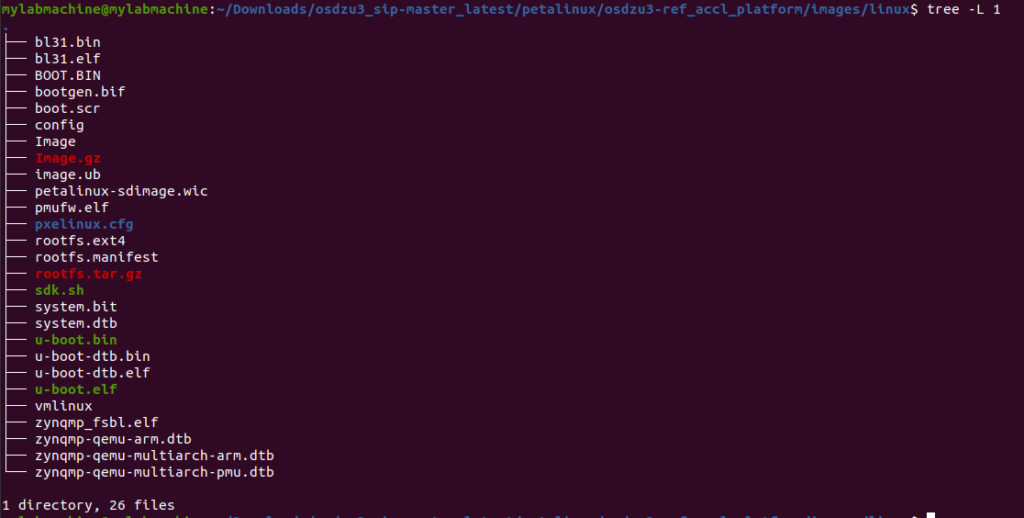
- Navigate to Petalinux software components directory from tutorial 2, and install Petalinux SDK
cd <your_petalinux-project-root>/images/linux- Launch Petalinux SDK installer and point the installation directory to osdzu3-ref-accl-vitis-pkg
./sdk.sh -d <path_to_your_ osdzu3-ref-accl-vitis-pkg_directory>
A successful SDK installation should output something similar to what is shown below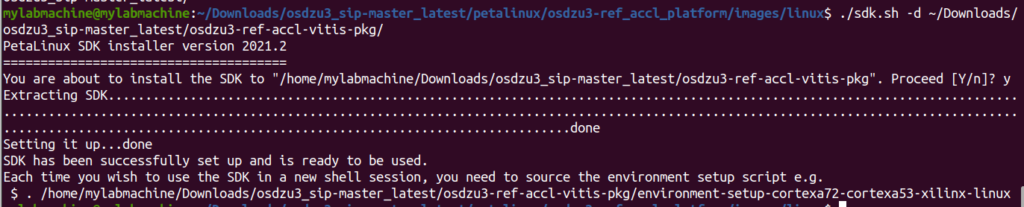

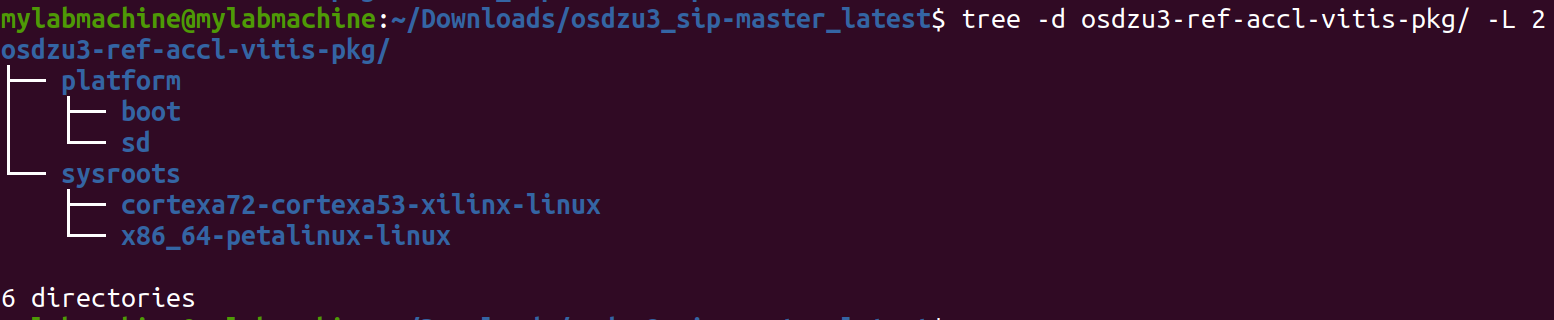
- Once petalinux SDK finishes installing, your osdzu3-ref-accl-vitis-pkg hierarchy should look as shown below.


- Copy the following boot components from <your_petalinux-project-root> /images/linux directory to the <path_to_your_ osdzu3-ref-accl-vitis-pkg_directory>/platform/boot.
- zynqmp_fsbl.elf
- pmufw.elf
- bl31.elf
- u-boot-dtb.elf
- system.dtb
- Rename u-boot-dtb.elf to u-boot.elf
- Copy the following sd components from <your_petalinux-project-root> /images/linux directory to the <path_to_your_ osdzu3-ref-accl-vitis-pkg_directory>/platform/sd
- boot.scr
- system.dtb
- At this point, the file directory structure should be as shown below:


Create Vitis Platform
- Open Vitis 2021.2
- Set osdzu3-ref-accl-vitis-pkg as your workspace directory
- Create a new platform project:
- File > New > Platform Project
- Name the project as osdzu3-ref-accl-vitis-platform
- Click Next
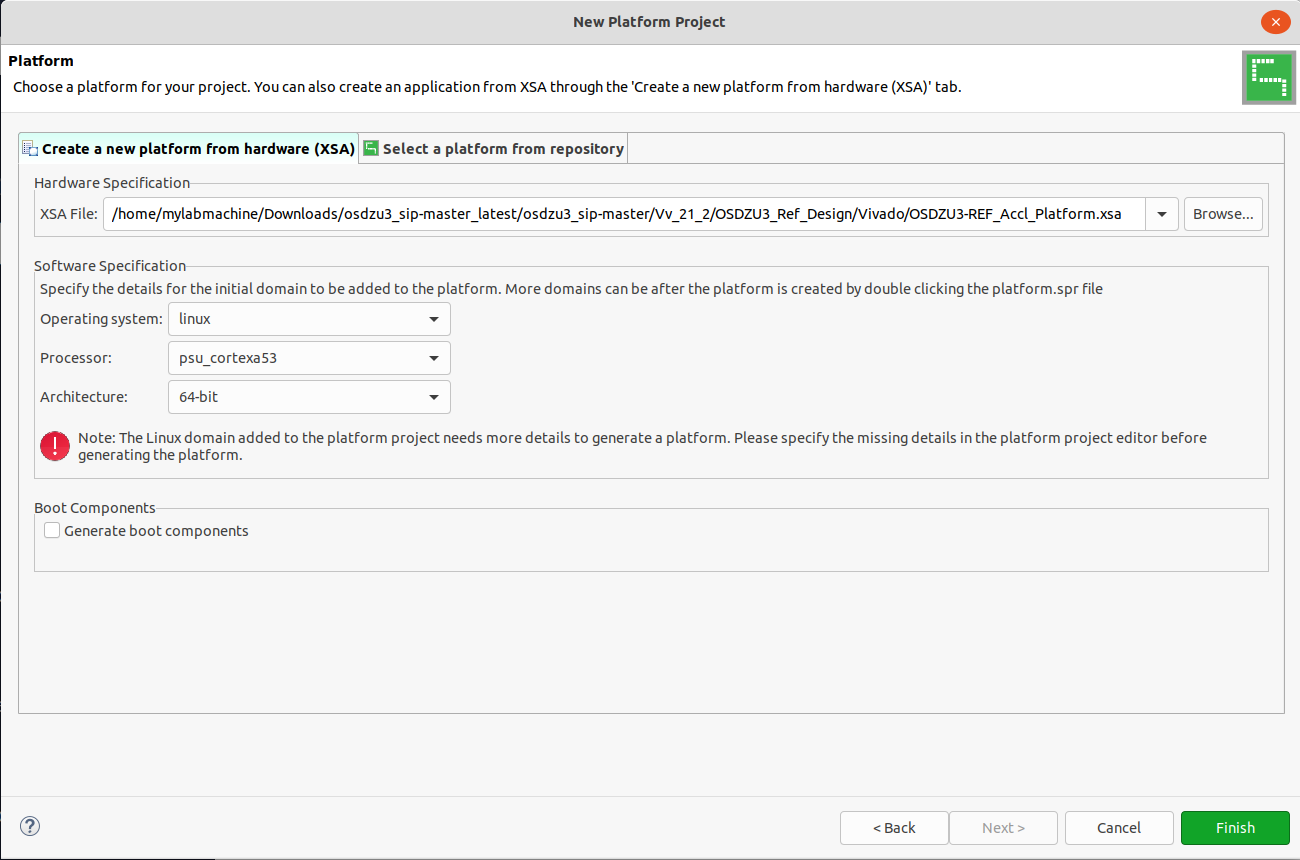
- Under platform page, browse and select your OSDZU3-REF_Accl_Platform.xsa file from Tutorial 1
- Set processor, architecture and operating system as shown in below picture
- Uncheck Generate boot components option since we have already generated boot components as part of Tutorial 2.
- Press Finish


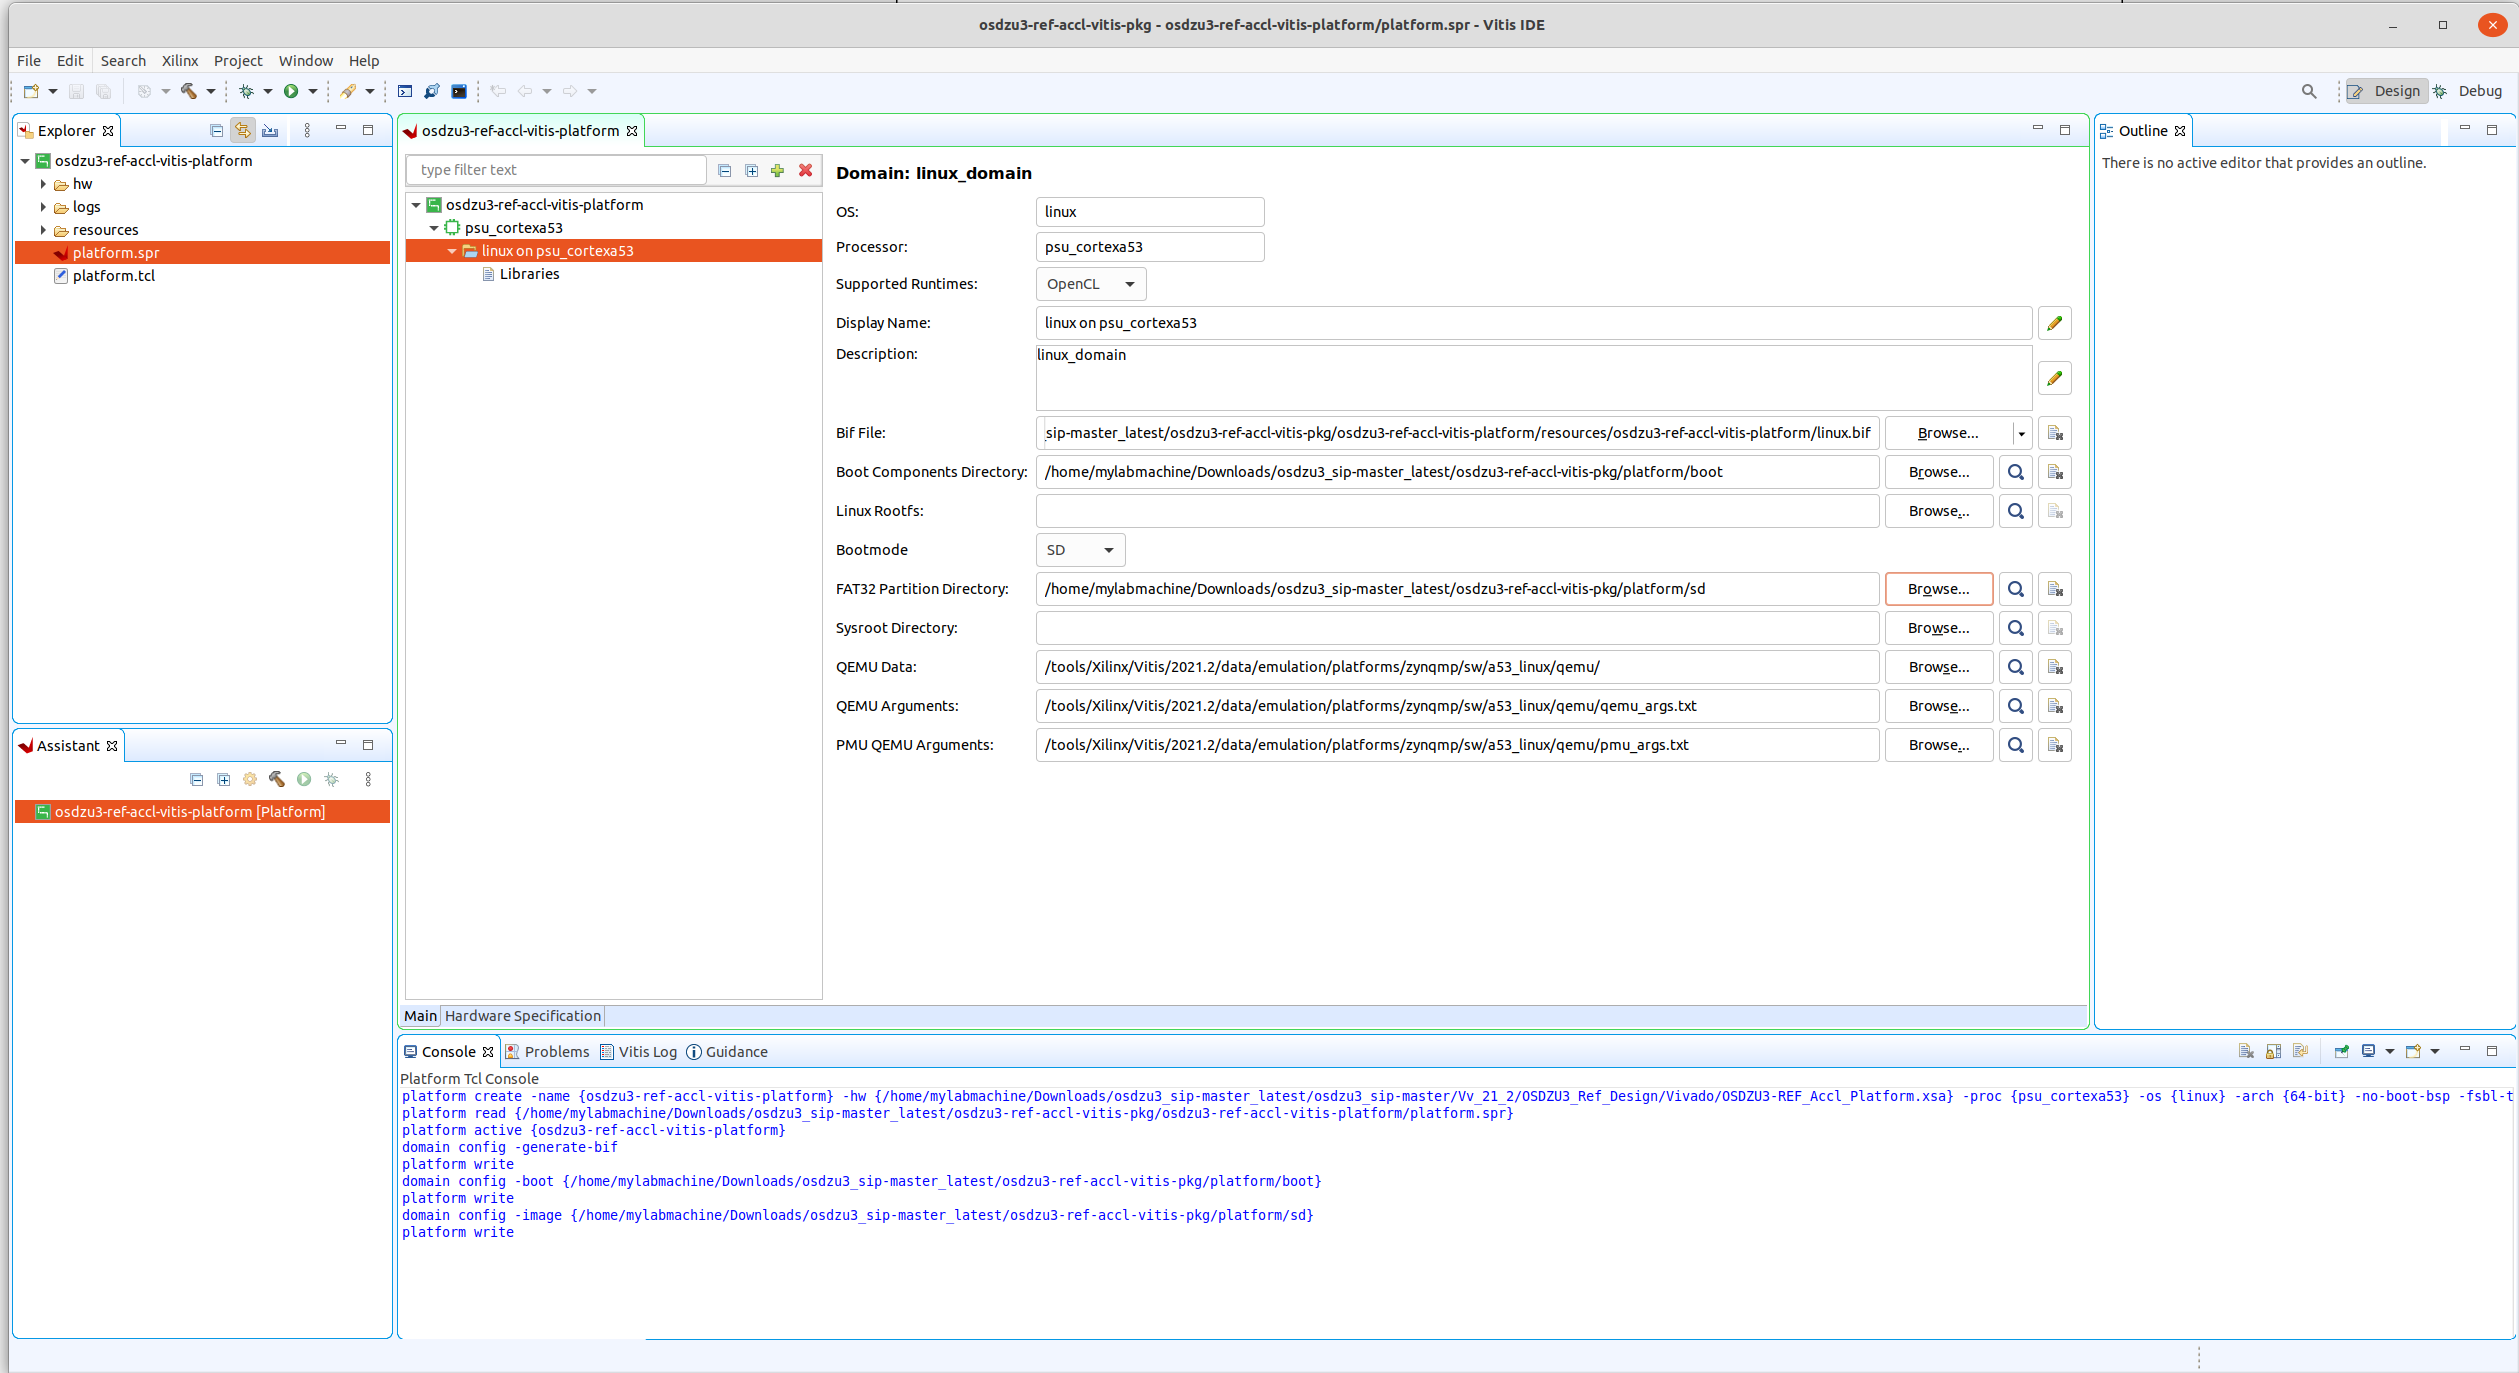
- Configure Platform Settings
- Under Vitis Explorer on the left > Double click and open platform.spr > Click on linux on psu_cortexa53
- Browse and set the appropriate directories for each of the following items:
- Bif file
- Click on the little down arrow next to Browse button > Generate Bif
- Boot components directory
- Browse and point to <path_to_your_ osdzu3-ref-accl-vitis-pkg _directory>/platform/boot
- FAT32 Partition Directory
- Browse and point to <path_to_your_ osdzu3-ref-accl-vitis-pkg _directory>/platform/sd
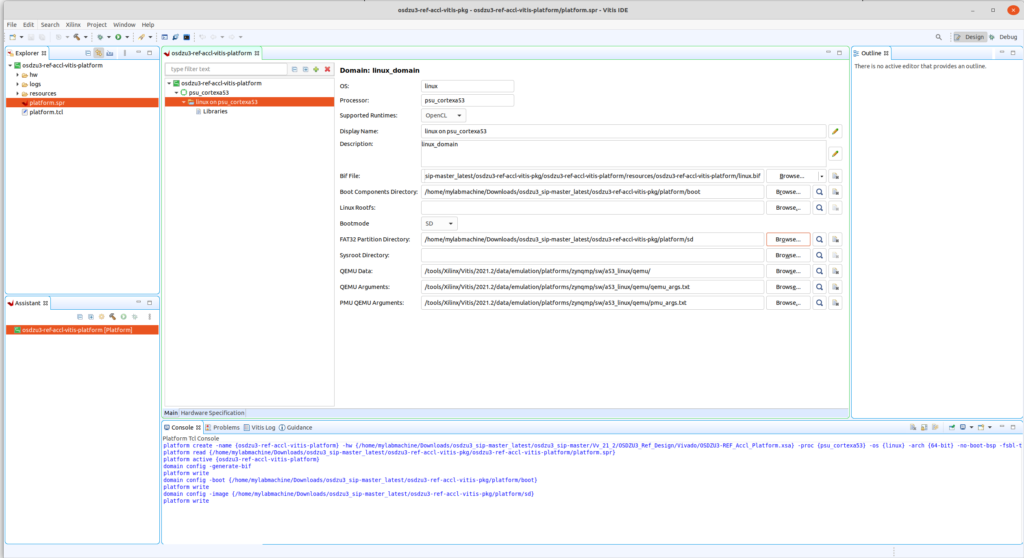

- Browse and point to <path_to_your_ osdzu3-ref-accl-vitis-pkg _directory>/platform/sd
- Bif file
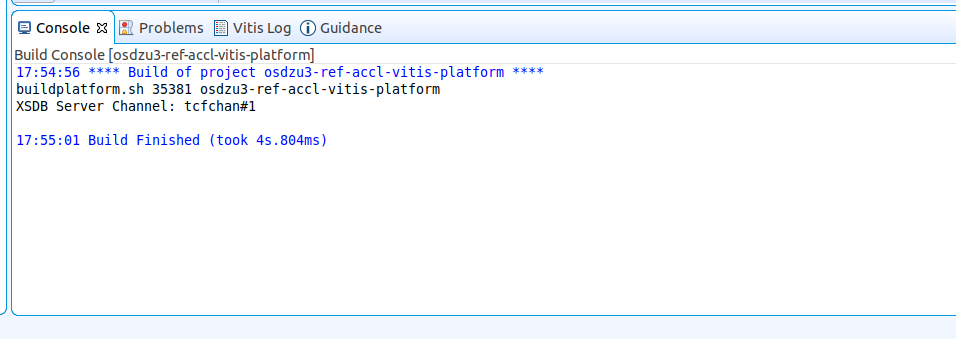
- Right click on osdzu3-ref-accl-vitis-platform under Explorer > Build Project
- You should see a message similar to the one shown below under Vitis Build Console, once the build completes:

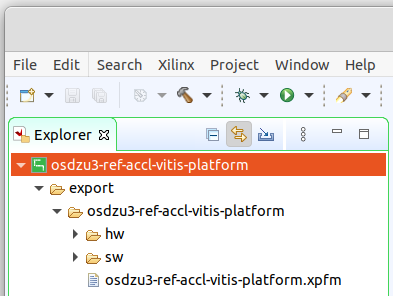
- The newly created Acceleration Ready Vitis Platform will be available under, “export” as shown below:

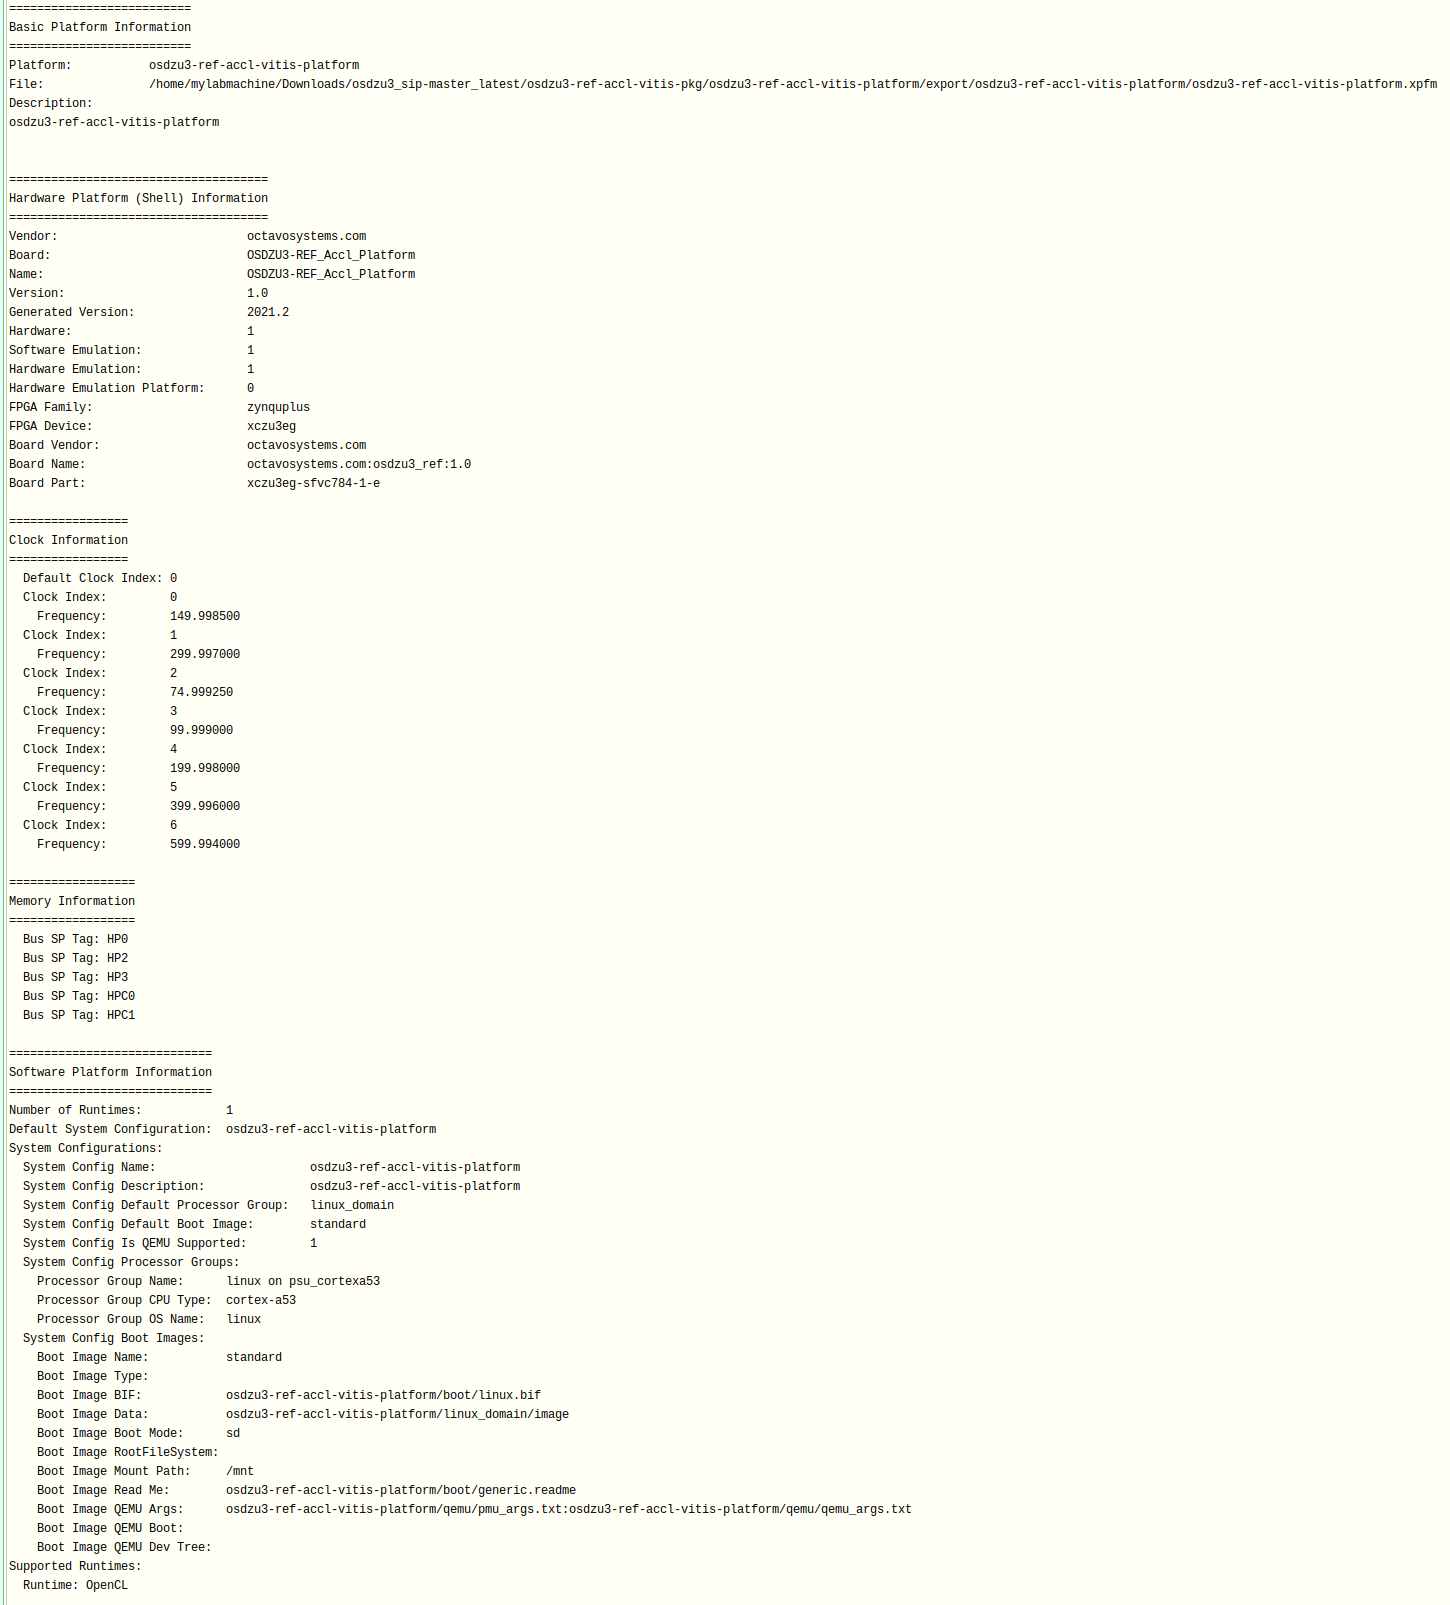
- Check the Platform Information to see if everything looks similar to what is shown below:
- Click on Xilinx > XSCT Console
- In the XSCT Console:
- platforminfo <full_path_to_your_vitis_platform_directory>/osdzu3-ref-accl-vitis-platform.xpfm
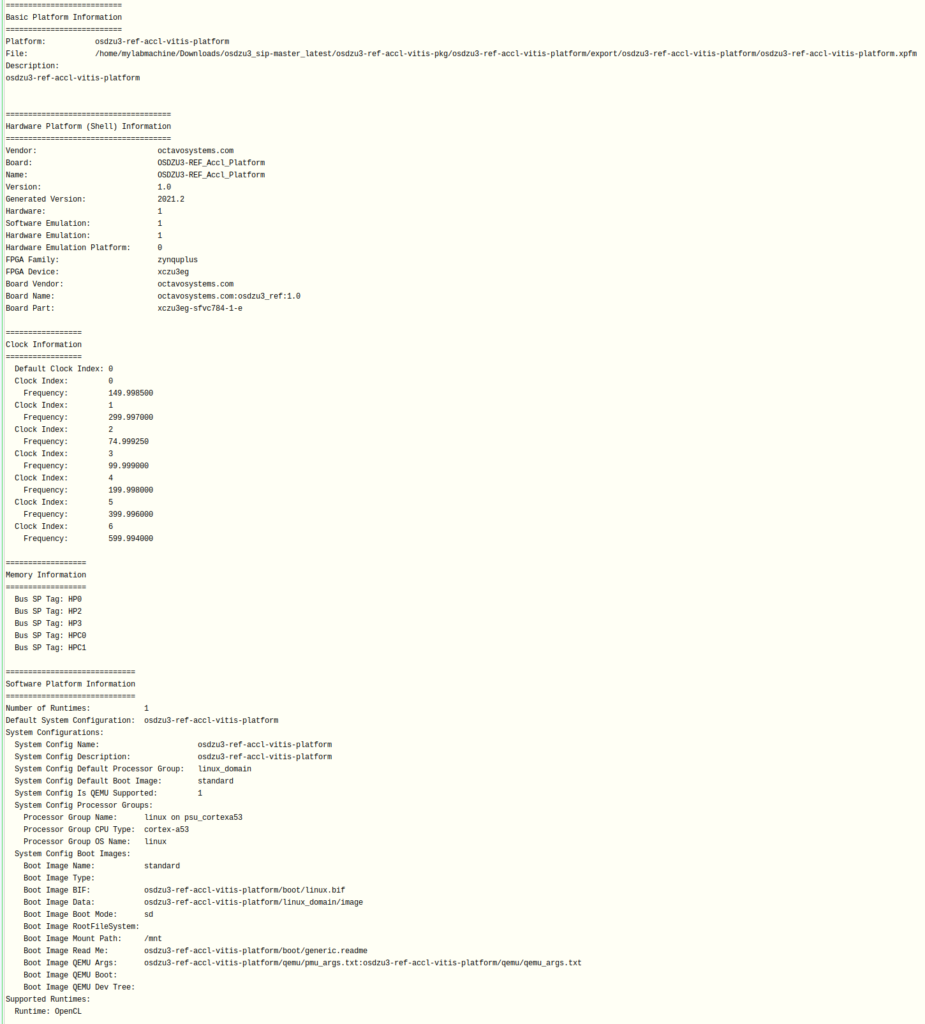

- platforminfo <full_path_to_your_vitis_platform_directory>/osdzu3-ref-accl-vitis-platform.xpfm
Further Reading
Continue the OSDZU3 Acceleration journey and run Vitis-AI DPU-TRD based Face Detection demo, ADAS Detection demo (and other AI demos) on the OSDZU3-REF board by reading Part 4 of the 4-part Acceleration Tutorial series.
Revision History
Get notified of updates to this Application Note and all of our Technical Documentation.
"*" indicates required fields
| Revision Number | Revision Date | Changes | Author |
| 1 | 11/13/2023 | Initial Revision | Eshtaartha Basu |
