OSD32MP1-BRK Getting Started
Published On: May, 8, 2020 By: Greg Sheridan | Updated: July 24, 2023 by Greg Sheridan
1 Introduction
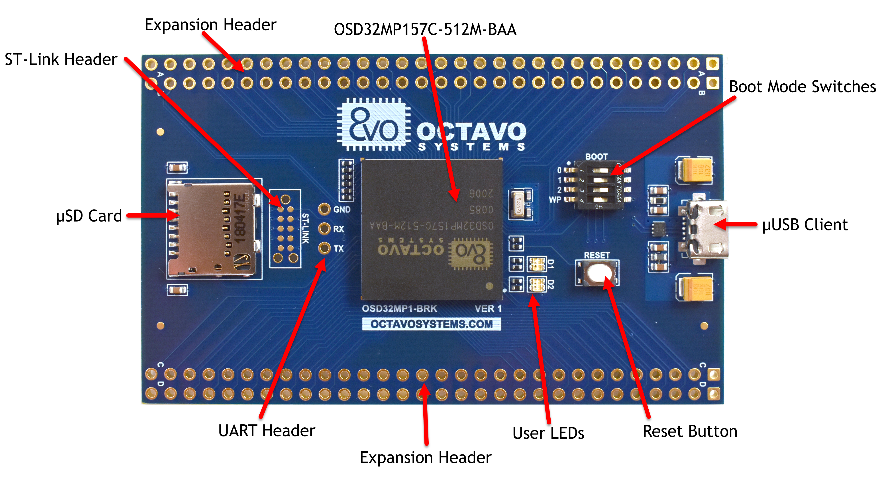
The OSD32MP1-BRK is a flexible prototyping platform for the OSD32MP15x System-in-Package, featuring the STM32MP1 microprocessor from STMicroelectronics. It gives you direct access to 107 I/O on the device allowing you ultimate flexibility in how to use the device. With direct access to so many I/O without additional overhead the OSD32MP1-BRK gives you the ability to easily prototype a system that will be very similar to your end design.
This Application note will give a brief overview of the board, its features, and how to begin using the board to prototype your applications. If you have any questions not answered in this guide, please ask us in the OSD32MP1-BRK forum.
Table of Contents
1 Introduction
2 Overview
3 Software
3.1 Pre-built Software Images
3.1.1 OpenSTLinx
3.1.2 Octavo Systems Debian
4 Pinout and Default Functions
4.1 Modifying the Default Functionality
5 Getting Started
5.1 Required Equipment
5.2 Downloading the Image and Preparing the microSD Card
5.3 Booting the OSD32MP1-BRK
5.4 Running the Demo Applications
5.4.1 Controlling LEDs
5.4.1.1 Command Line Tools
5.4.1.2 Web Interface
5.4.2 OpenSTLinux Specific Example Applications
6 Connecting the OSD32MP1-BRK to the Internet
7 Troubleshooting
8 Conclusion
9 Revision History
2 Overview

In the OSD32MP1-BRK Box you will find 2 items a Getting Started Card and the OSD32MP1-BRK in an anti-static bag.
The getting started card provides links to this page, the forum, and the product pages.
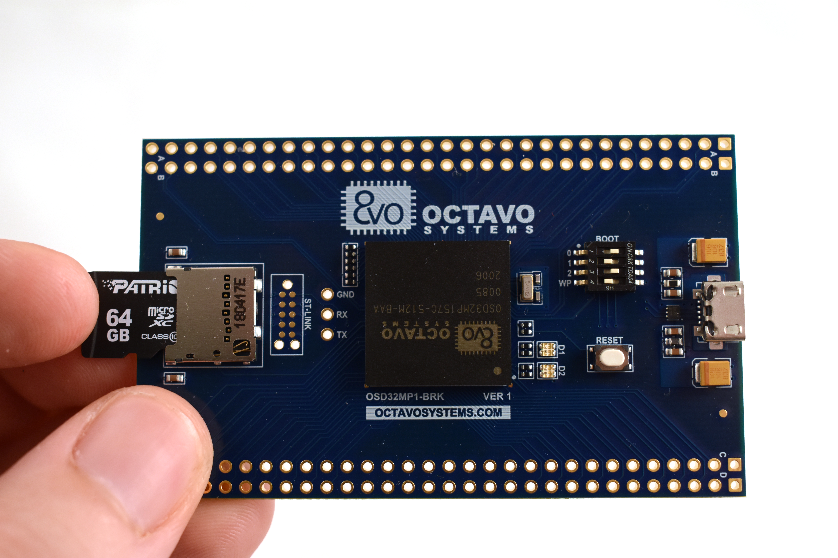
The OSD32MP1-BRK is a small Open Source prototyping platform about the size of a business card. It features:


OSD32MP1-BRK Features OSD32MP157C-512M-BAA
- µUSB
- STLink
- UART
- µSD Card
- 32KHz Crystal
- 4 Layer Design
- 3” x 1.8” (75mm x 46mm)
- Singled Sided
The Altium design files can be found here. A PDF version of the schematics can be found here.
3 Software
The OSD32MP1-BRK is completely compatible with all software for the STM32MP1 MPU. This includes OpenST Linux and the STM32Cube Ecosysem of Tools. We have a tutorial on using STM32CubeMX with the OSD32MP1.
3.1 Pre-Built Software Images
While you are free to build and run your own software images on the OSD32MP1-BRK we have provided 2 pre-built images to help speed up your development. Both images have been configured for the OSD32MP1-BRK and set the default functions of the headers. By default these images support the following features:
- 3x I2C
- 4x UART
- 3x SPI
- 2x USB
- 1x FDCAN
- 2x Analog
- 3x PWM
- 72x GPIO (3x for user LED)
Please see Pinout and Default Functions section for the default configuration of the headers.
3.1.1 OpenSTLinux
We have provided a version of the OpenSTLinux Starter image that has been configured to run on the OSD32MP1-BRK.
This image should be used if you are planning on using OpenSTLinux and Yocto as your development platform.
You can download the latest image here:
3.1.2 Octavo Systems Debian
We have also created Debian Linux Distribution for the OSD32MP1-BRK. This image is developed and maintained by Octavo Systems to support our development boards.
Debian is one of the oldest operating systems based on the Linux Kernel. It is very user friendly and has many software packages available to download through different software repositories.
The Octavo Systems’ Debian Image is a great place to start if you want to quickly prototype and test new functionality. You can leverage the online repositories and the package manager to load new software without needing to be familiar with YOCTO.
You can download the latest image here:
4 Pinout and Default Functions
The software images provided by Octavo Systems set the default functions of headers to something that can be utilized by a wide range of applications. The Image below outlines the pin out of the OSD32MP1-BRK along with the default functions supported by the provided software images.
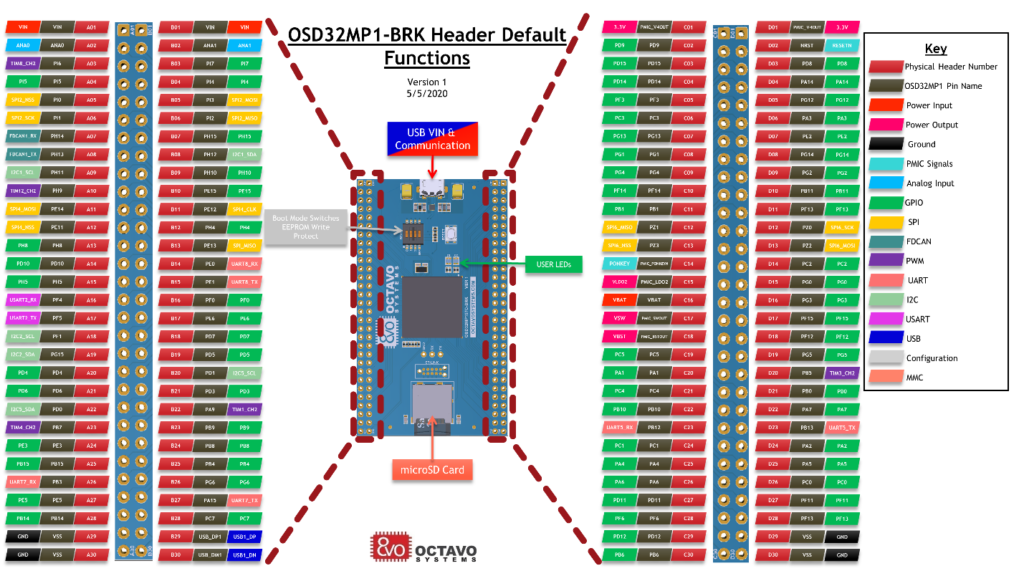
4.1 Modifying the Default Functionality
While we have chosen this set of functions you are free to modify it to fit your needs. Any function that is mapped to that specific OSD32MP1 pin can be used. You will need to modify the device tree to make that function available. Please refer to the STM32MP1 datasheet for information on the alternate functions that are supported by the specific pins.
5 Getting Started
The rest of this guide will focus on getting you started using the OSD32MP1-BRK. We will go through the following steps:
- Gathering required equipment
- Downloading the Software image and preparing the microSD card
- Booting the OSD32MP1-BRK and communication
- Running a pre-installed demo program
- Connecting the OSD32MP1-BRK to the internet.
5.1 Required Equipment
To get started using the OSD32MP1-BRK you will need:
- OSD32MP1-BRK board
- microUSB cable
- microSD Card (we recommend at least 32GB)
- A SD Card reader
- A PC with an open USB Port
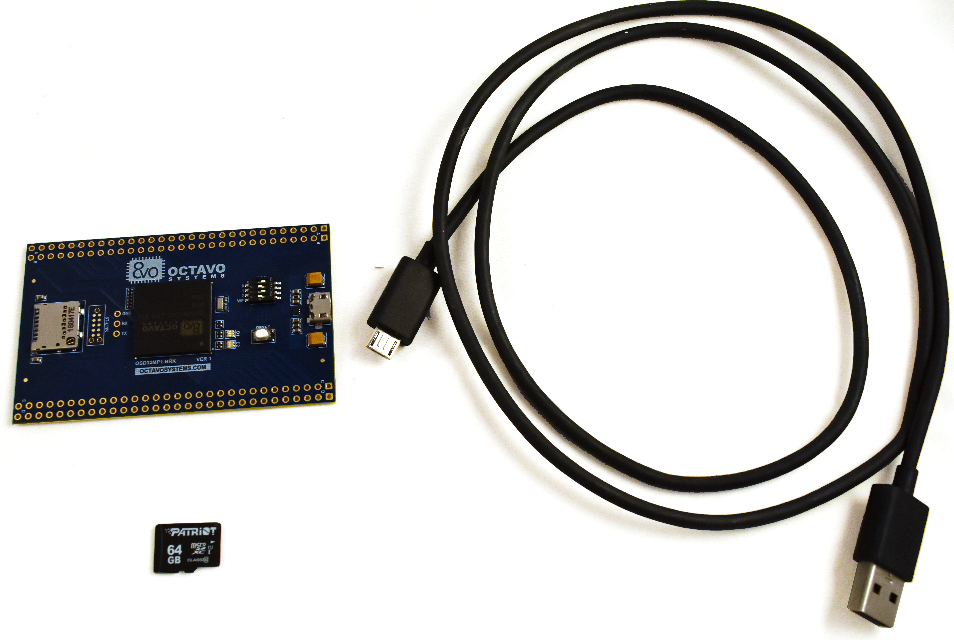

OSD32MP1-BRK Getting Started Required Equipment
5.2 Downloading the Image and Preparing the microSD Card
The first thing you will need to do is select a prepared Linux image as described Software section. We will then use Etcher to flash the image onto the microSD card.
- Download your preferred Linux image.
- Download and install Etcher.
- Insert the microSD card into the SD card reader
- Launch Etcher


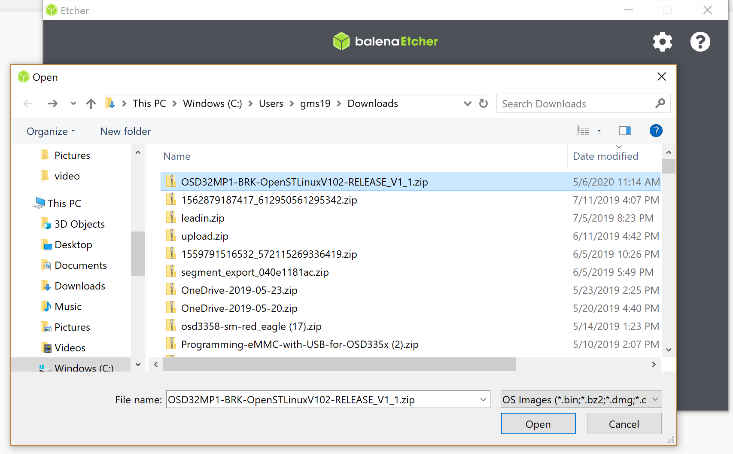
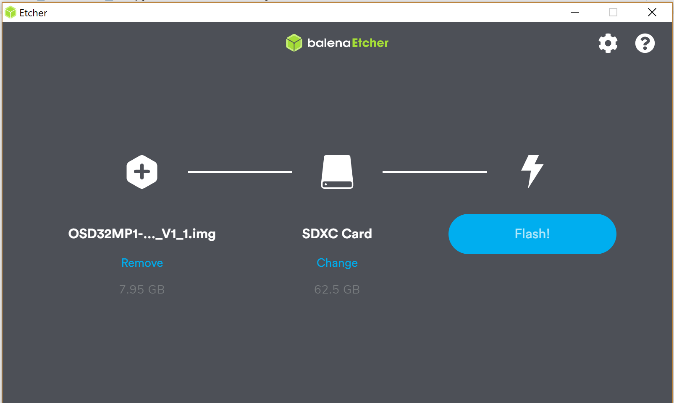
Etcher - Select the image ZiP file you downloaded earlier


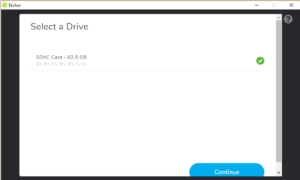
Etcher Select image - Select the SD card

Etcher Select SD Card - And Flash!
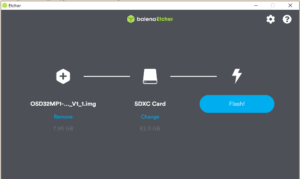

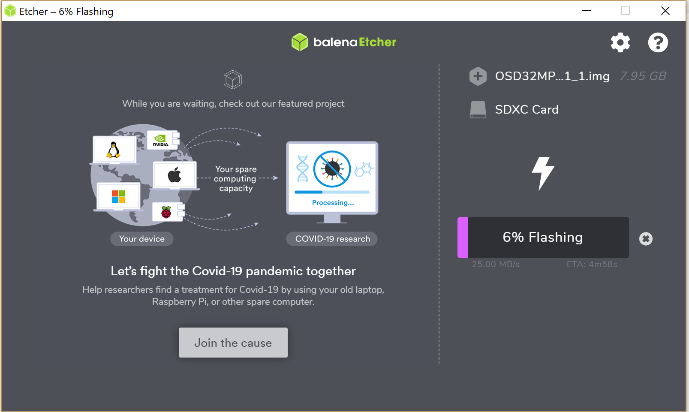
Etcher Flash 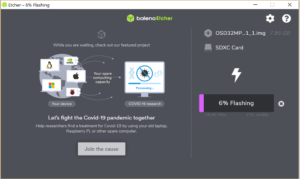
Etcher Flashing - The SD Card is now ready to use.
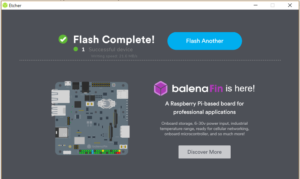
Etcher SD Card Ready


5.3 Booting the OSD32MP1-BRK
Now that we have a microSD card with a Linux image on it we are ready to boot the board and begin communicating with it. We are going to use a USB port on a PC to supply power to the board and to communicate with it.
- Insert the prepared microSD card into the microSD card cage


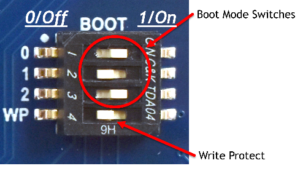
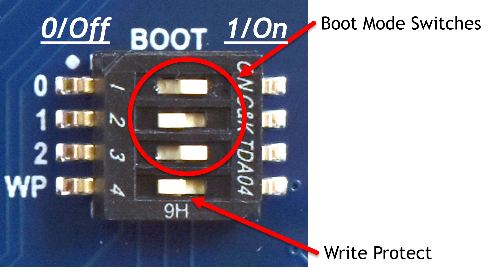
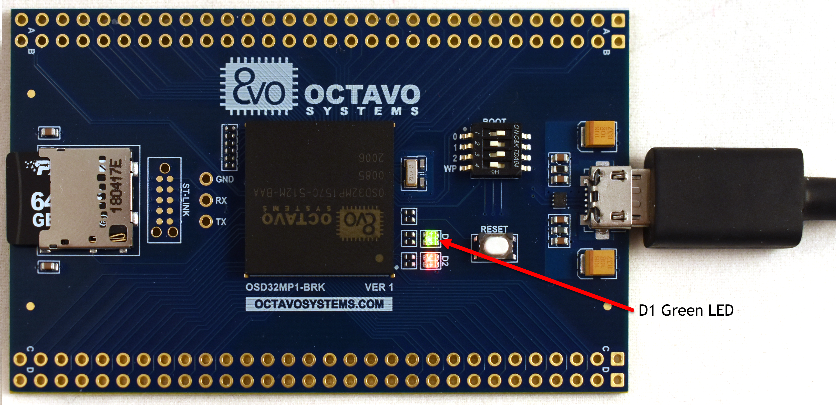
OSD32MP1-BRK microSD card - Make sure the boot mode switches are set to 101. This ensures the OSD32MP1 device boots from the SD Card.

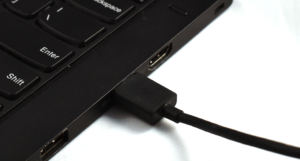
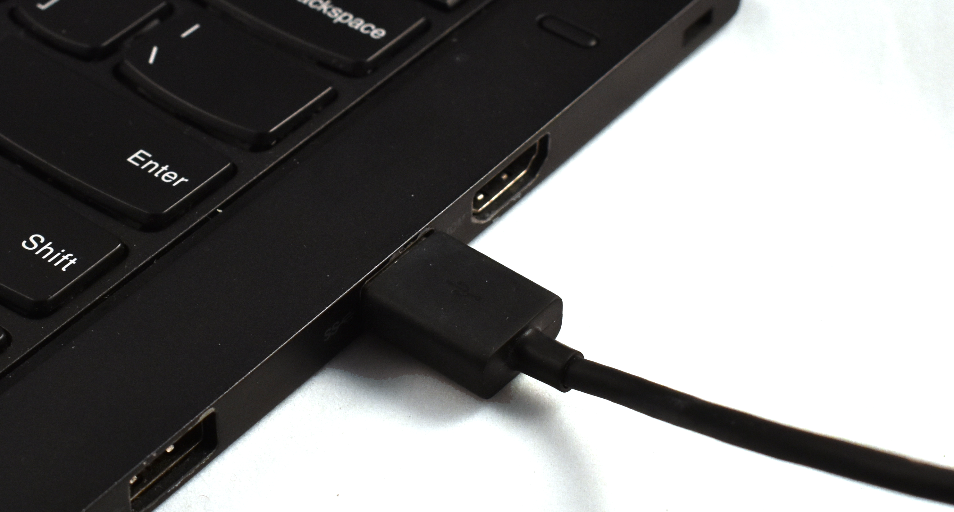
OSD32MP1-BRK Boot Mode Switches - Plug the microUSB cable into the OSD32MP1-BRK


OSD32MP1-BRK USB Connector - Plug other end of USB cable into PC

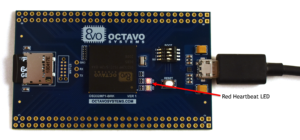
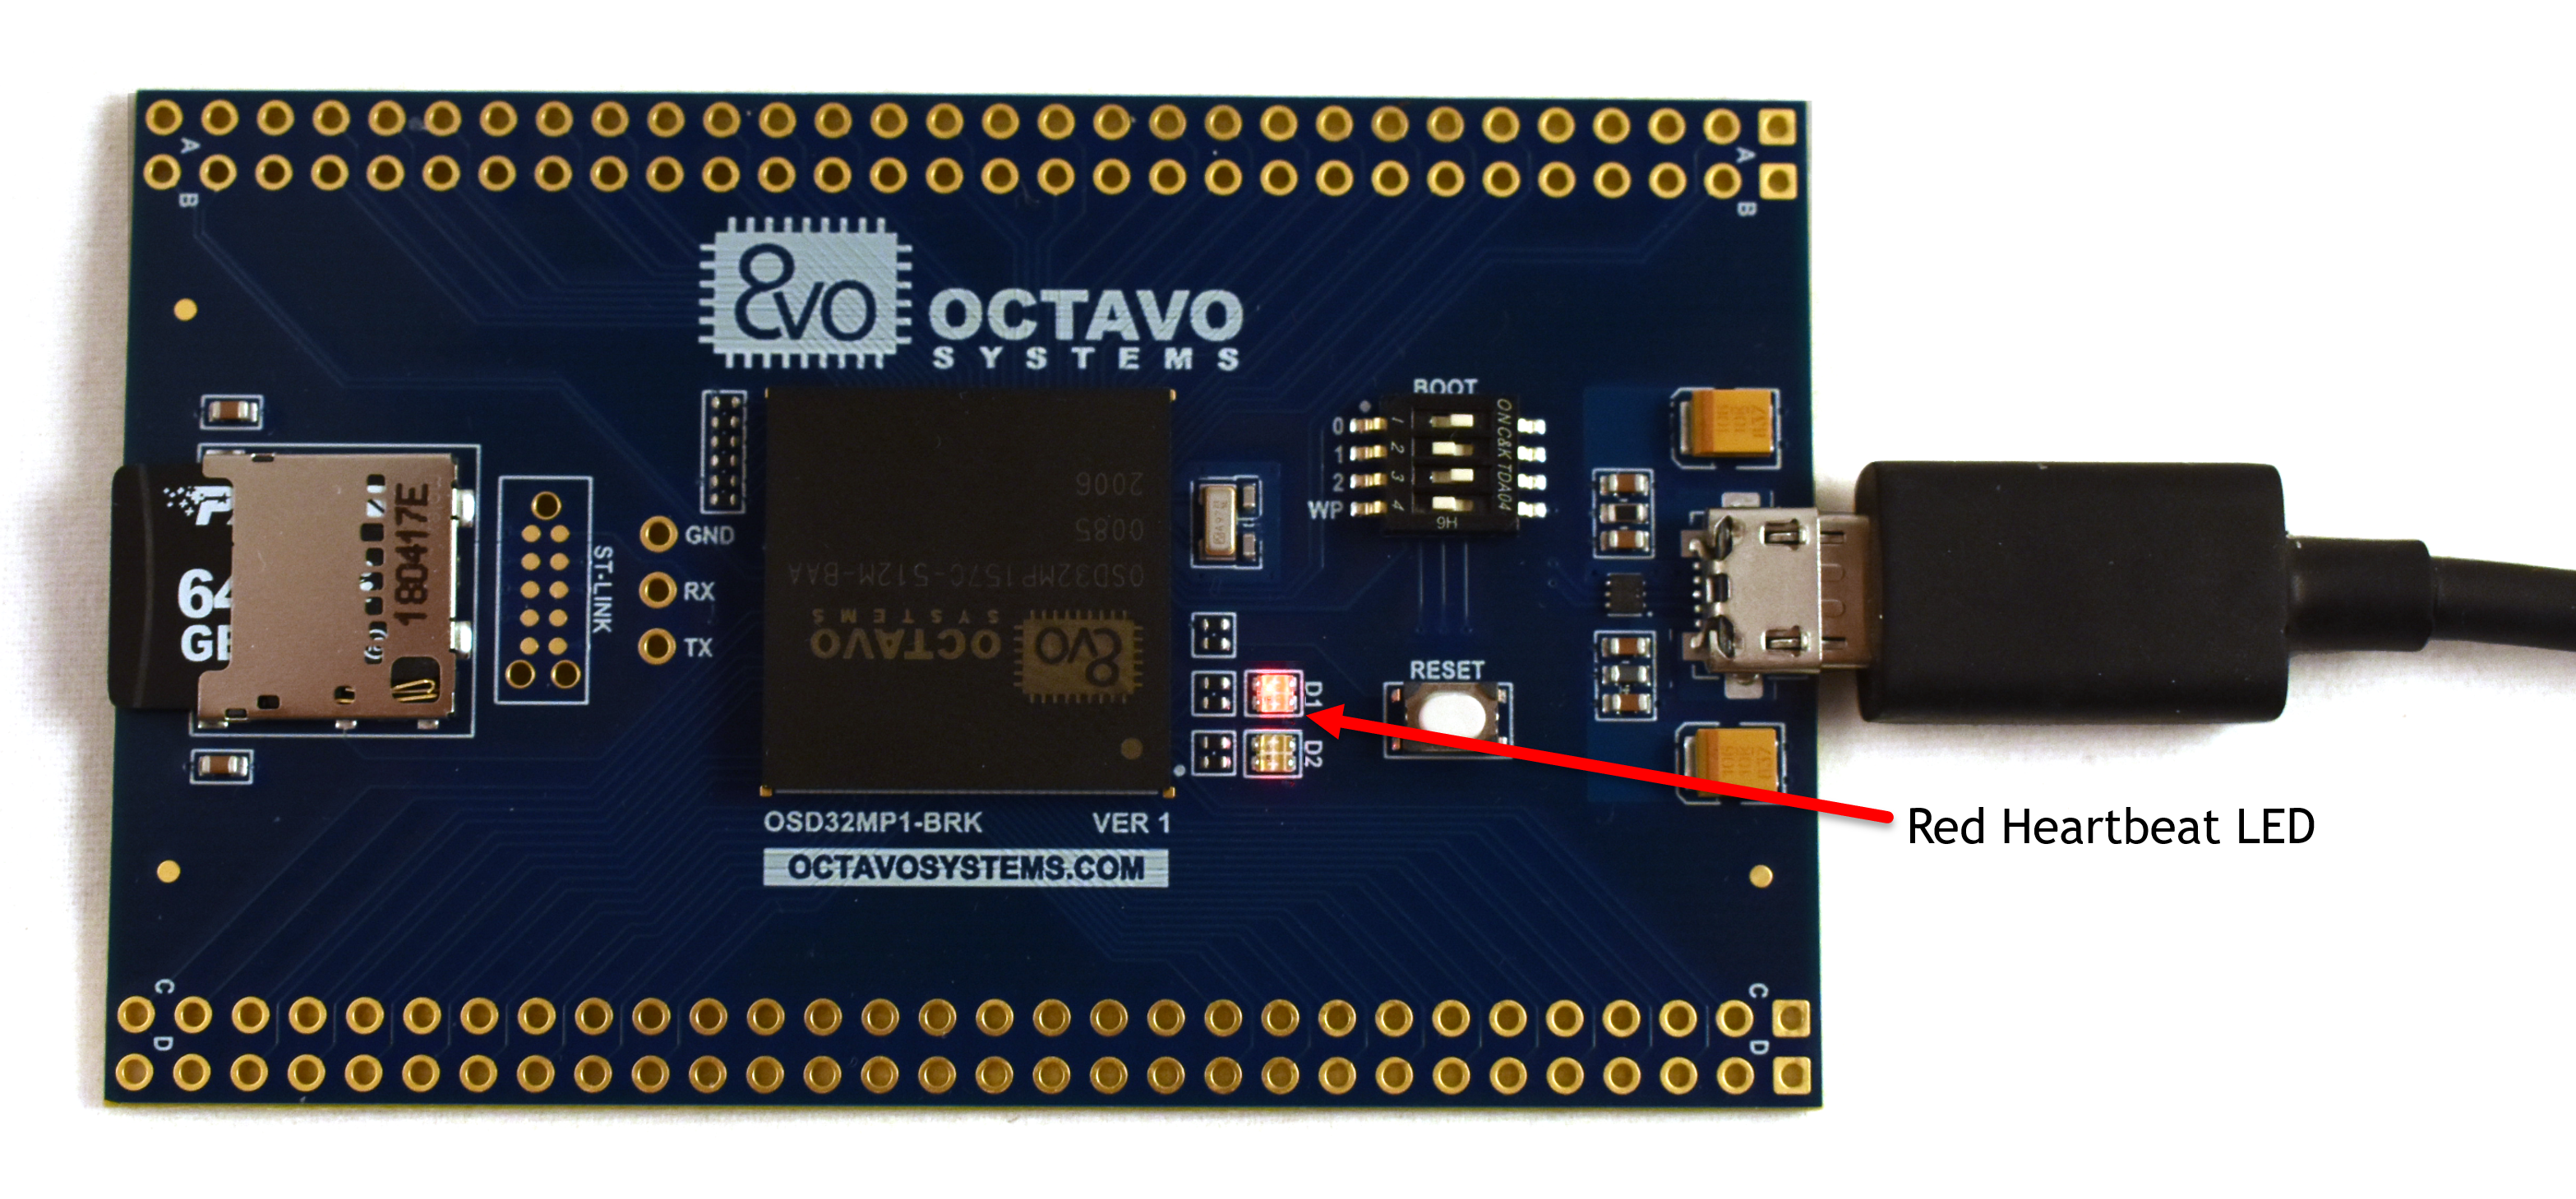
USB Connected to PC - After Few Seconds, green light comes on, red heartbeat LED starts blinking

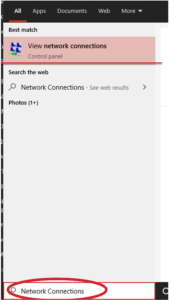
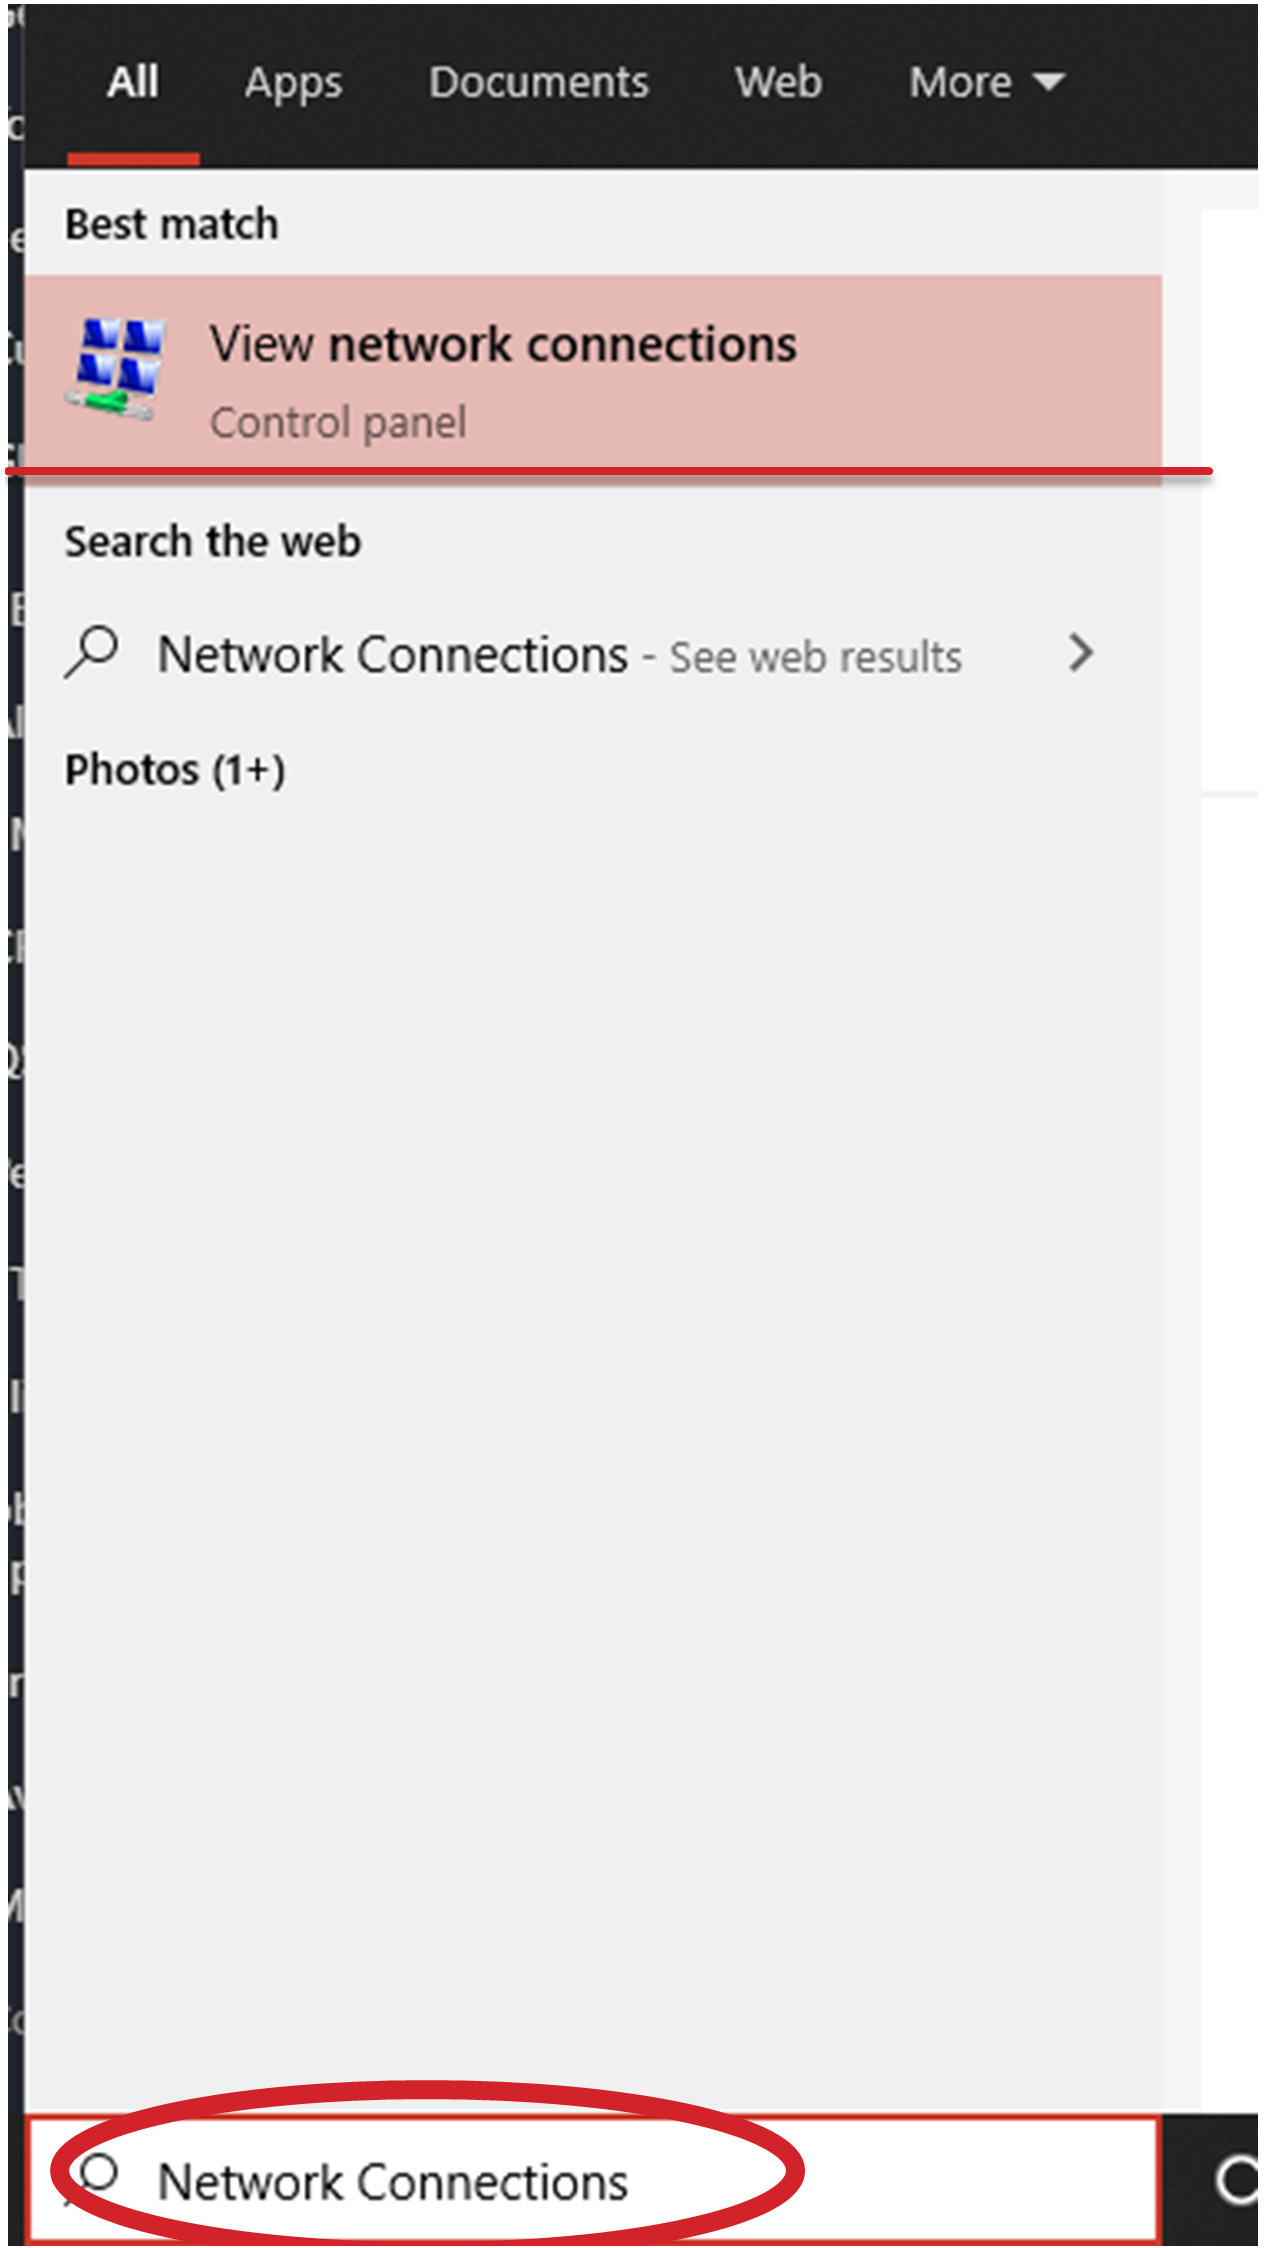
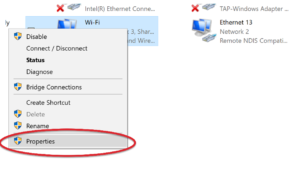
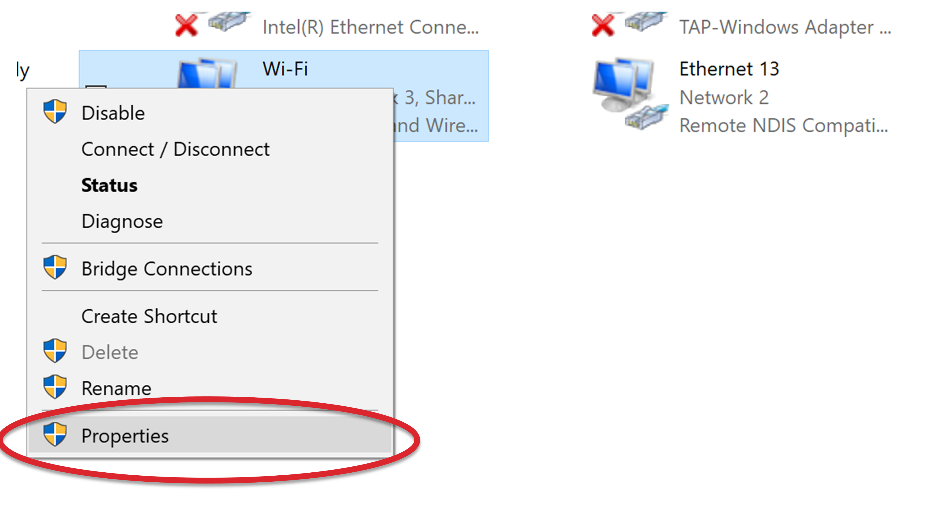
OSD32MP1-BRK Heartbeat LED - Navigate to the Network Connections on your PC. Type Network Connections into the search box and press Enter.

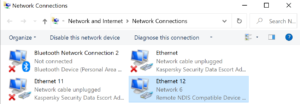
Network Connection Settings - After a few more seconds you should see a new network adapter in your settings called Remote NDIS Compatible Device. This is the USB network connection to the OSD32MP1-BRK. (See Troubleshooting section if don’t see new RNDIS device under Network Connections)
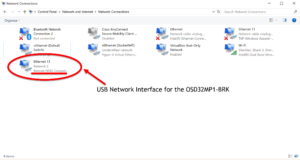

OSD32MP1-BRK RNDIS Interface  Note: The OSD32MP1-BRK will not show up as a mass storage device in windows explorer by default. You have to go to the Network Connection Settings to ensure the OSD32MP1-BRK is connected
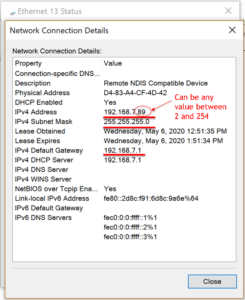
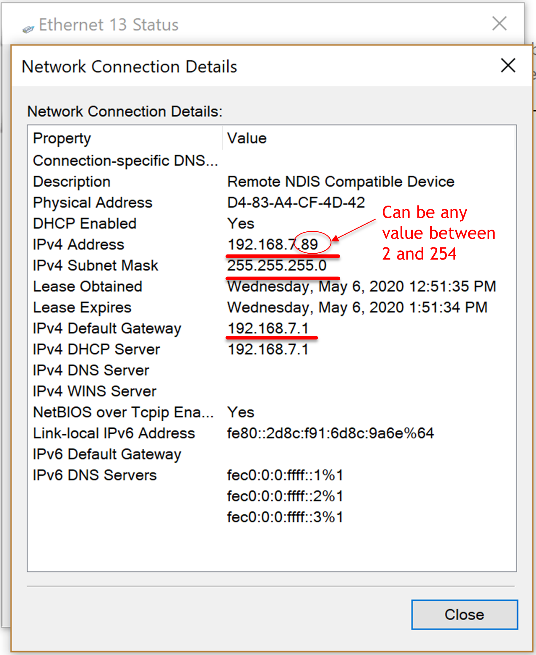
 - Before we can connect to the OSD32MP1-BRK we need to ensure the new RNDIS network connection is set up correctly. Open the connection details and ensure that the following properties are set correctly. If not please set them manually ( Following the Ethernet, IPV4 instructions found here.):
IPv4 Address: 192.168.7.XX (XX can be any number between 2 and 254)
IPv4 Subnet mask: 255.255.255.0
IPv4 Default Gateway: 192.168.7.1

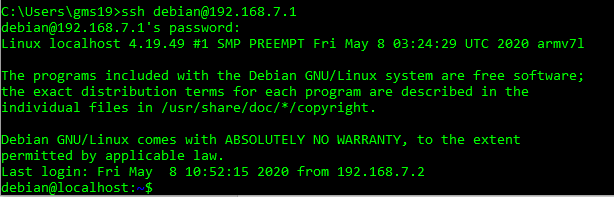
PC Network Settings - Now using the program of your choice, you can SSH into the OSD32MP1-BRK using the instruction below depending on the image you chose.
OpenSTLinux
ssh root@192.168.7.1


Username: root
Password: <none>
Octavo Systems Debian
ssh debian@192.168.7.1


Username: debian
Password: tmppwd - You have now successfully connected to the board and are ready to start running applications!
- Insert the prepared microSD card into the microSD card cage


5.4 Running the Demo Applications
Now that you have connected to the board you are able to run programs that are already installed on the particular image you chose. This section will show you how to run some initial programs on the OSD32MP1-BRK.
5.4.1 Controlling LEDs
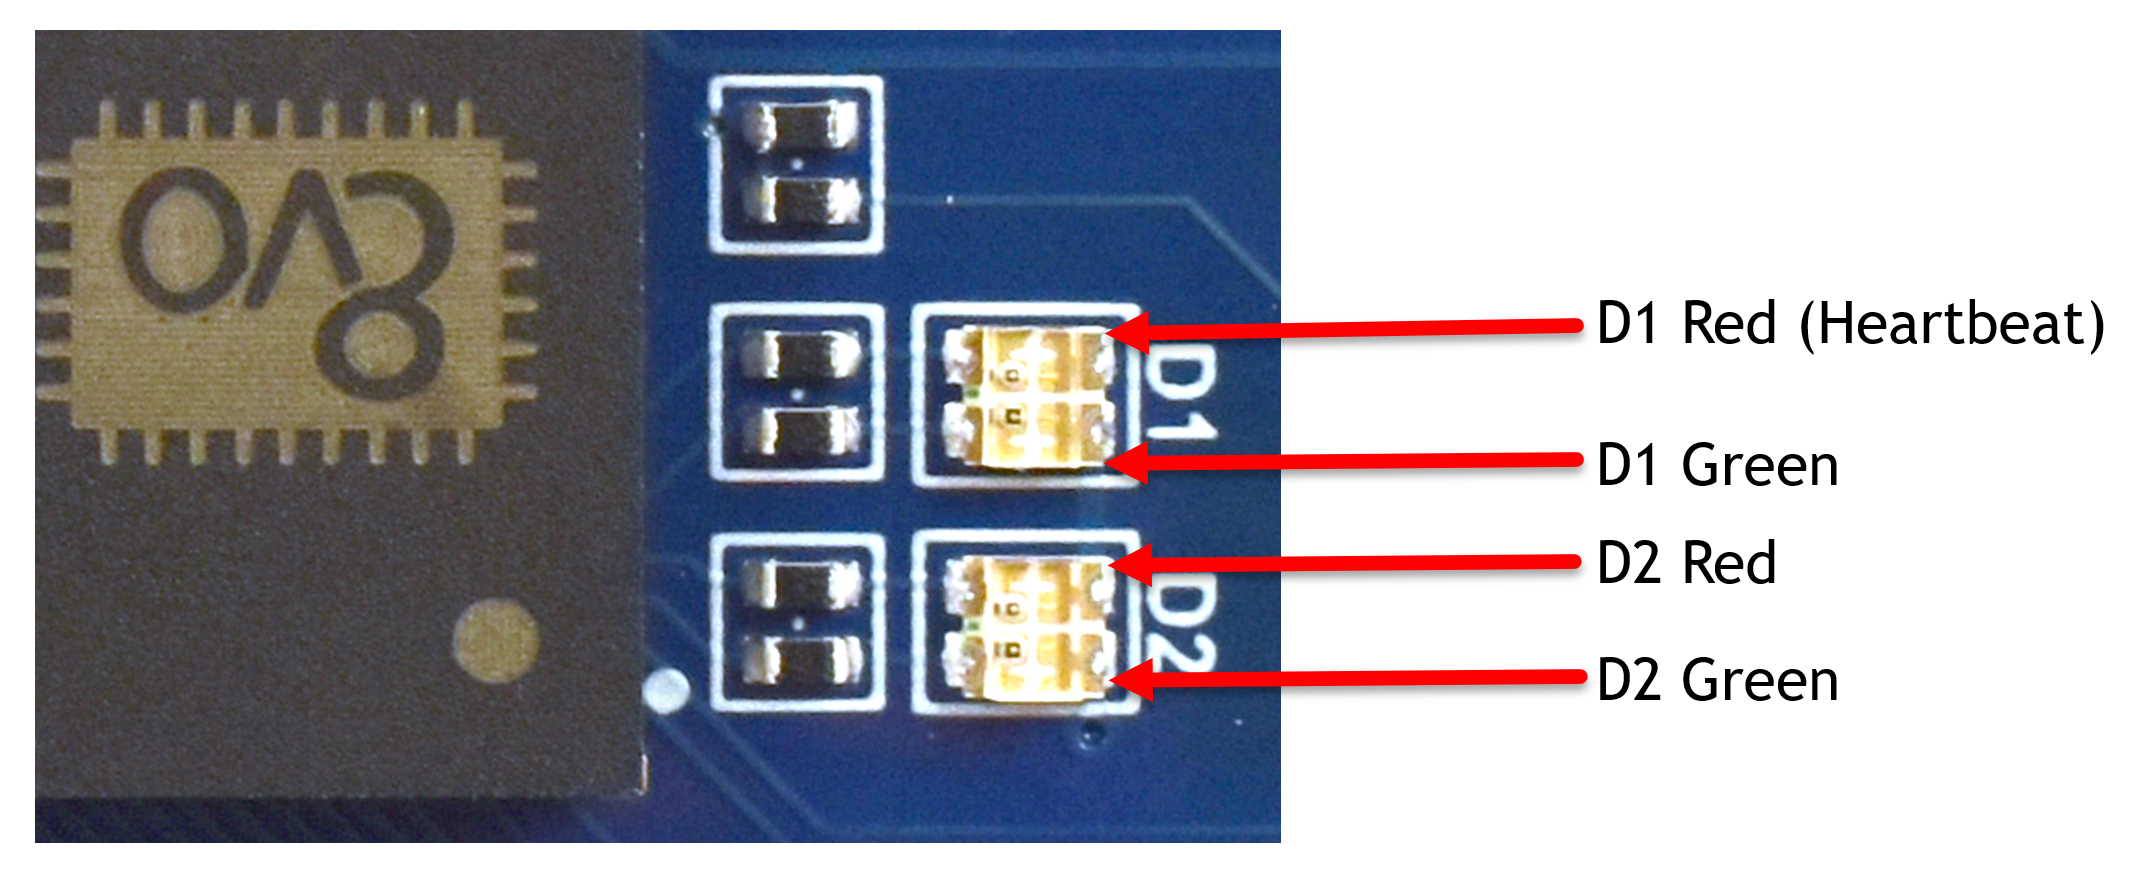
There are 4 LEDs on the OSD32MP1-BRK, one is used as the Heartbeat but the other 3 are available for the user. Both Linux Images provide command line tools and a web interface to manipulate the LEDs.
5.4.1.1 Command Line Tools
The LEDs are controlled by setting the brightness value in the /sys/class/leds file structure. Each LED has its own directory outlined below:
| LED # | LED Color | /sys/class/leds Directory |
| D1 | Green | LED1_GRN |
| D1 | Red | LED1_RED |
| D2 | Green | LED2_GRN |
Since we are setting the brightness of the LED a value of 255 turns it on and a value of 0 turns it off.
The following command turns on the D1 Green LED:
OpenSTLinux
echo 255 > /sys/class/leds/LED1_GRN/brightness
Octavo Systems Debian
sudo echo 255 > /sys/class/leds/LED1_GRN/brightness
Note: You need to use sudo when writing to the /sys/class/leds directories since Debian does not log in as root by default. If permission is still denied, use sudo su command to switch to root user and write to /sys/class/leds.
The LED should now be on.
To turn the LED off run this command:
OpenSTLinux
echo 0 > /sys/class/leds/LED1_GRN/brightness
Octavo Systems Debian
sudo echo 0 > /sys/class/leds/LED1_GRN/brightness
Note: You need to use sudo when writing to the /sys/class/leds directories since Debian does not log in as root by default. If permission is still denied, use sudo su command to switch to root user and write to /sys/class/leds.
Try to turn on and off the other LEDs yourself!
5.4.1.2 Web Interface
Because we are running Linux on the OSD32MP1-BRK we also have access to high level programming languages and powerful tools. To help demonstrate this we have included a simple Webserver written in Python that will control the LEDs. Once you start the server you will be able to use a browser on your host PC to load the webpage and control the LEDs.
- Change to the demo directory located at /usr/local/demo/LEDWebDemo
cd /usr/local/demo/LEDWebDemo


Demo Directory - Start the Server
OpenSTLinux
python3 LEDWebServer.py


OpenSTLinux Start Webserver Octavo Systems Debian
sudo python3 LEDWebServer.py


Octavo Systems Debian Start Web Server Note: You need to use sudo to use the gpioset tool since Debian does not log in as root by default
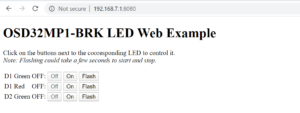
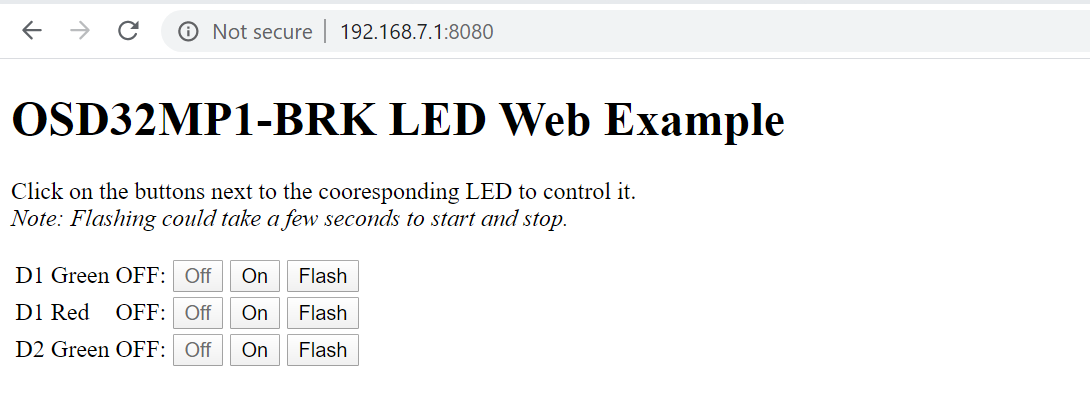
- On your host PC open a web browser and navigate to 192.168.7.1:8080. You should now see a simple web page with buttons that allows you to control the LEDs.

OSD32MP1-BRK LED Web Page - Click on the buttons and see what happens!


5.4.2 OpenSTLinux Specific Example Applications
ST provides extensive documentation on their OpenSTLinux distribution. See the Executing Basic Commands section of the ST Wiki for some basic information to test out the image.
Note that some of the commands mentioned in the ST Documentation is specific to the STM32MP1 Discovery Kit 2. The output of the commands may differ (For Example the GPU is disabled by default on the OSD32MP1-BRK)
6 Connecting the OSD32MP1-BRK to the Internet
Now that we have connected to the OSD32MP1-BRK through ethernet over USB we can connect the OSD32MP1-BRK to the internet via the same interface. This will require us to share our internet connection on the PC with the OSD32MP1-BRK.
- On your PC open the properties of your main network connection that is providing the PC with internet access.

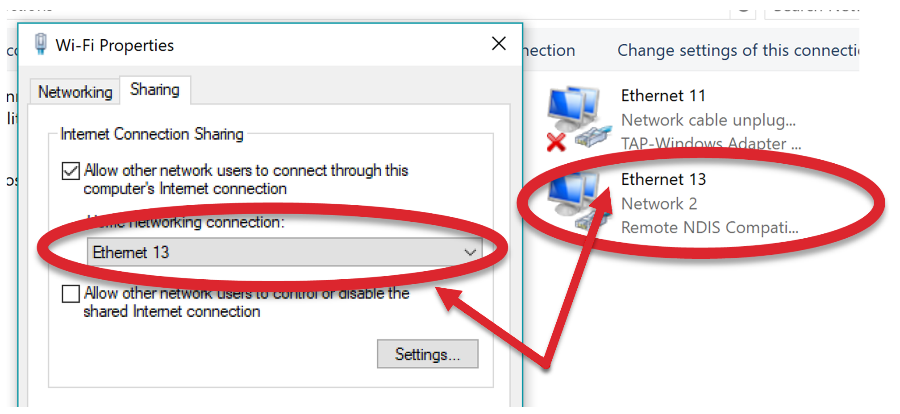
PC Network Properties - Navigate to the sharing tab and make sure Allow other network users to connect through this computer’s Internet connection option is selected.
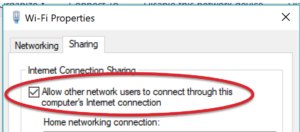

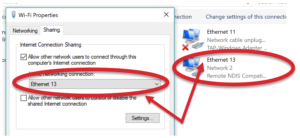
PC Network Sharing - If required select the RNDIS network adopter as the network connection to share with.

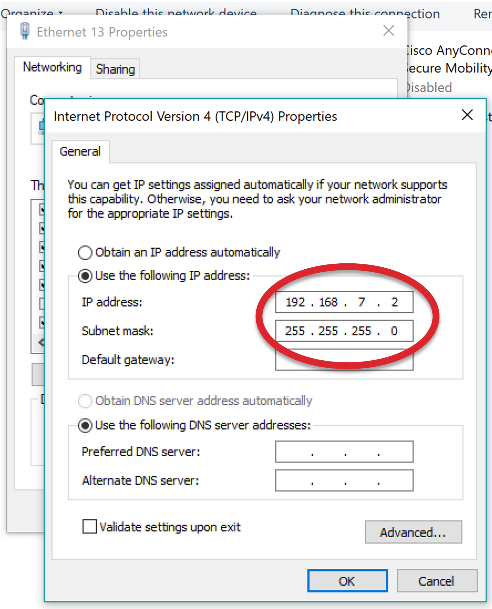
PC Share network with RNDIS - Enabling sharing will more than likely change the IP address on your RNDIS network adapter. You need to go back and change it to be on the same network as the OSD32MP1-BRK. You will need to ensure the following are set appropriately:
IPv4 Address: 192.168.7.XX (XX can be any number between 2 and 254)
IPv4 Subnet mask: 255.255.255.0
IPV4 Default Gateway: Leave Blank
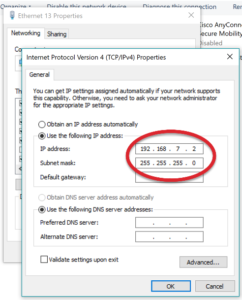

RNDIS Network Configuration - Connect back to the OSD32MP1-BRK board using the same instructions as listed in Step 8 of Booting the OSD32MP1-BRK section.
- Set the default gateway of the OSD32MP1-BRK using the following command:
OpenSTLinux
route add default gw 192.168.7.XX(where XX is the same number you used in step 4)

OpenSTLinux Set Default Gateway Octavo Systems Debian
sudo route add default gw 192.168.7.XX(where XX is the same number you used in step 4)

Octavo Systems Debian Set Default Gateway - Try to ping google.com
OpenSTLinux
ping google.com


OpenSTLinux Ping Google.com Octavo Systems Debian
sudo ping google.com


Octavo Systems Debian Ping Google.com - If you received a response, then you are connected to the internet and you are free to download additional files to the board.


7 Troubleshooting
This section will provide solutions to potential minor roadblocks might come across while getting started with OSD32MP1-BRK.
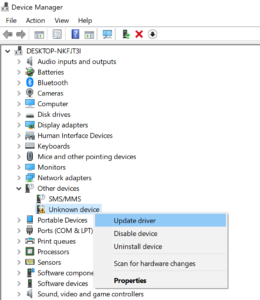
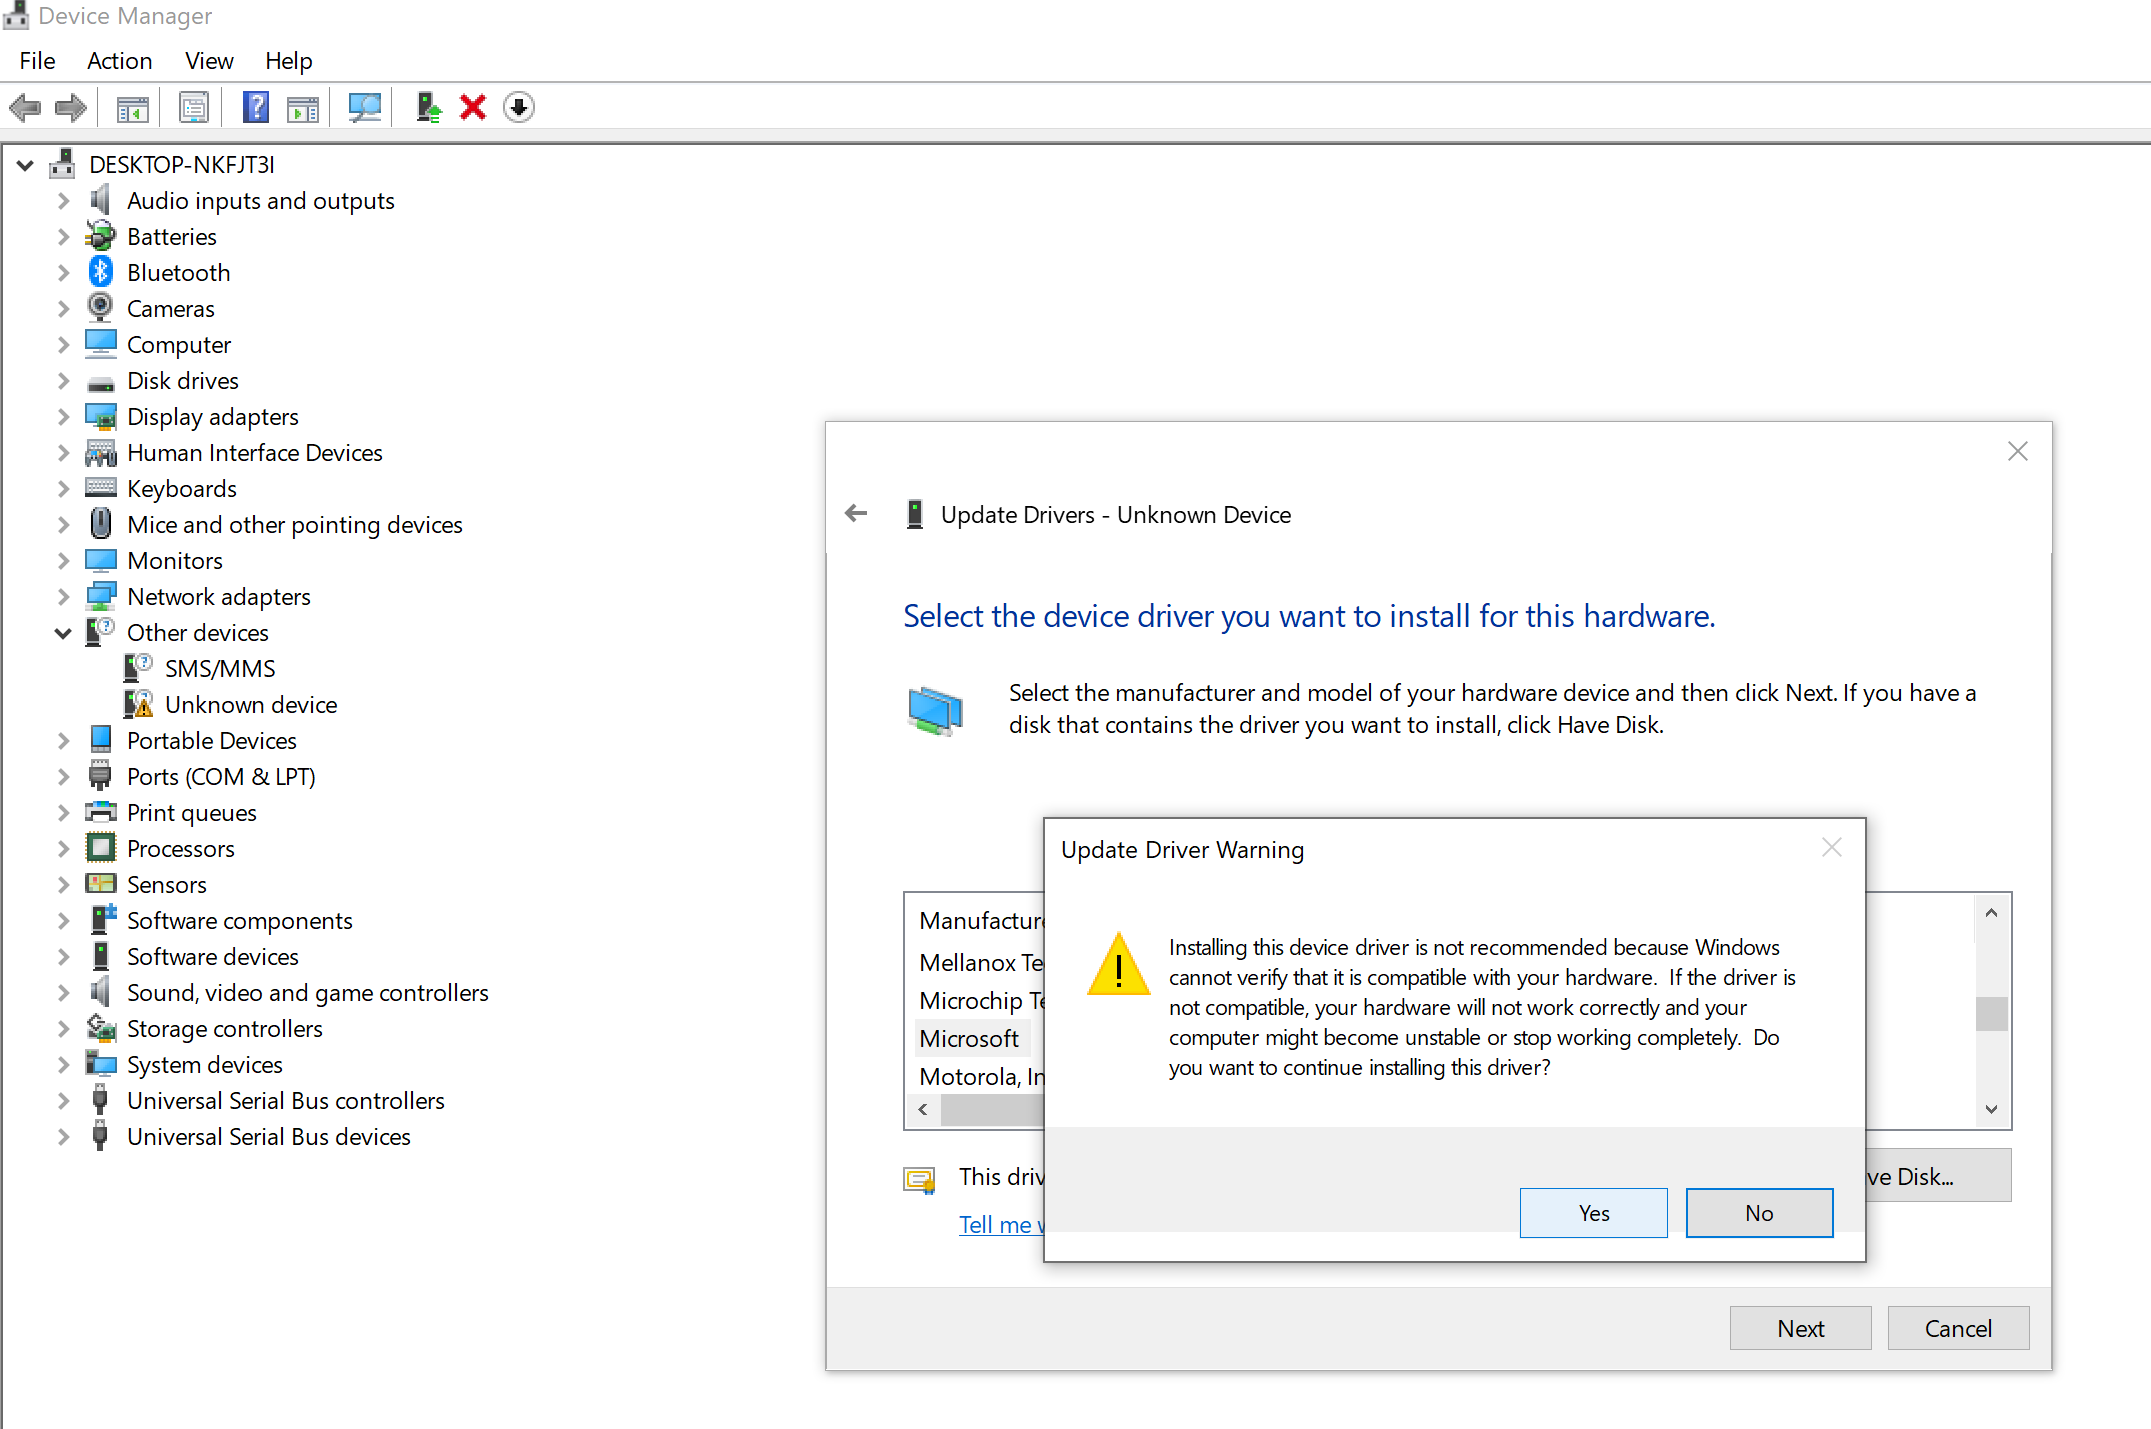
7.1 OSD32MP1-BRK shows up as “Other Device” under Windows Device Manager
If OSD32MP1-BRK does not show up as Remote NDIS Compatible Device under Network Connections, look for new devices under Device Manager. You may find OSD32MP1-BRK under “Other Devices”. To resolve this issue:
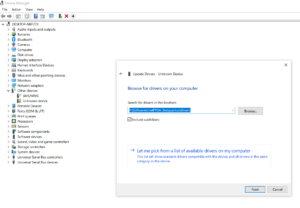
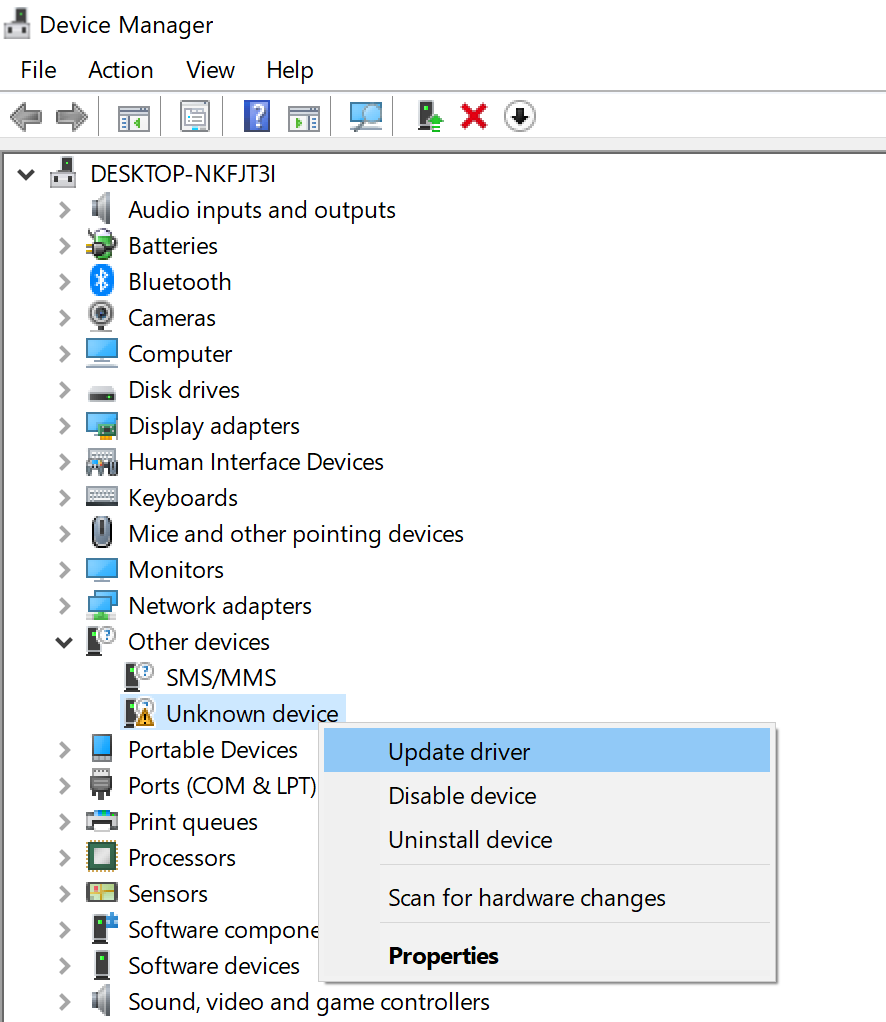
- Right click on the Unknown device > Update driver

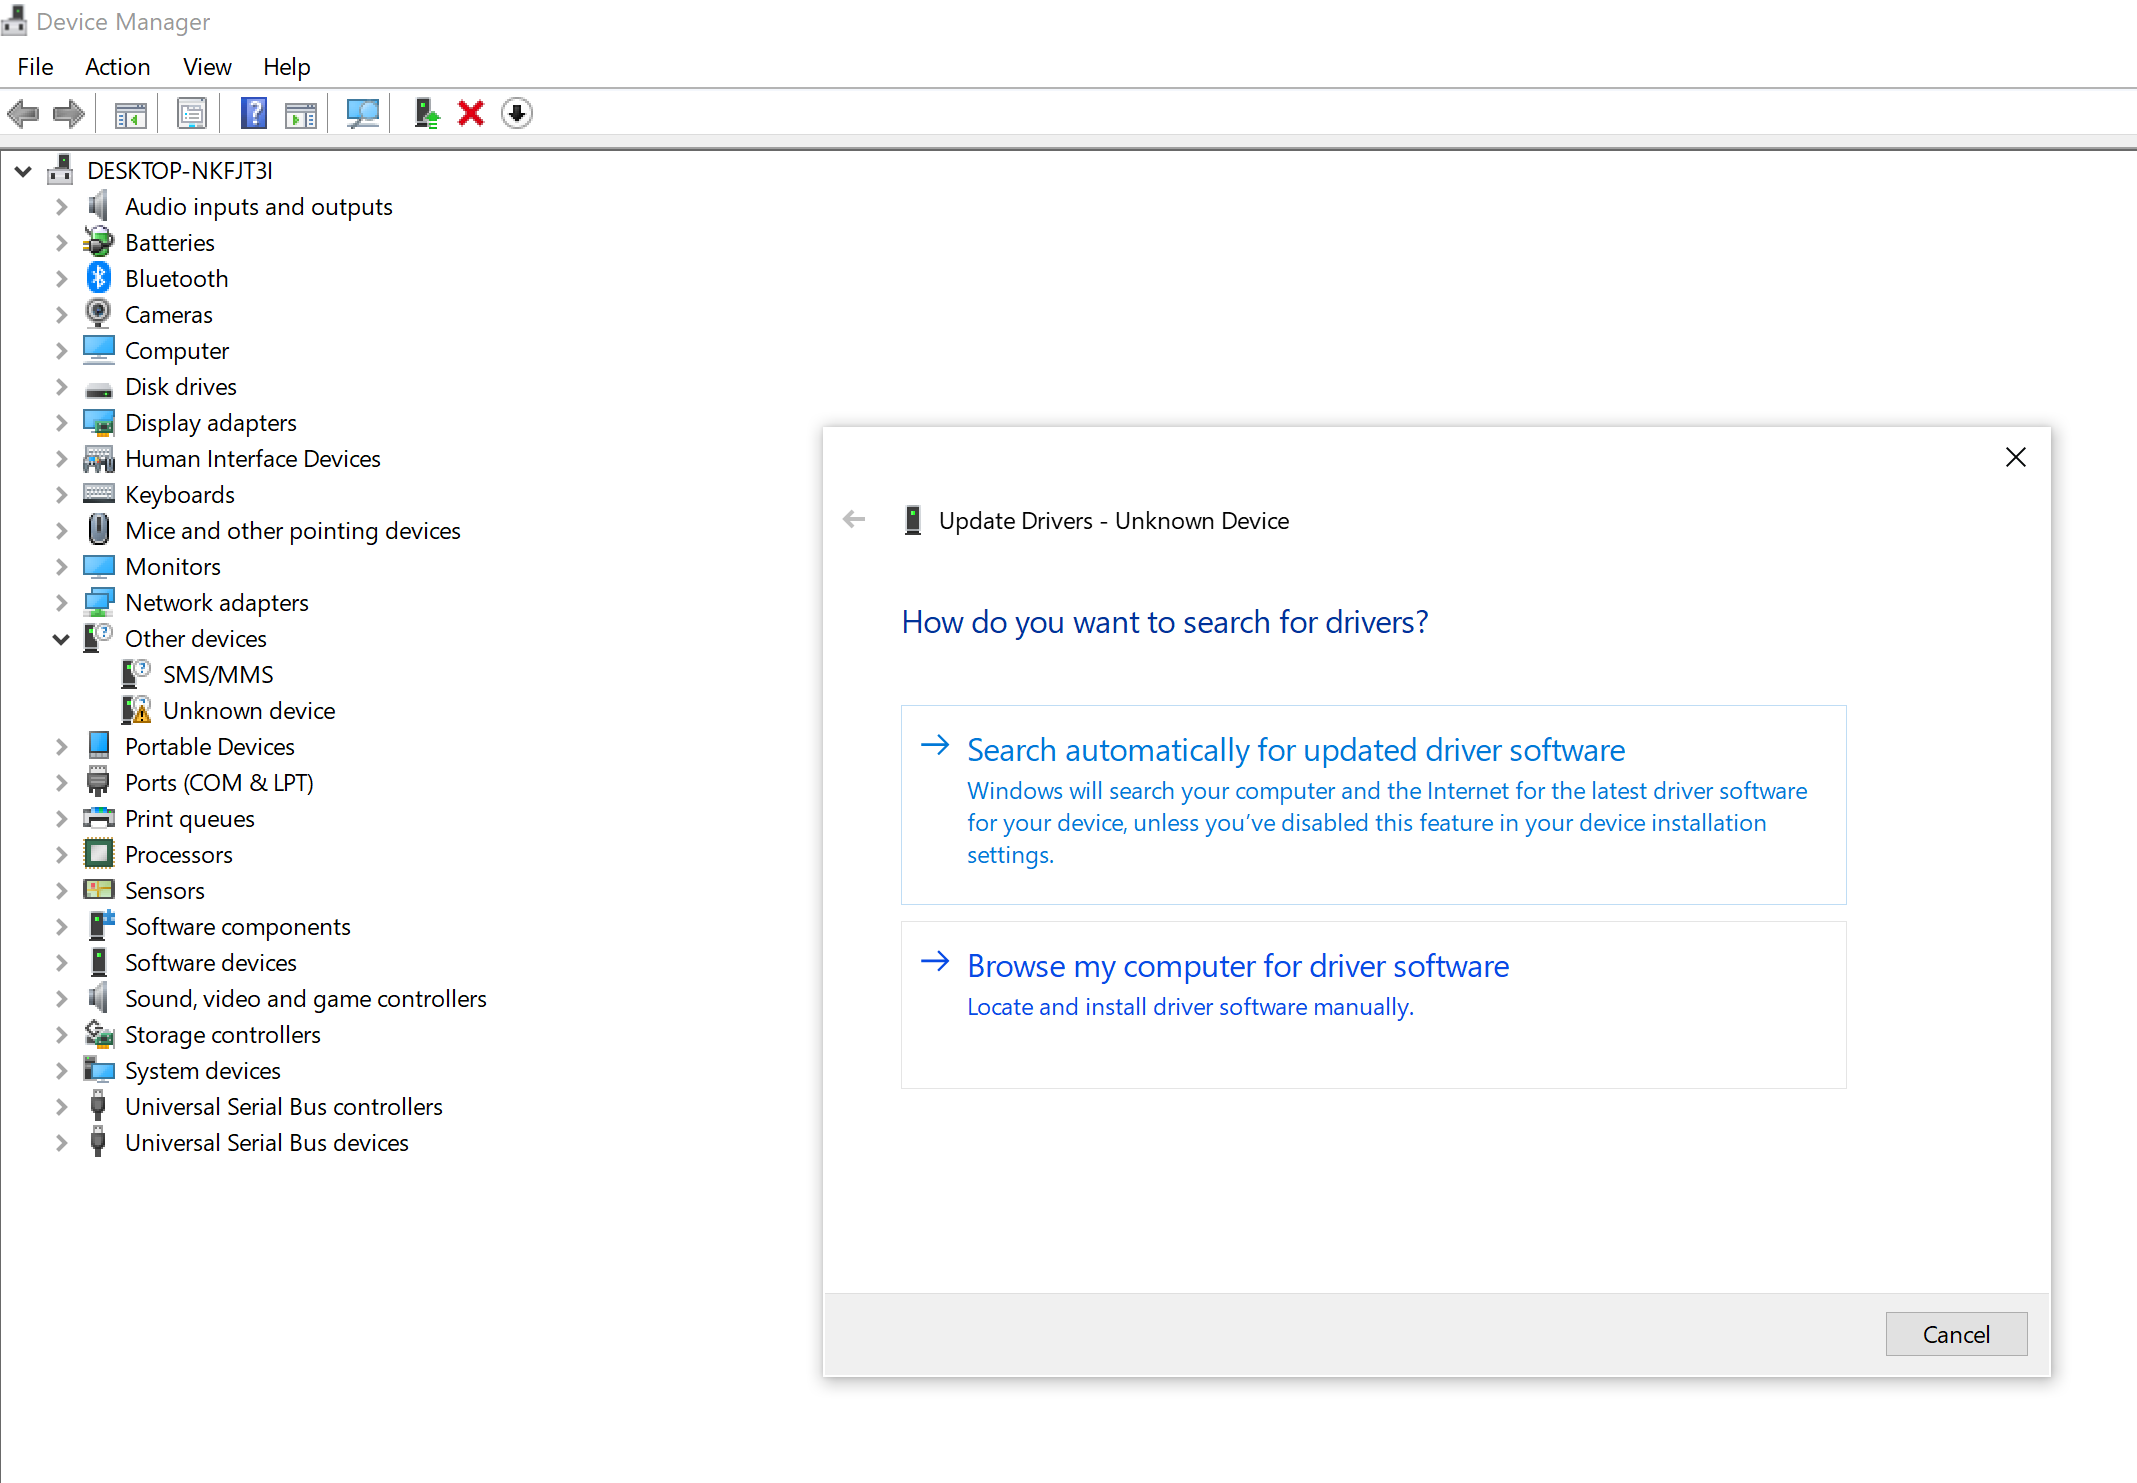
- Click on Browse my computer for driver software
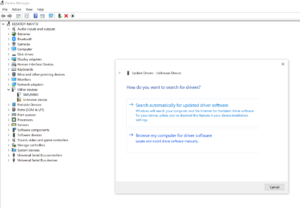

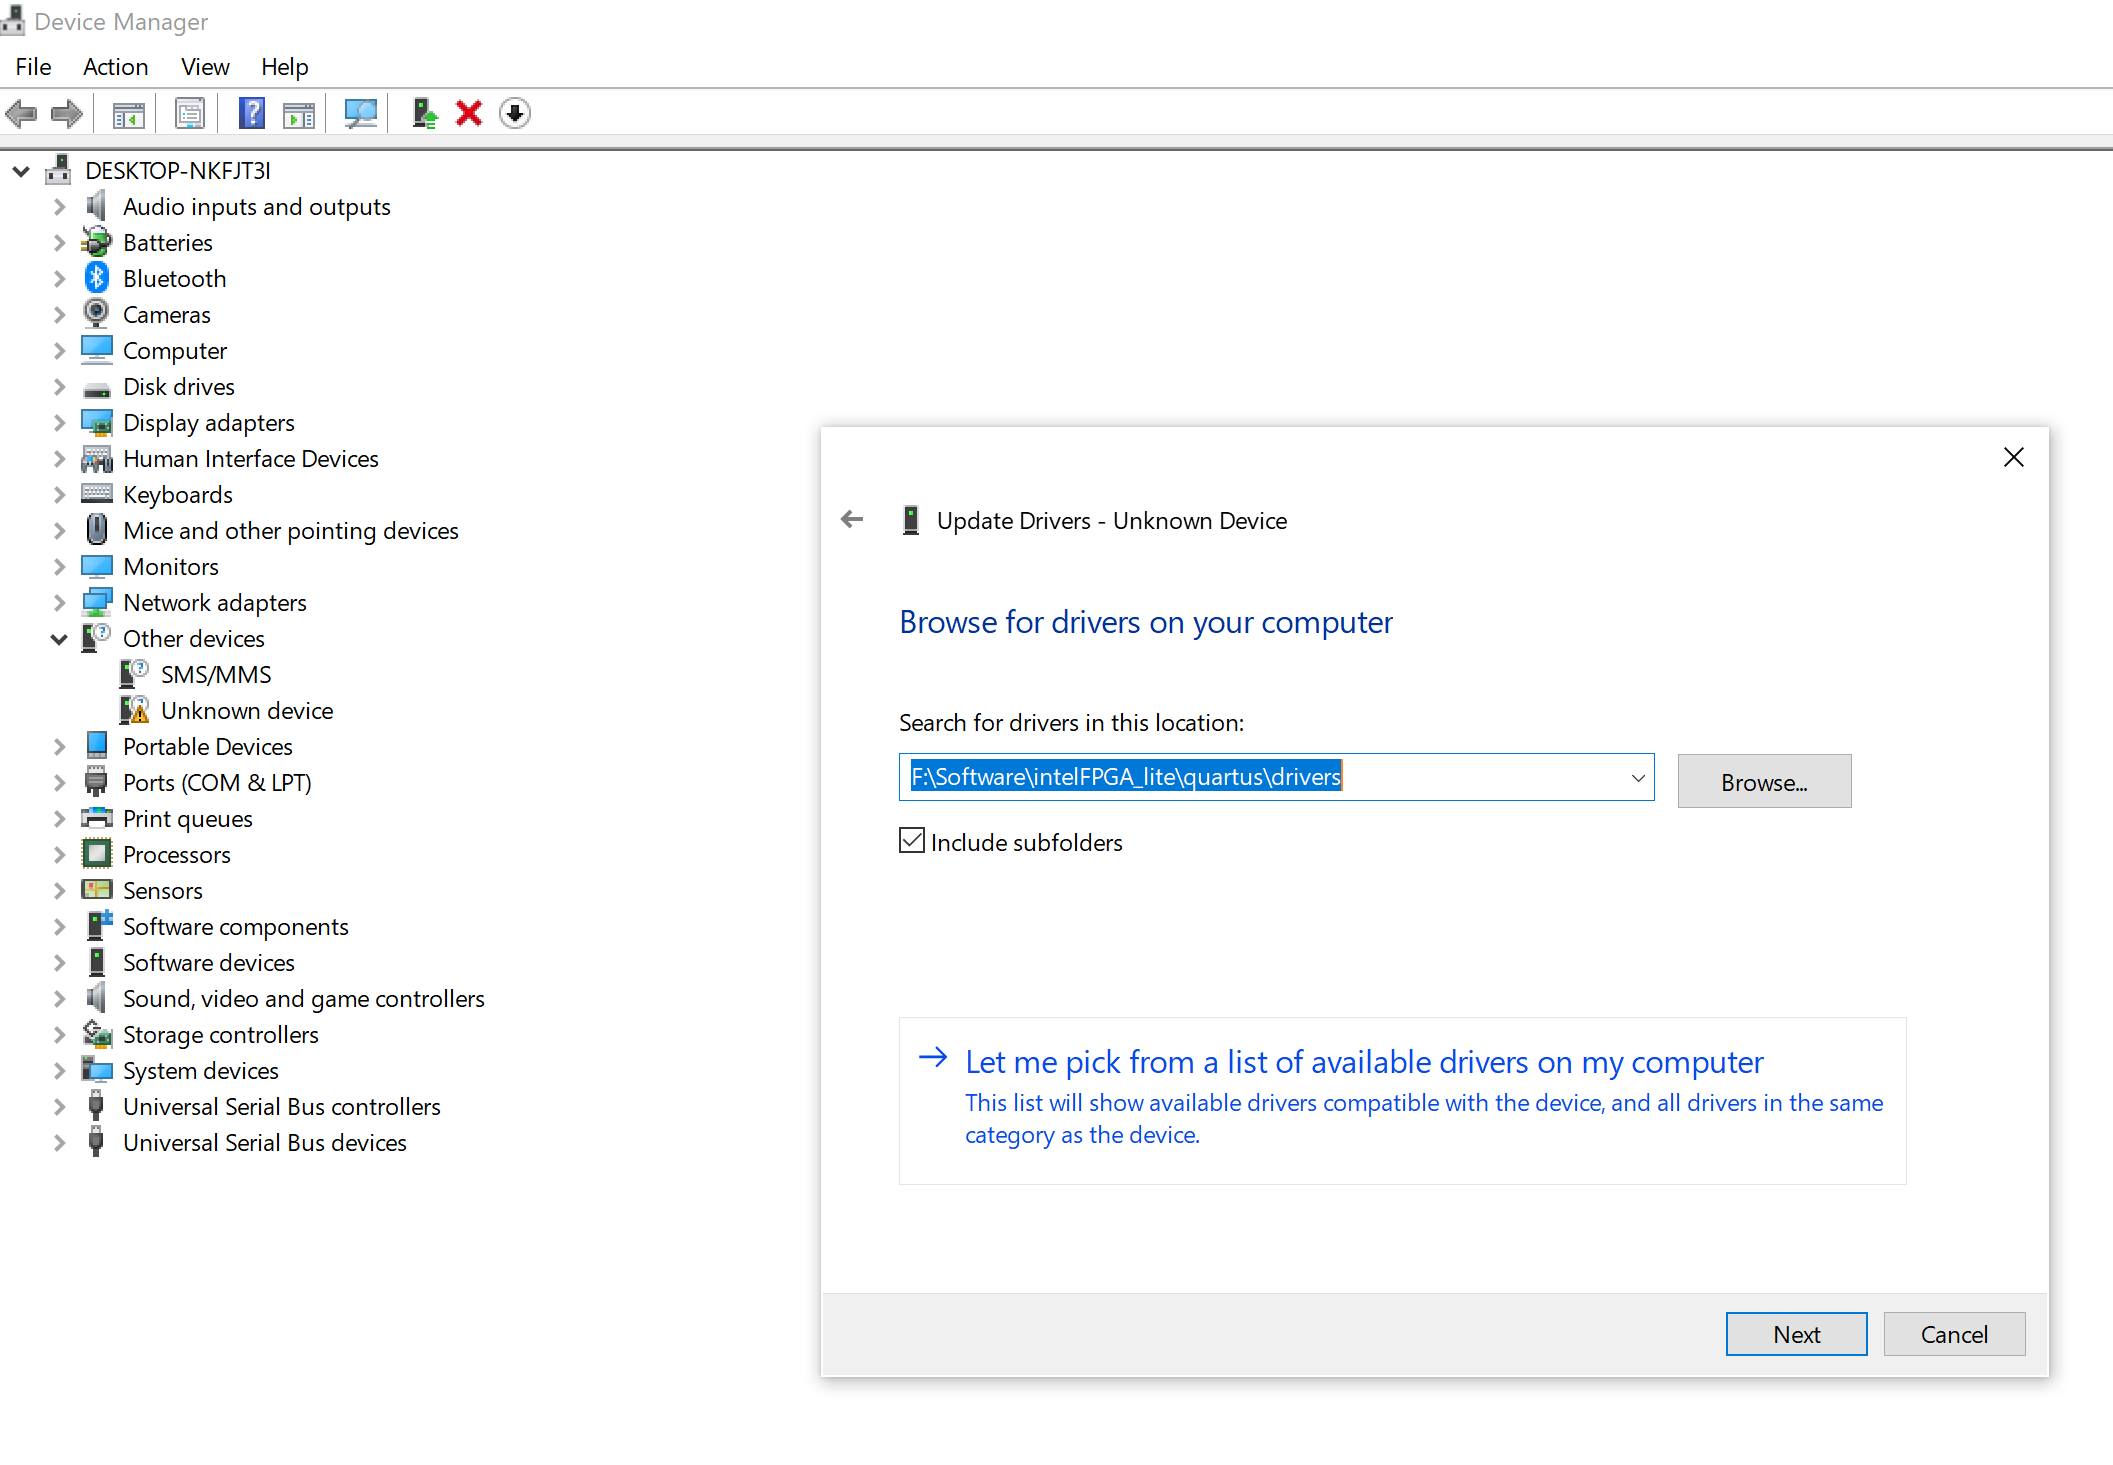
- Click on Let me pick from a list of available drivers on my computer
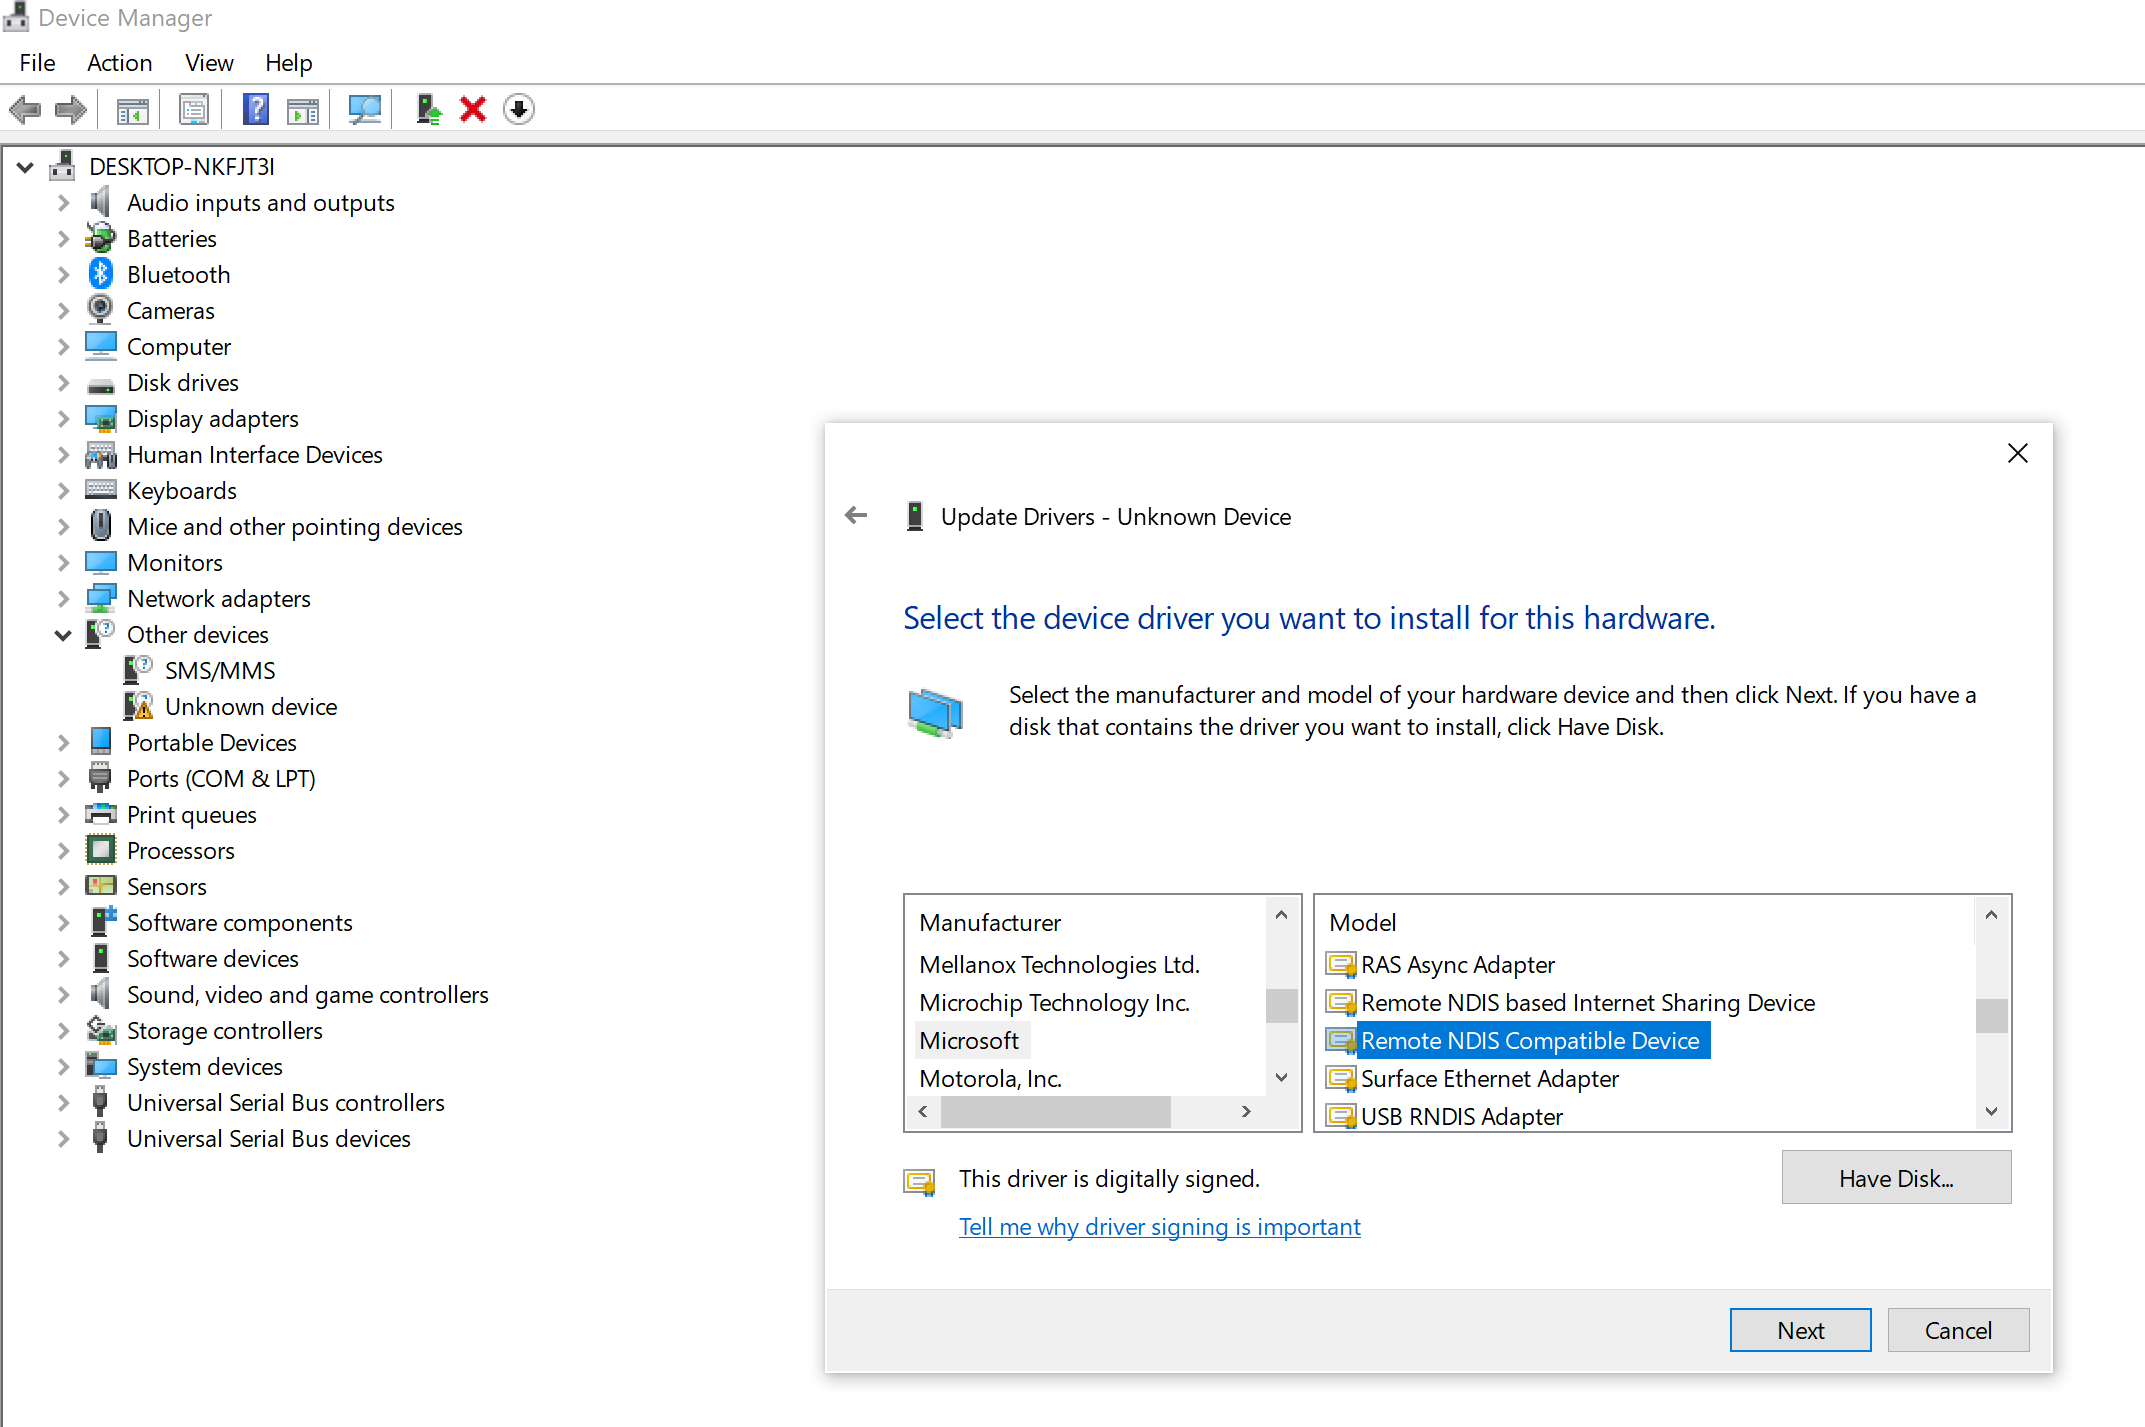
- Choose Network adapters and press Next
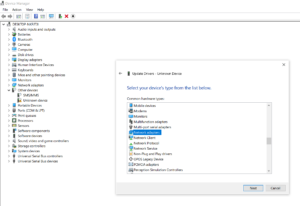

- Choose Microsoft under Manufacturers > Choose Remote NDIS Compatible Device and press Next

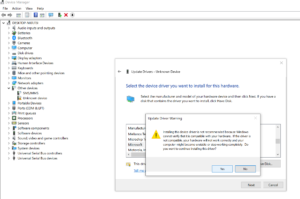
- Click Yes for Update Driver Warning

- OSD32MP1-BRK should now show up as Remote NDIS Compatible device under Network Connections


8 Conclusion
You are now ready to start using the OSD32MP1-BRK. Don’t hesitate to reach out to us in the Forums if you have any additional questions or run into any problems.
We are constantly updating our documentation to make sure they have the most accurate, update, and clear information. Sign up for our Documentation Update Notifications to make sure you have the latest information.
"*" indicates required fields
9 Revision History
| Revision Number | Revision Date | Changes | Author |
| 1 | 05/08/2020 | Initial Release | G. Sheridan |
| 2 | 09/17/2020 | Added Clarifying Comments | G. Sheridan |
| 3 | 12/03/2020 | Added Troubleshooting Section | E. Basu |
| 4 | 04/26/2022 | Updated Command Line LED commands to work with latest distribution images | G. Sheridan |
| 5 | 03/28/2023 | Updated OSD32MP1-BRK LEDs and OSD32MP1-BRK Heartbeat LED pictures. Added info on sudo su usage to write to /sys/class/leds. | E. Basu |
