Connect OSD3358-SM-RED to the Internet
Published On: November, 3, 2020 By: Jennifer Hellar | Updated: November 5, 2020 by Cathleen Wicks
Introduction
Connecting to the internet is one of the first things most users want to do with their development board after they get it set up. Connecting the OSD3358-SM-RED to the internet enables easy loading and updating of applications, and is critical for prototyping any type of IoT application.
The OSD3358-SM-RED is the Reference, Evaluation and Development Platform for the OSD335x family of SiPs. This full featured development platform allows you to connect to the internet in 3 different ways, using the on board ethernet, a USB WiFi Dongle, or over USB through a host PC or Mac. This article will quickly introduce the first 2 methods and then go into detail on sharing a PC/MAC internet connection with the RED platform.

Table of Contents
Connecting OSD3358-SM-RED Board to Internet using Ethernet/WiFi adapter
The two most standard ways to connect OSD3358-SM-RED to the internet are to use the on board 1Gb Ethernet or connect a WiFi-USB adapted. This section quickly outlines these two options.
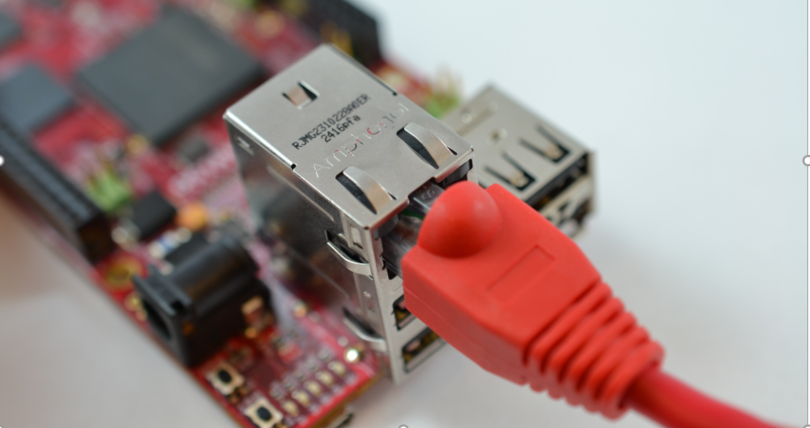
Option 1: An ethernet cable can be plugged into the ethernet connector receptacle on X4.
Option 2: a WiFi-USB adapter can be plugged into one of the available USB ports on X4 or X5 connector. A list of compatible adapters can be found at http://www.elinux.org/Beagleboard:BeagleBoneBlack#WIFI_Adapters. Procedures to connect to a WiFi network using the adapter can be found online.
| 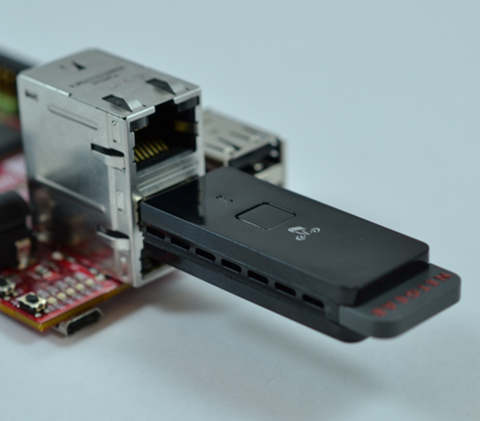 |
Connecting OSD3358-SM-RED Board to Internet using PC
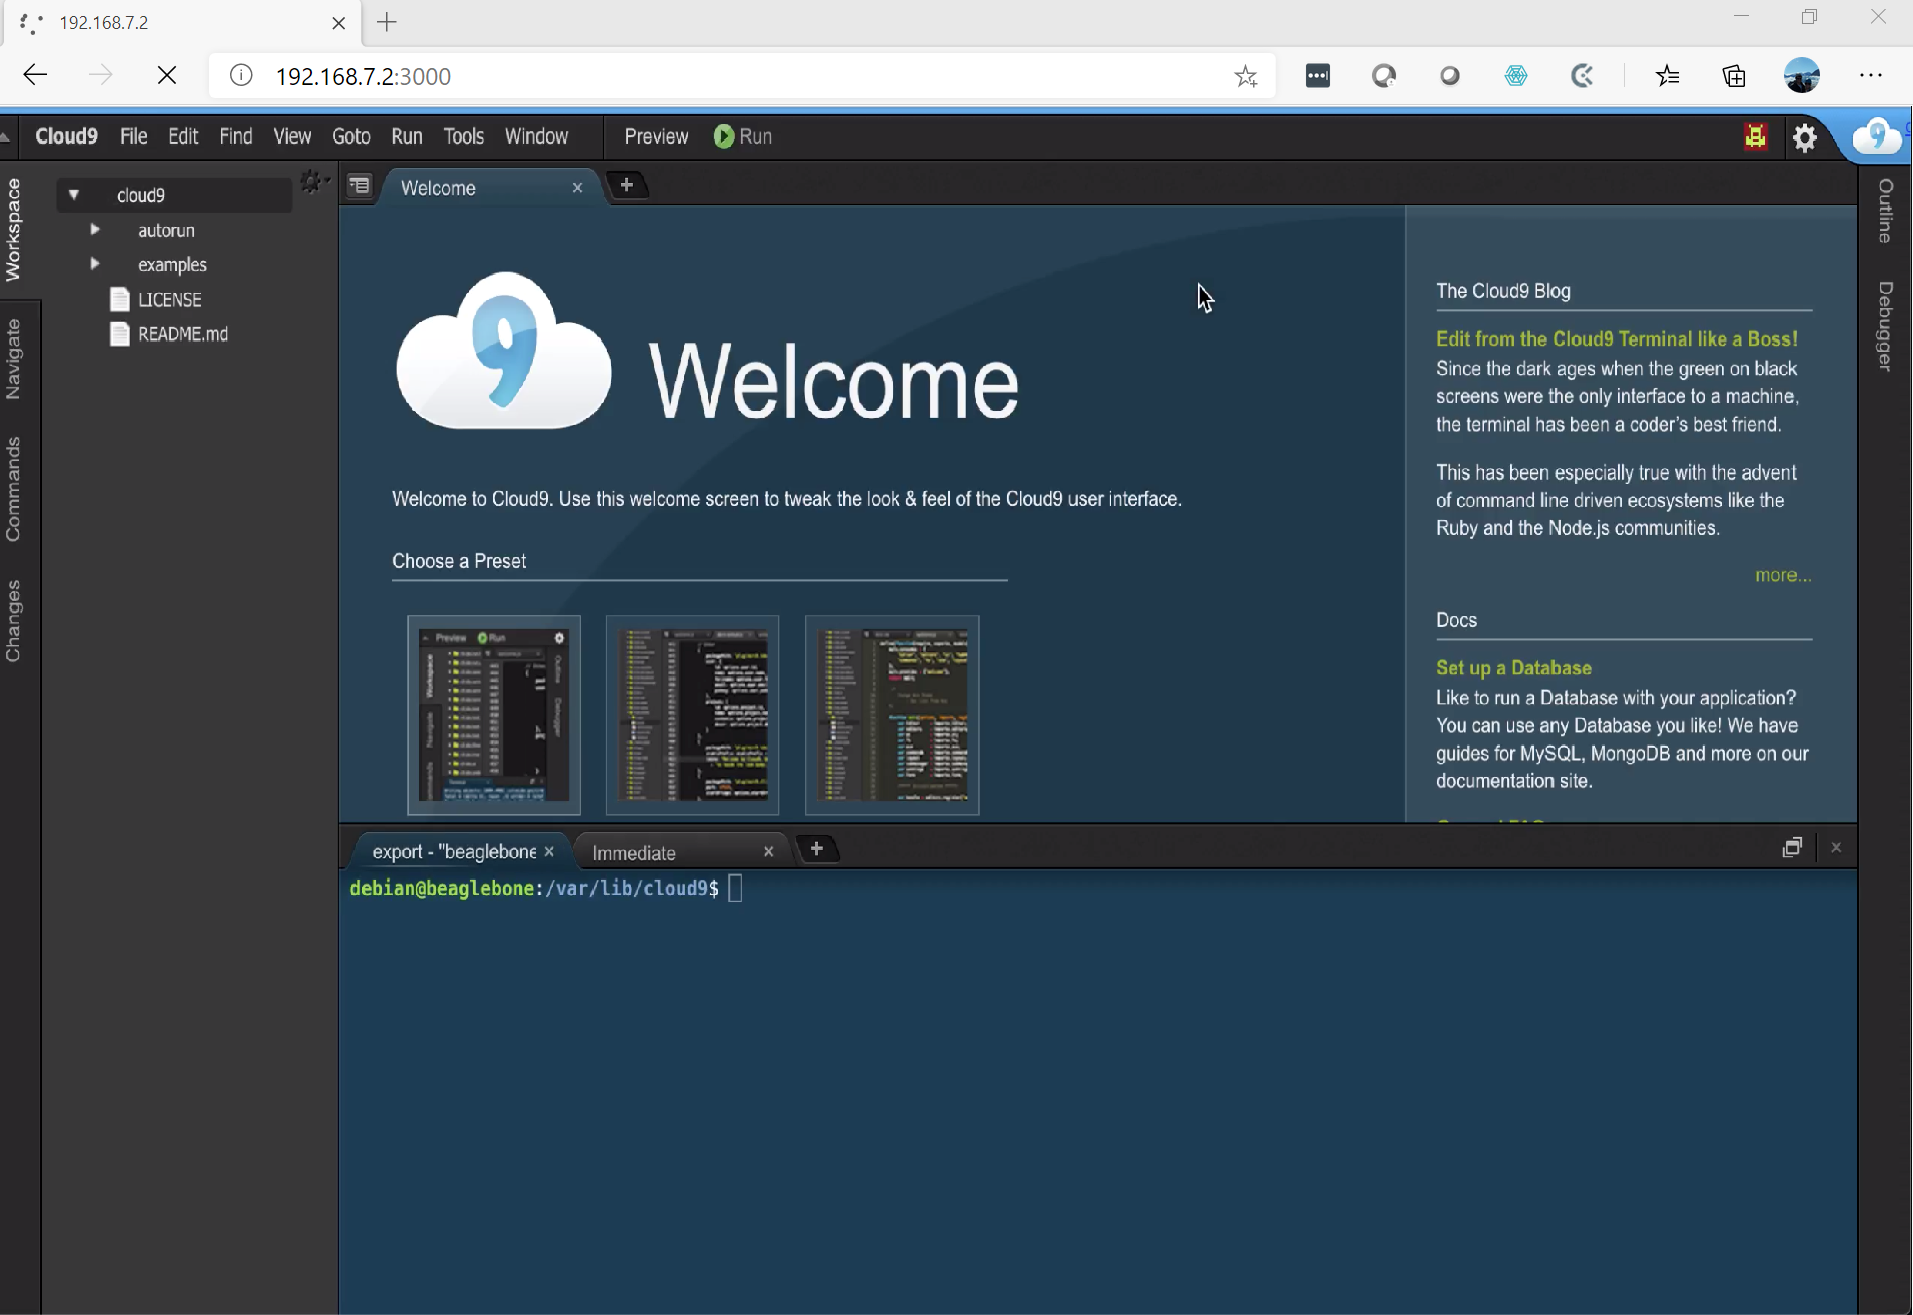
When the OSD3358-SM-RED is connected to your PC’s USB port it will automatically be assigned an IP address that can be accessed from your PC. By default, the IP address is 192.168.7.2. Typing 192.168.7.2:3000 into your browser will bring up the Cloud9 IDE, pictured below. Even though your PC and the RED board are connected the RED board cannot yet connect to the internet through your PC. The rest of this section will outline how to have the RED board connect to the internet through the PC.
To enable the OSD3358-SM-RED to connect to the internet through its USB connection with your PC, first, open up the control panel in Windows and navigate to the Network & Sharing Center (see below).
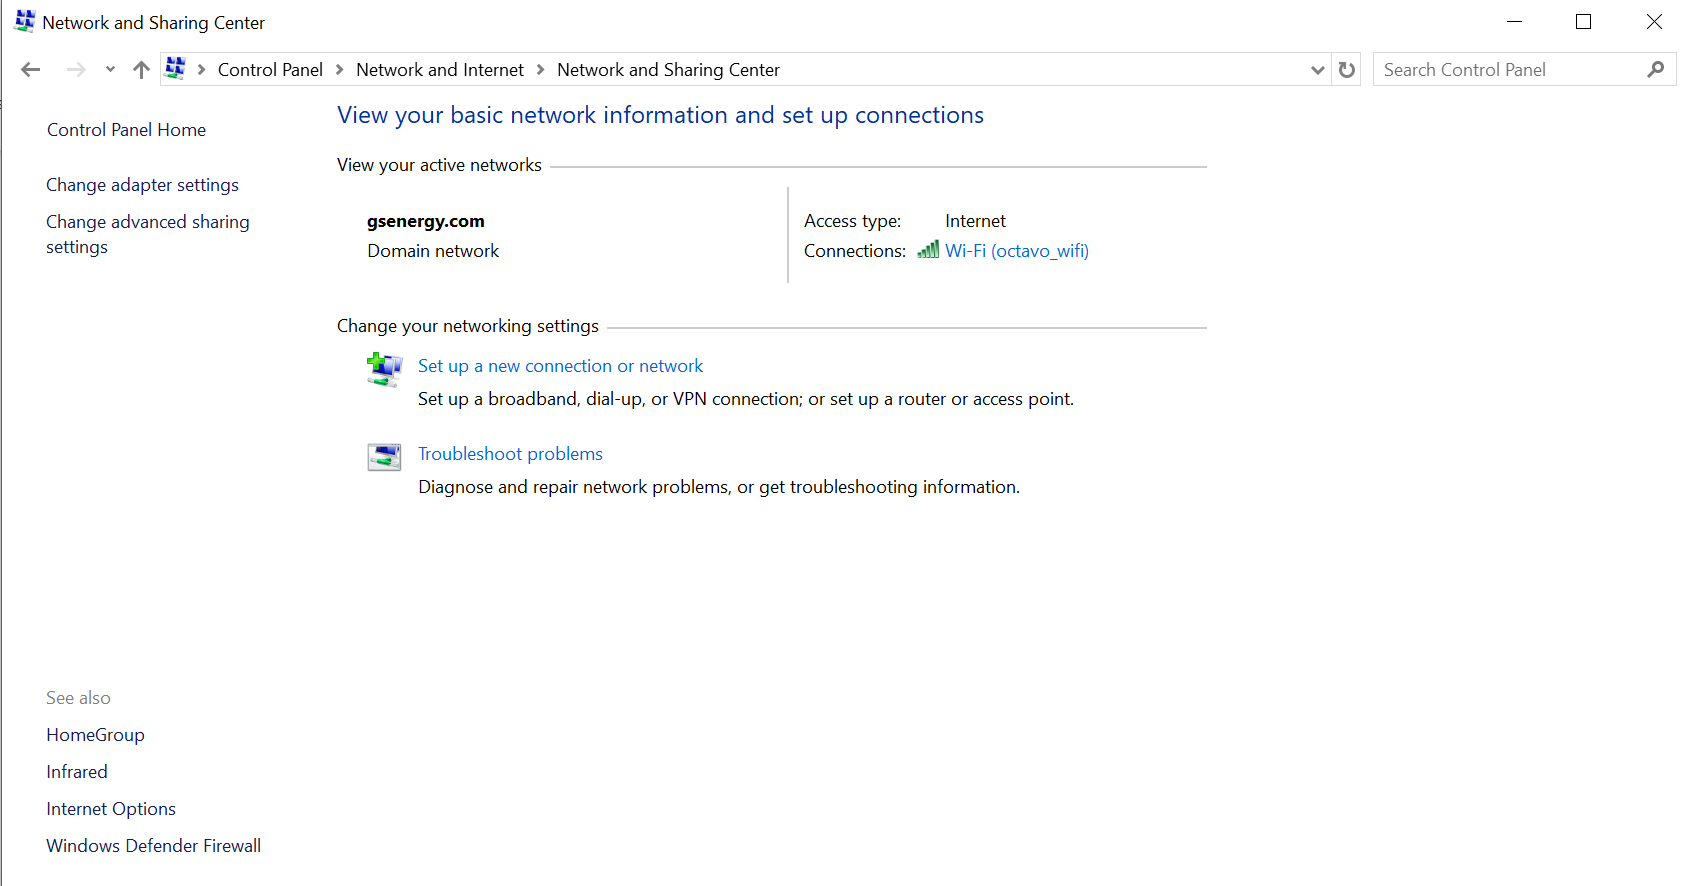
Select the network connection where you connect to the Internet (in the case above, Wi-Fi). A window like the one shown below will appear.
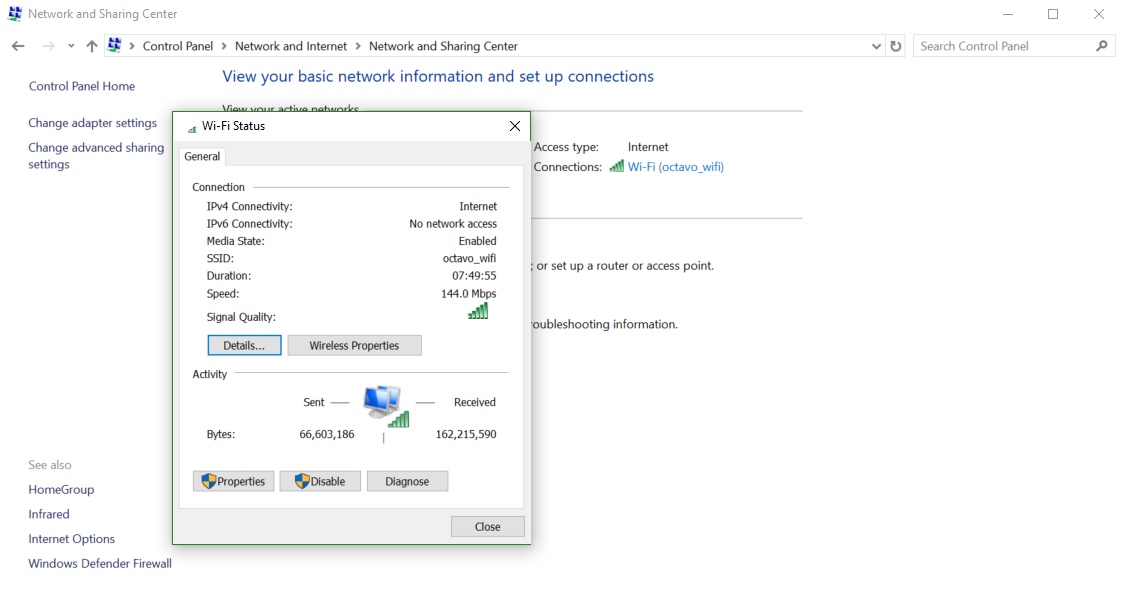
Select “Properties” and then click on the “Sharing” tab at the top of the new window that appears.
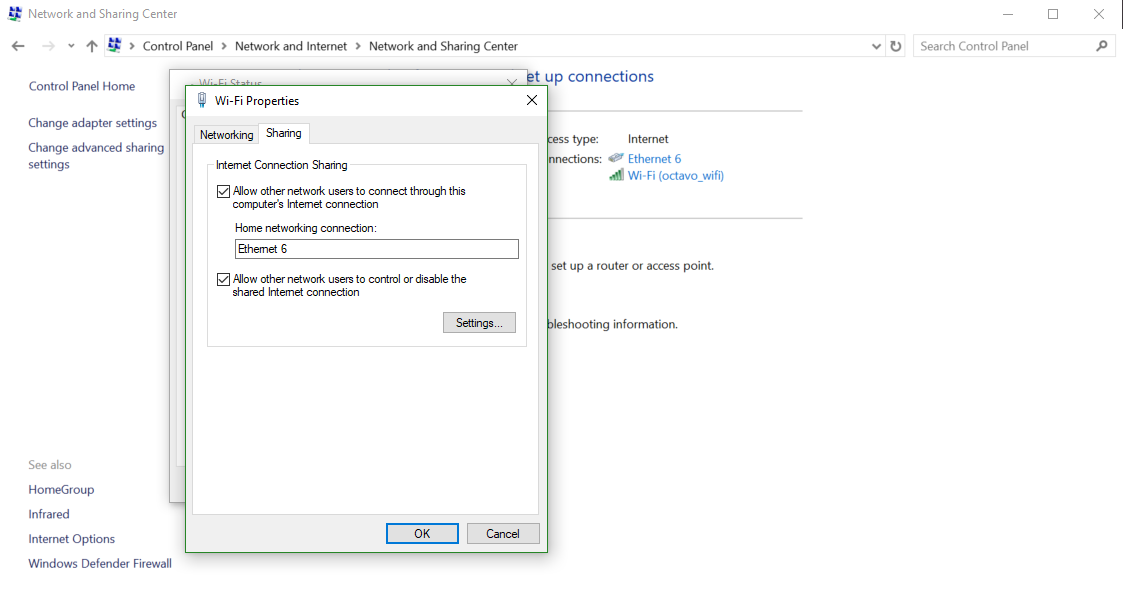
Click to “Allow other network users to connect through this computer’s Internet connection,” and select the connection (in the case above, Ethernet 6) to the OSD3358-SM-RED. Click OK.
Now, you have to manually change the IP address and its settings on the OSD3358-SM-RED network device. Click on the appropriate network (Ethernet 6 in the example) and go to Properties (see below).
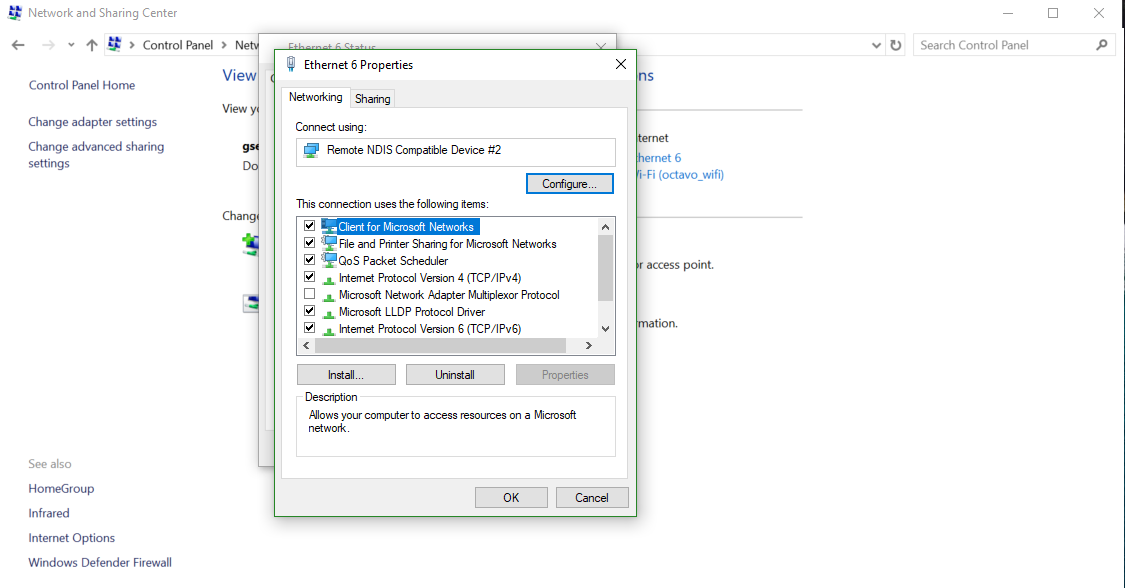
Click on “Internet Protocol Version 4 (TCP/IPv4)” from the list and then click Properties. In the pop-up window, add the IP address of the gateway (192.168.7.1) and the other settings shown below.
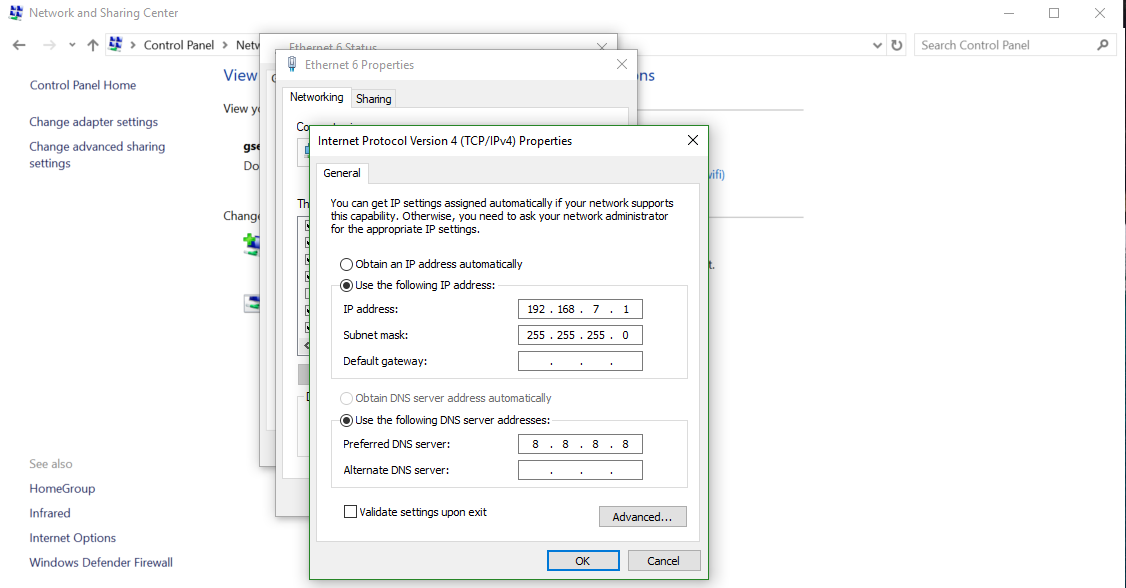
Click OK. At this point, you should have noticed that the connection has closed between the OSD3358-SM-RED and your computer due to the network connection resetting. Just reload the Cloud9 page.
Now, we need to tell the OSD3358-SM-RED how to connect to the internet connection via the computer gateway (IP 192.168.7.1). Since we will probably need to reset the board multiple times and we will want to continue to use the internet, we should save time by setting it up to connect automatically. First, type the following command into the Cloud9 terminal to test the USB connection:
ping 192.168.7.1
Ping is a debugging tool to test TCP/IP connections between devices. You should see an output on the screen, which is a response from your computer to say everything is ok (“Reply from 192.168.7.1: bytes = X time = X ms TTL = X”). Press Ctrl+C to stop it.
Change to the “bin” directory below home and open a new script using the nano editor:
cd ~/bin
nano network.sh
Add the following lines to this file and press Ctrl+X to leave it. The editor will prompt you to save the changes you have made, so make sure to select Y for yes:
#!/bin/bash
/sbin/route add default gw 192.168.7.1
echo “nameserver 8.8.8.8” >> /etc/resolv.conf
This adds the computer gateway address to the OSD3358-SM-RED IP address routing table and adds a name server to translate the IP addresses into names and vice versa. We also need to update the permissions so that this script is executable:
chmod 755 network.sh
Next, we will create a directory to store log files:
mkdir logs
Now that we have this basic infrastructure, we can create our cron entry. First, we need to edit the “crontab” for root:
sudo crontab -e
(remember that the default password for OSD3358-SM-RED is “tmppwd”).
This will prompt you to select an editor to add the cron entry; you can type 1 ENTER to open the nano editor. You should add the following line:
@reboot sleep 30 && sh /home/debian/bin/network.sh > /home/debian/bin/logs/cronlog 2>&1
This instructs cron that right after a reboot, it should first sleep for 30 seconds, and then execute our script. The output of the script and any error messages should be put into the file: “/bin/logs/cronlog”. Now, reboot and check the connection:
sudo reboot
ping google.com
(Don’t forget Ctrl+C to stop the output.)
Connect OSD3358-SM-RED Board to Internet using MAC
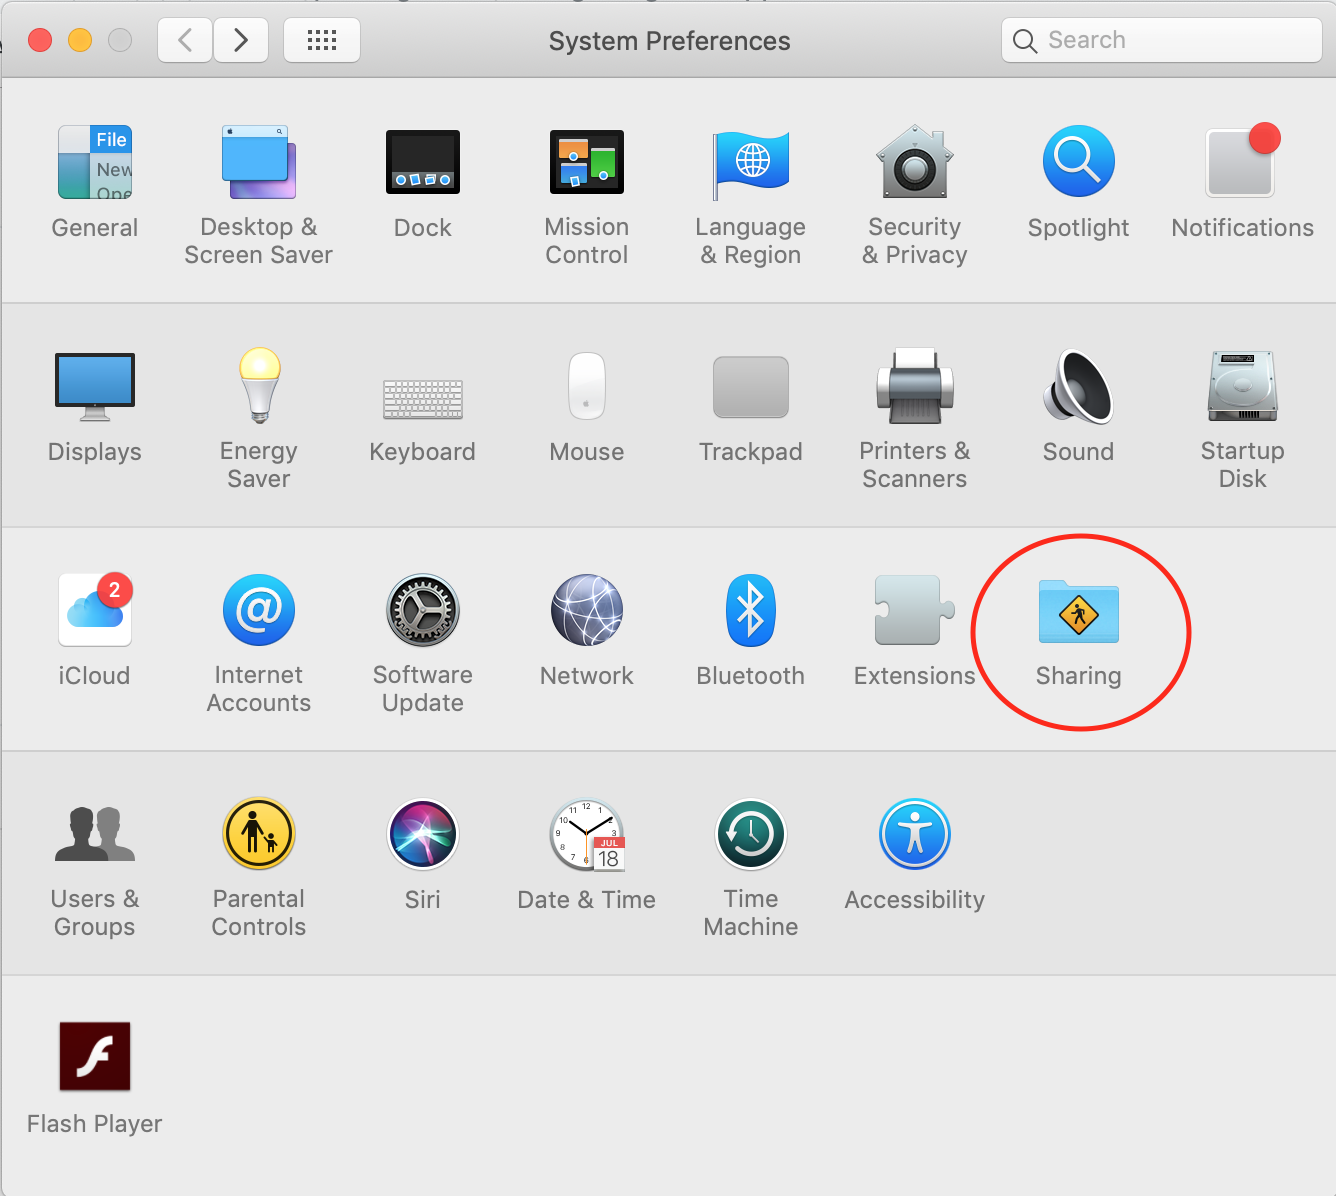
After booting up the RED board using a USB connector, but before configuring the network settings, ensure that the internet sharing settings on the RED board are on. Do this by going to System Preferences, and then clicking on Sharing.
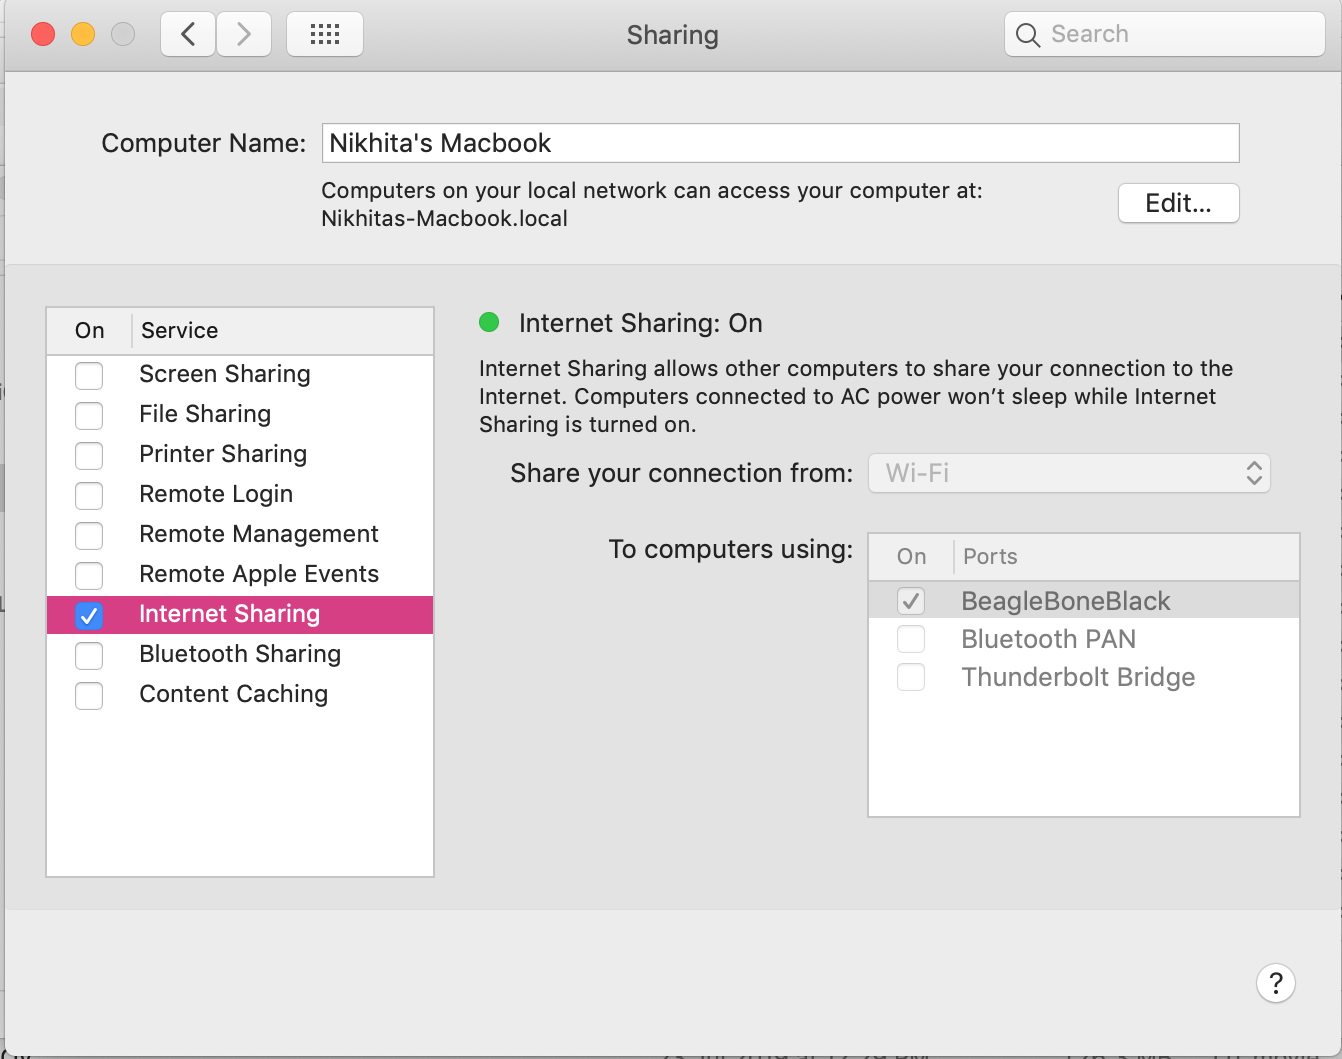
Once in Sharing, ensure that Internet Sharing is turned on, to computers using BeagleBoneBlack.
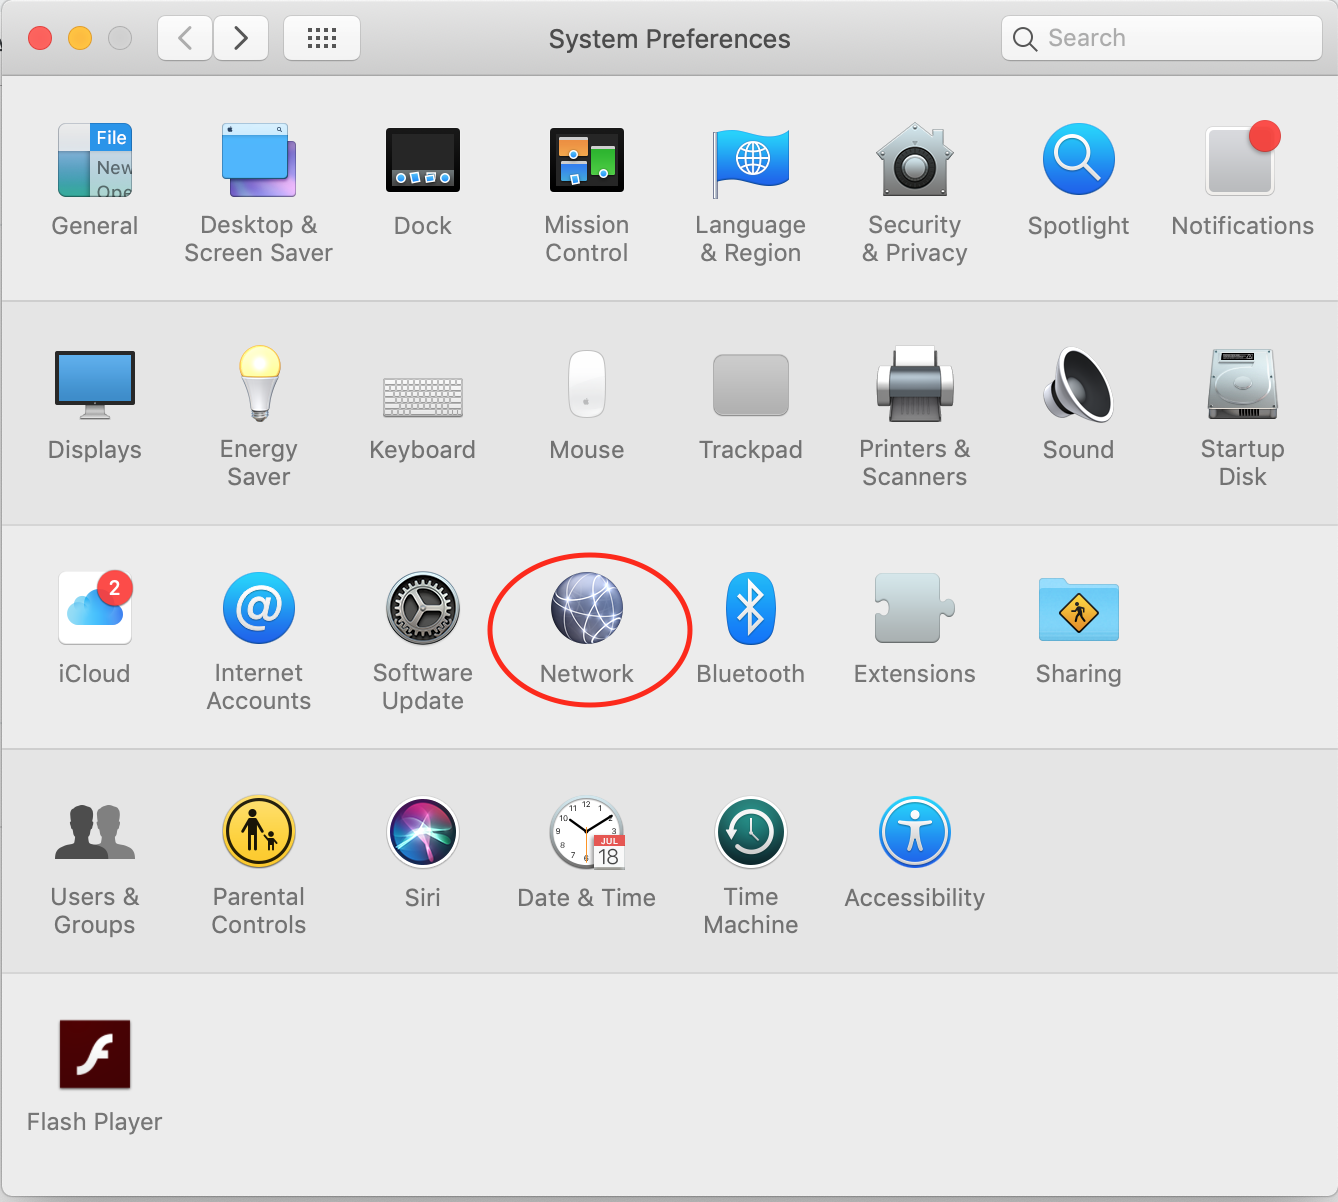
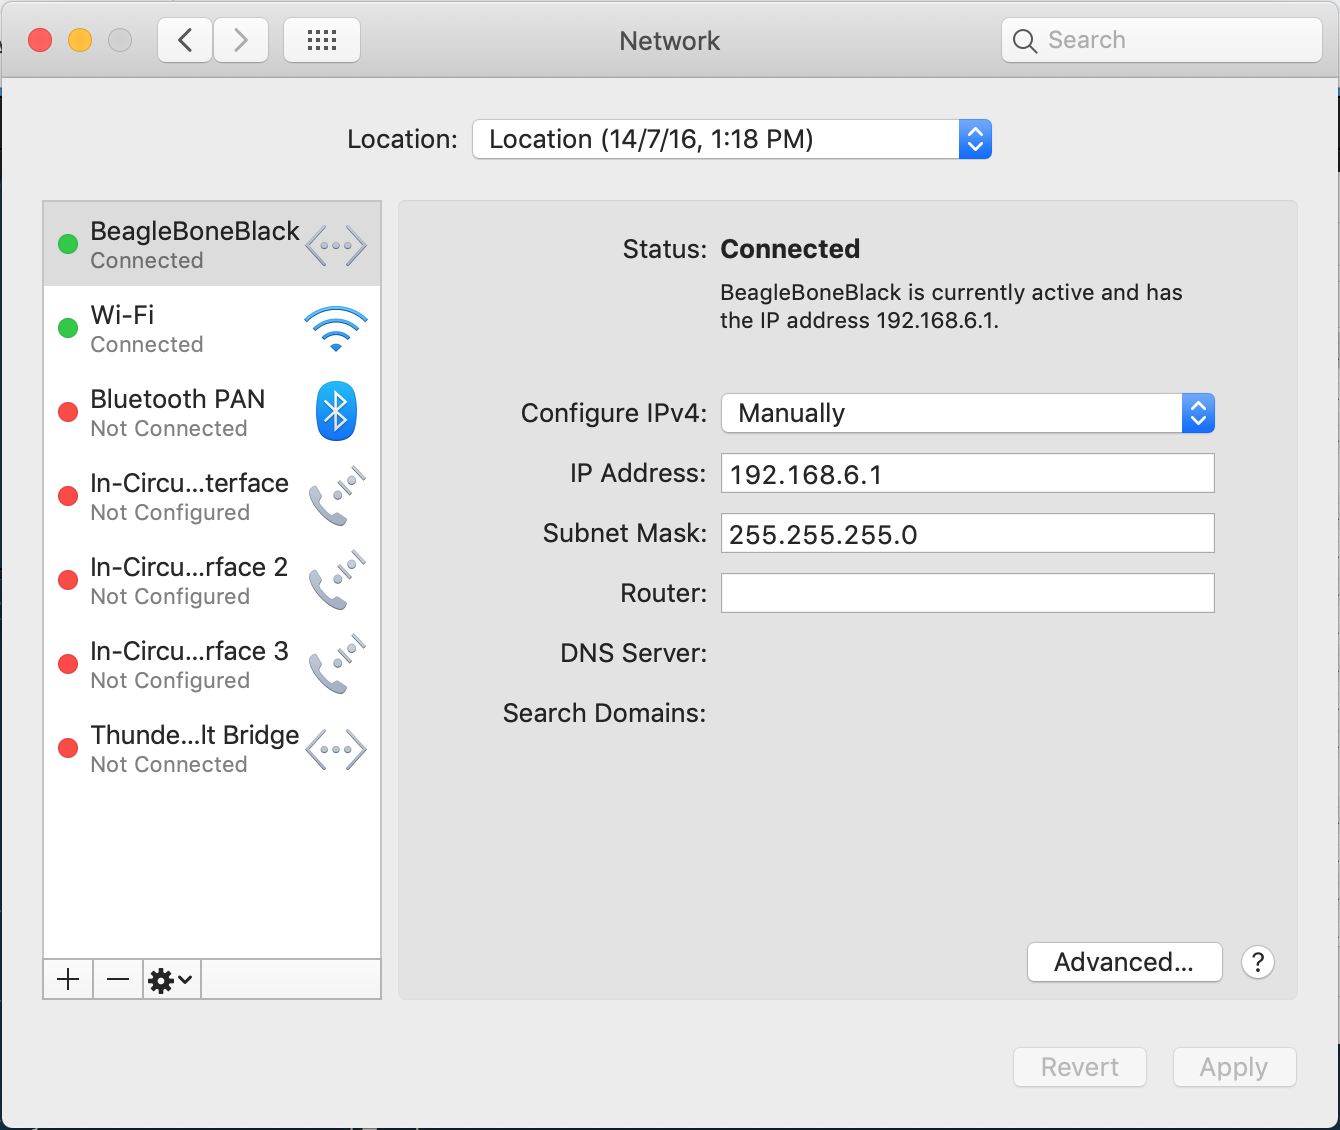
After doing this, go to your network settings:
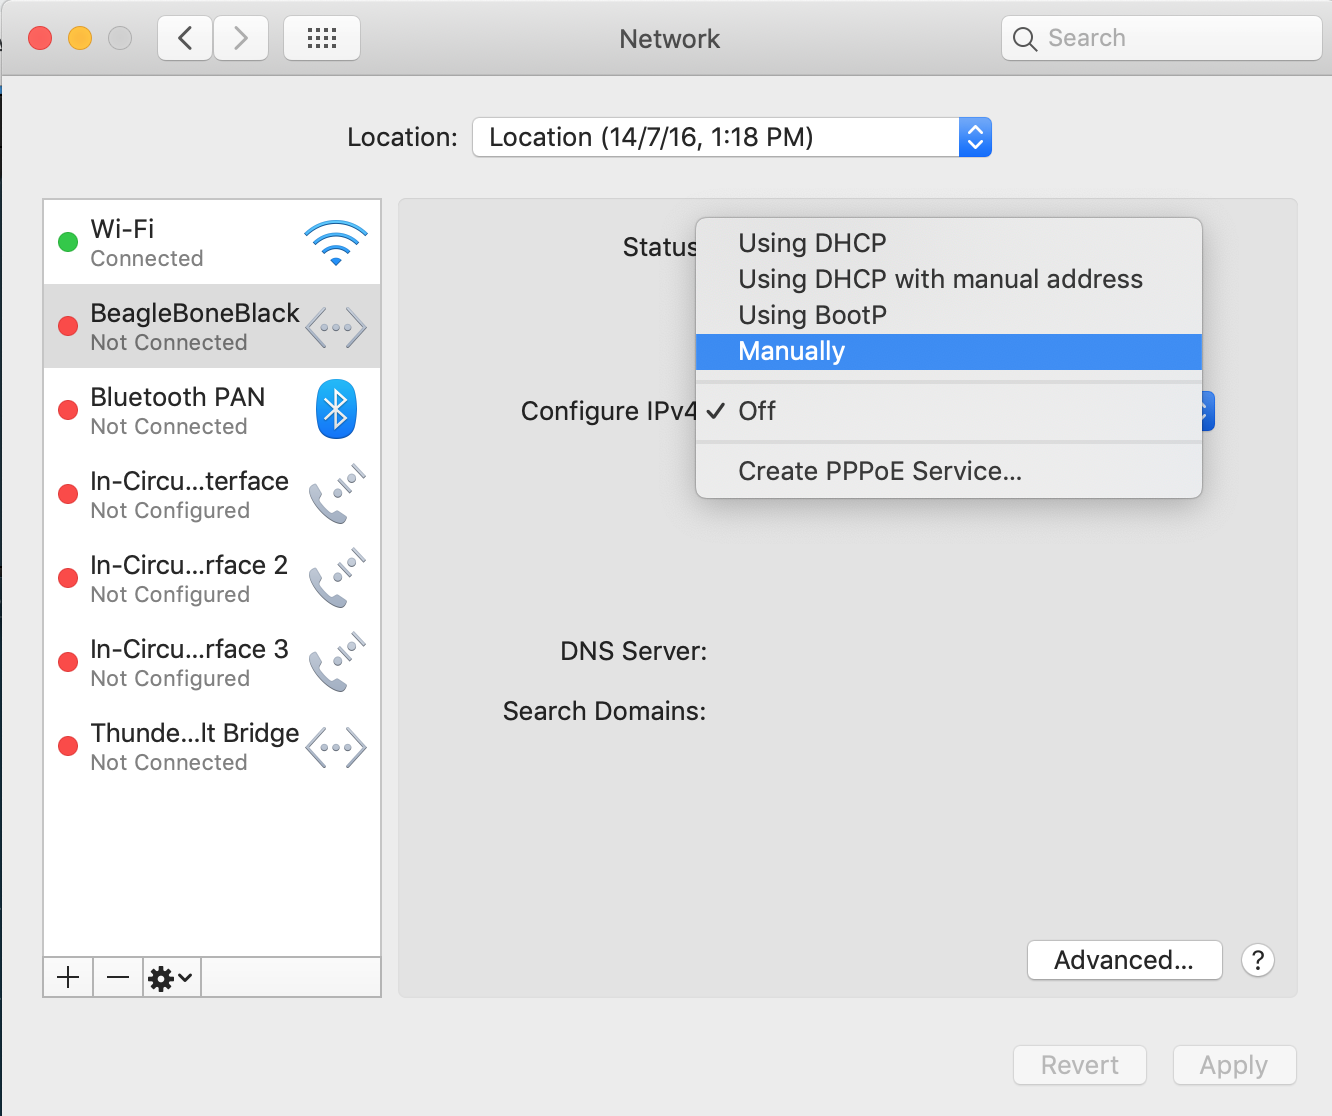
In Network settings, check to make sure that your OSD3358-SM-RED has the right IPv4 Configuration. The IP address should be 192.168.6.1. The board will reserve 192.168.6.2 for itself. The Subnet Mask should be 255.255.255.0. If this is not already the case, you will have to set it manually as shown in the following images.
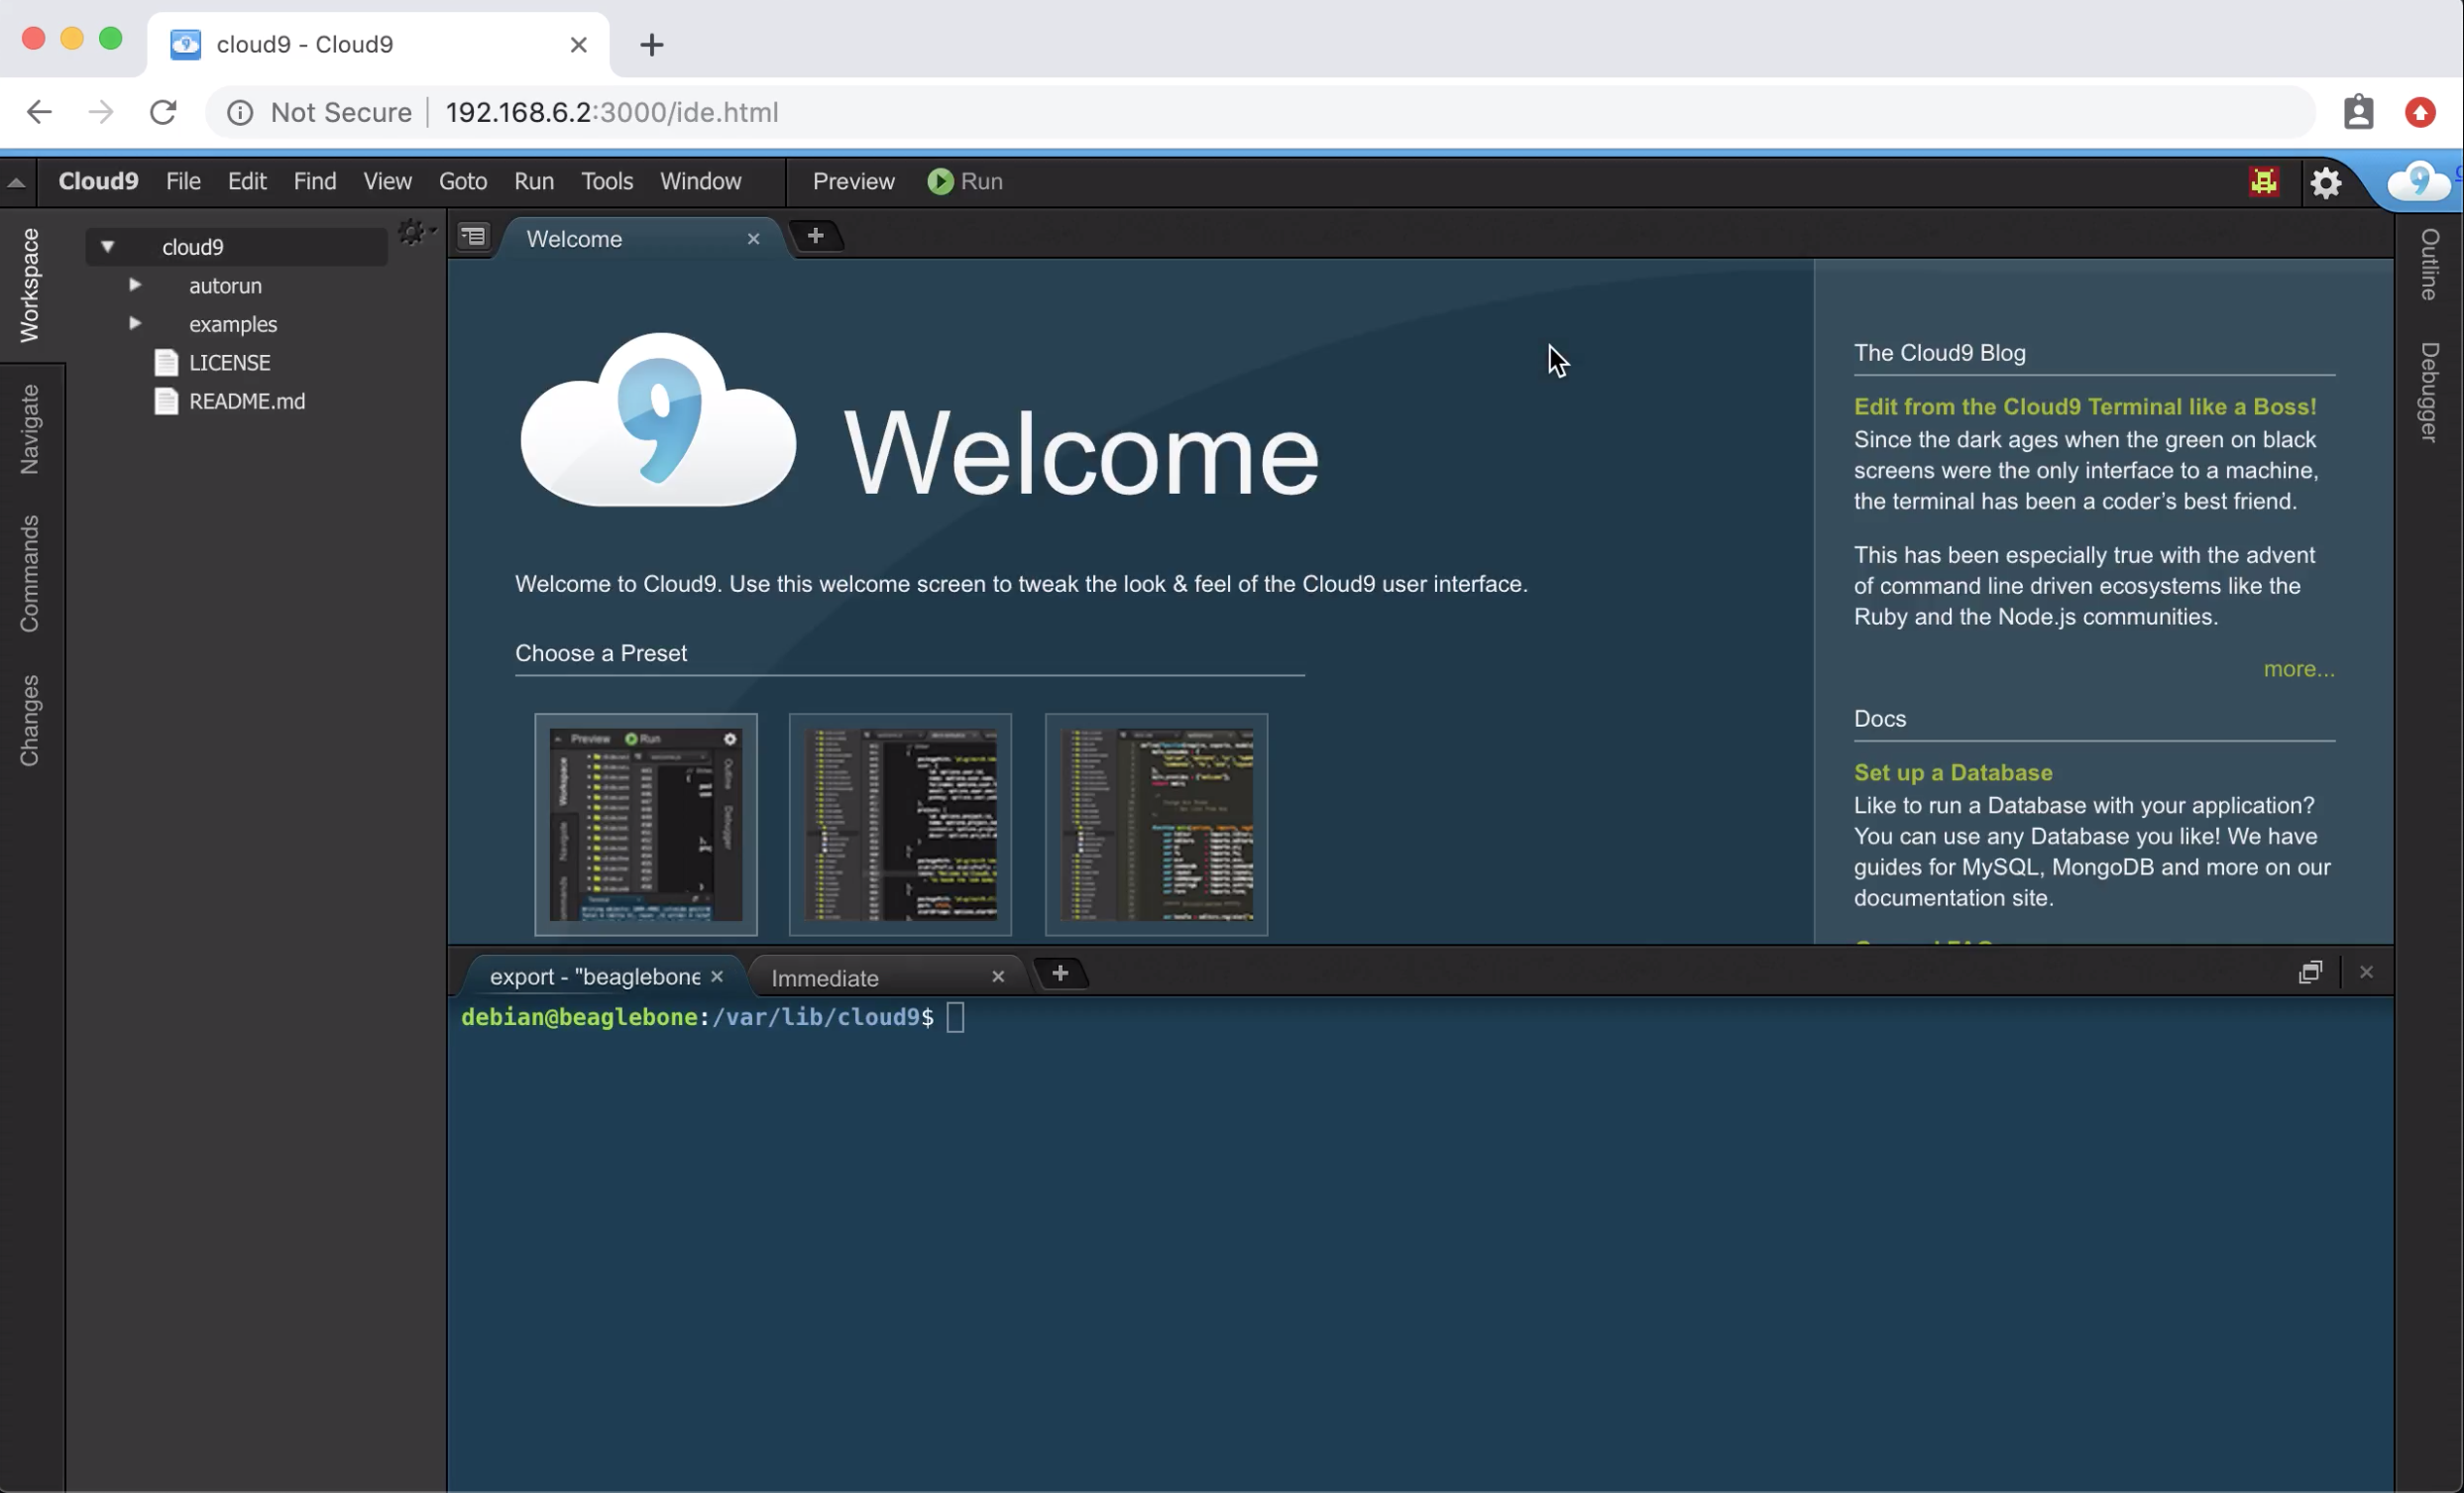
After this, you should be able to access Cloud9 at the address 192.168.6.2:3000
Use the “ifconfig” command to display current network configuration information.
ifconfig
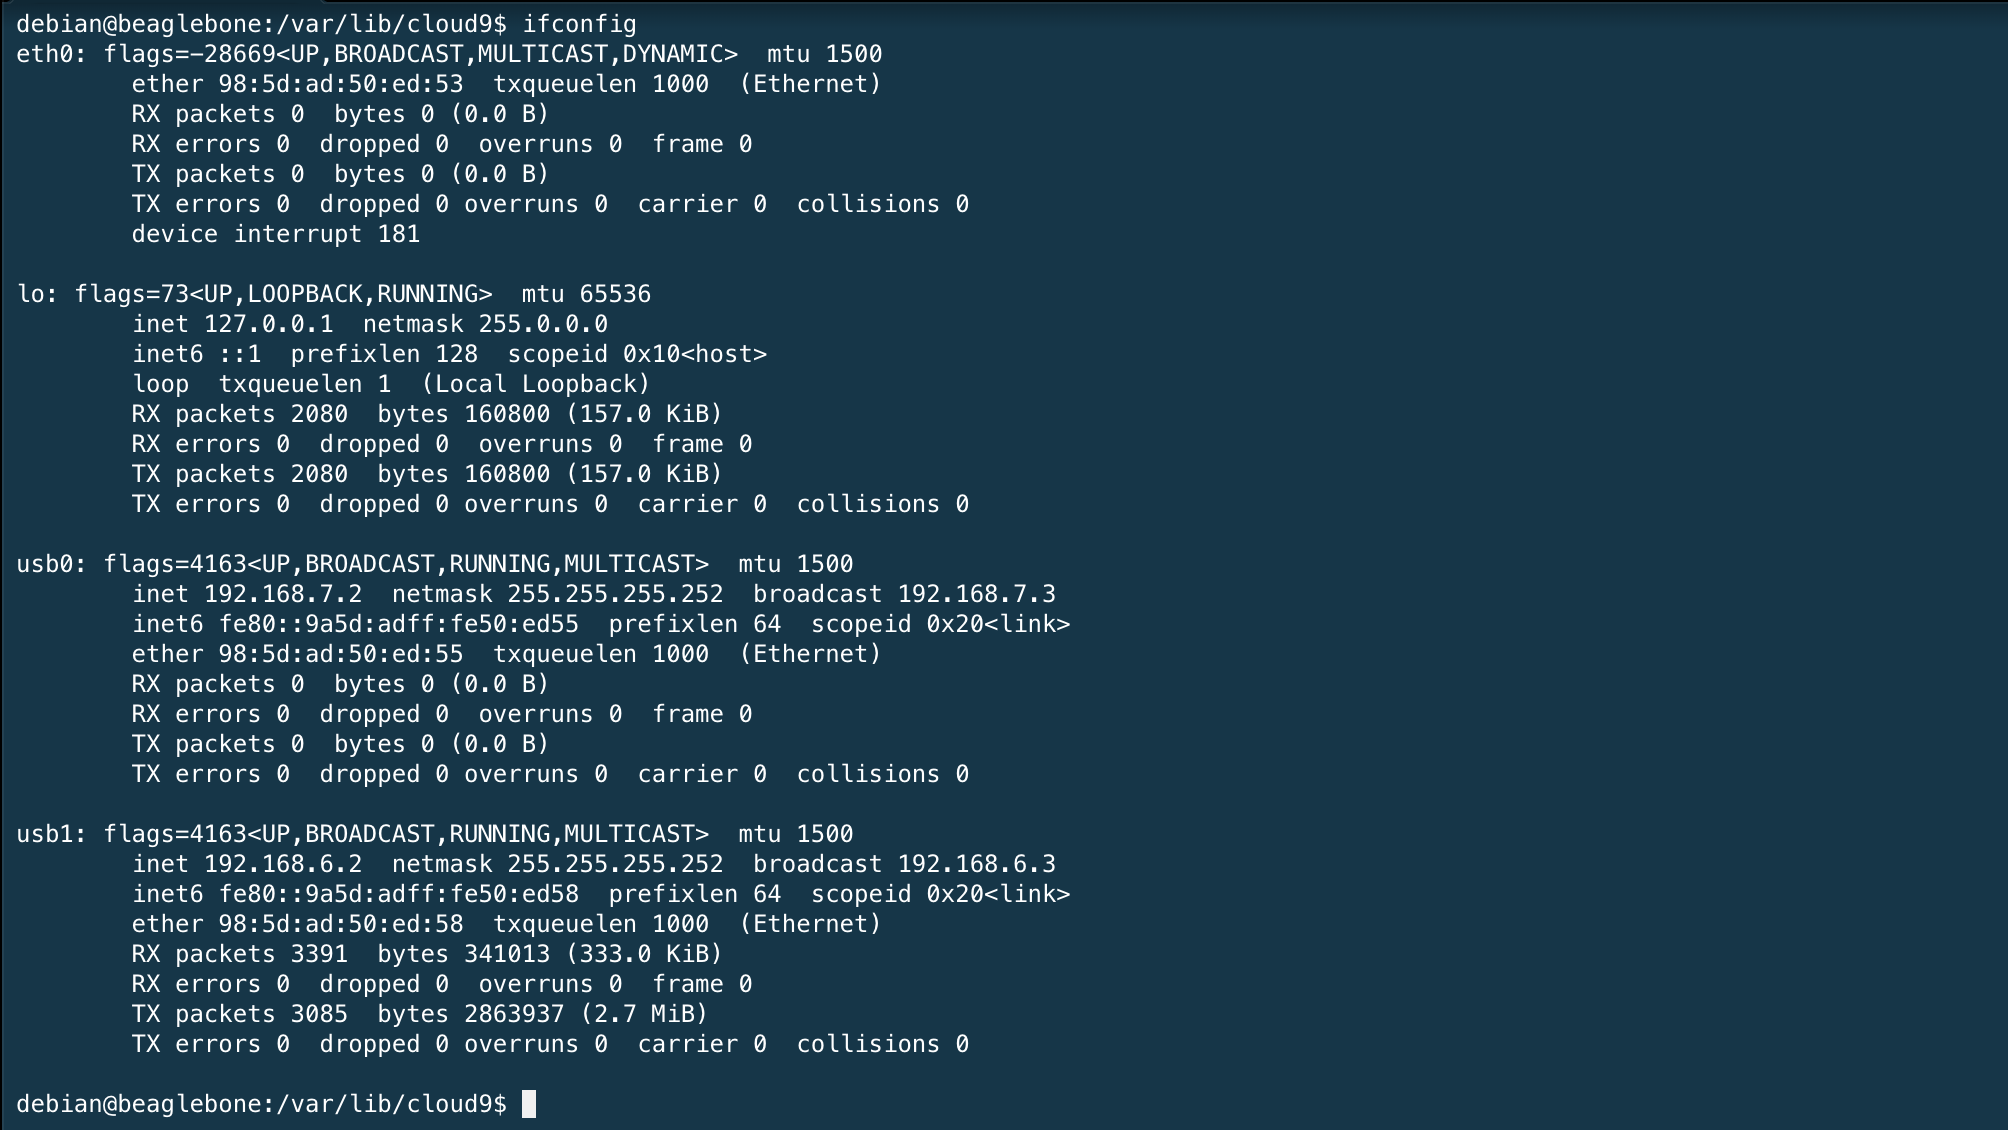
Look for the name of the network interface that is associated with your device. In this case, it is usb1.
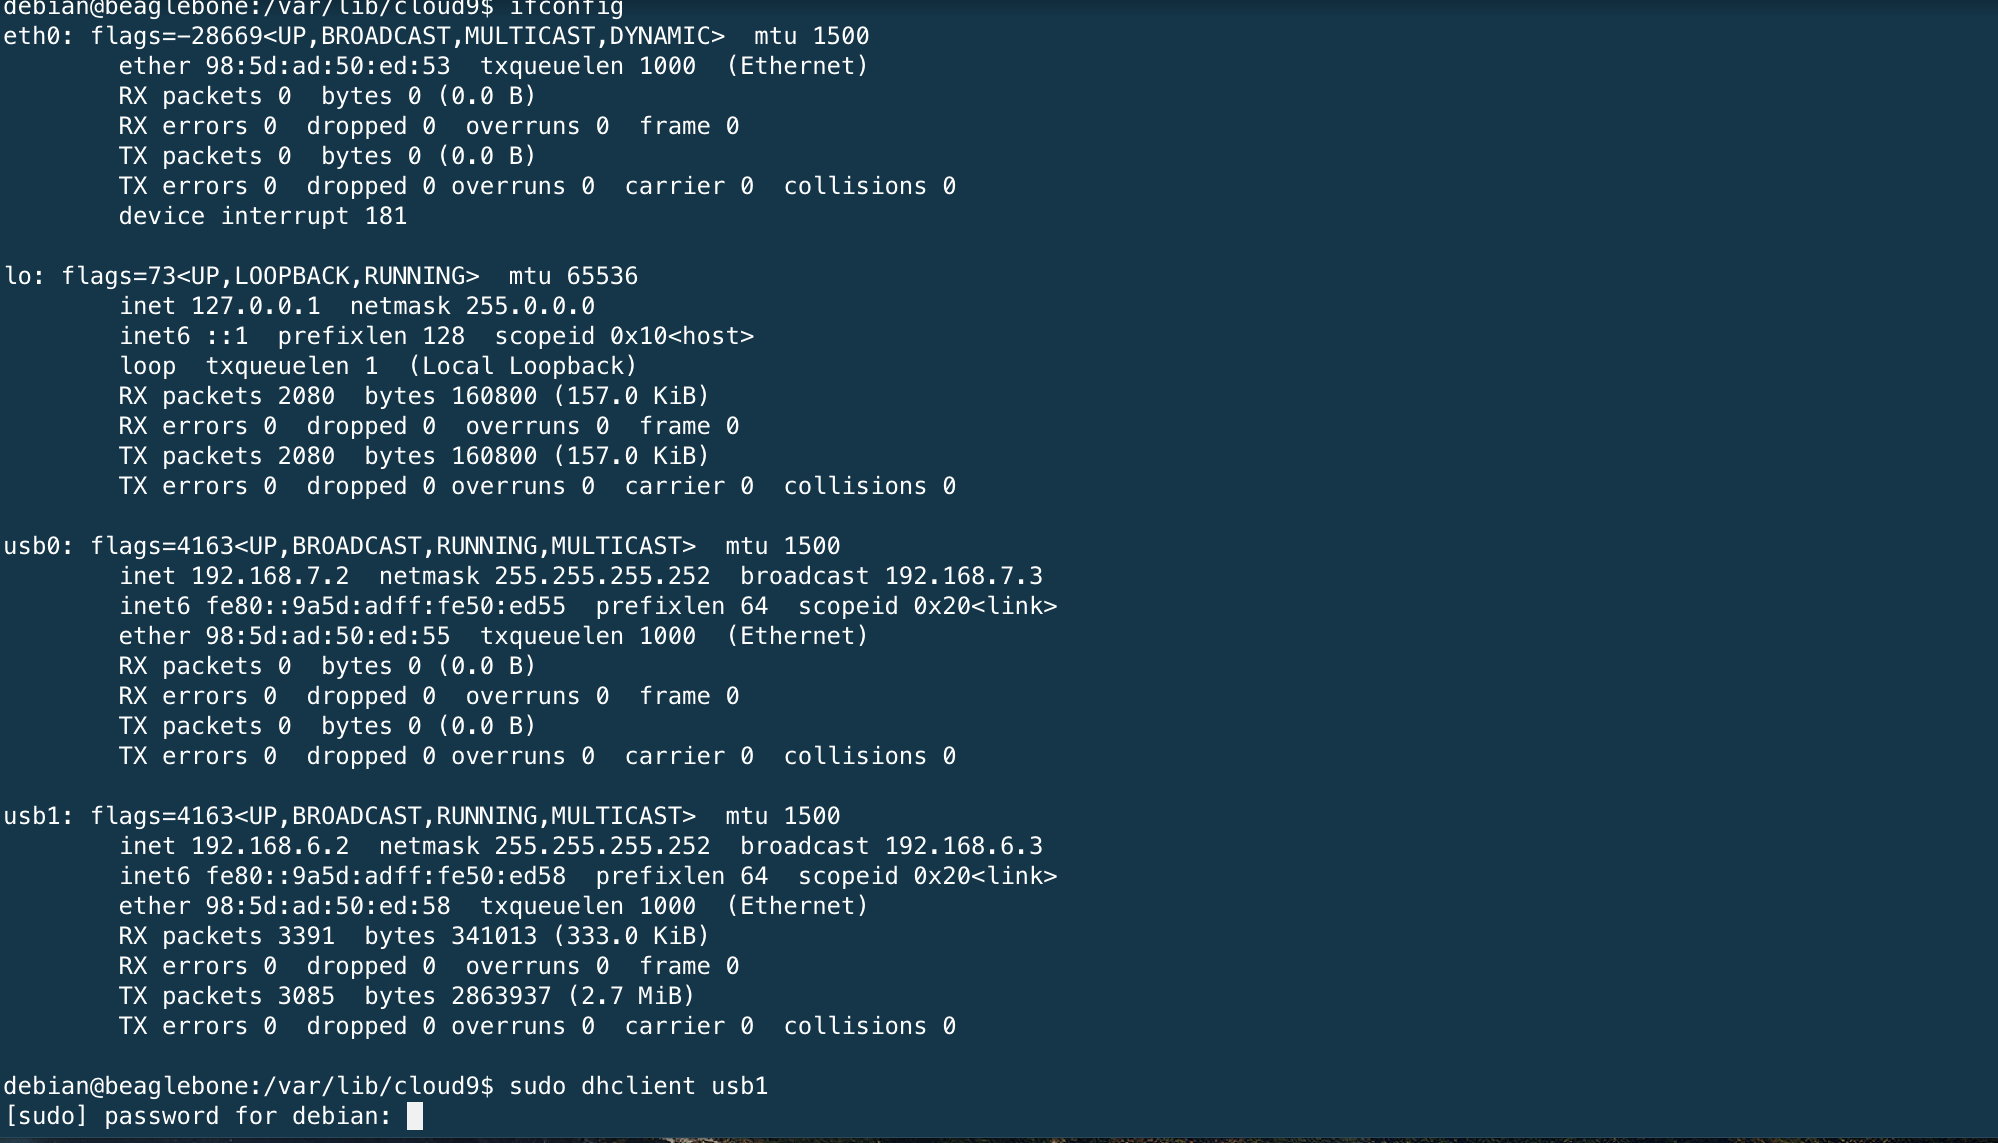
Next, use the “dhclient” command. It asks for an IP address for the device. It should be used as a sudo command, and include the network interface associated with the RED Board. In this example, it is usb1.
“sudo dhclient <network interface>”
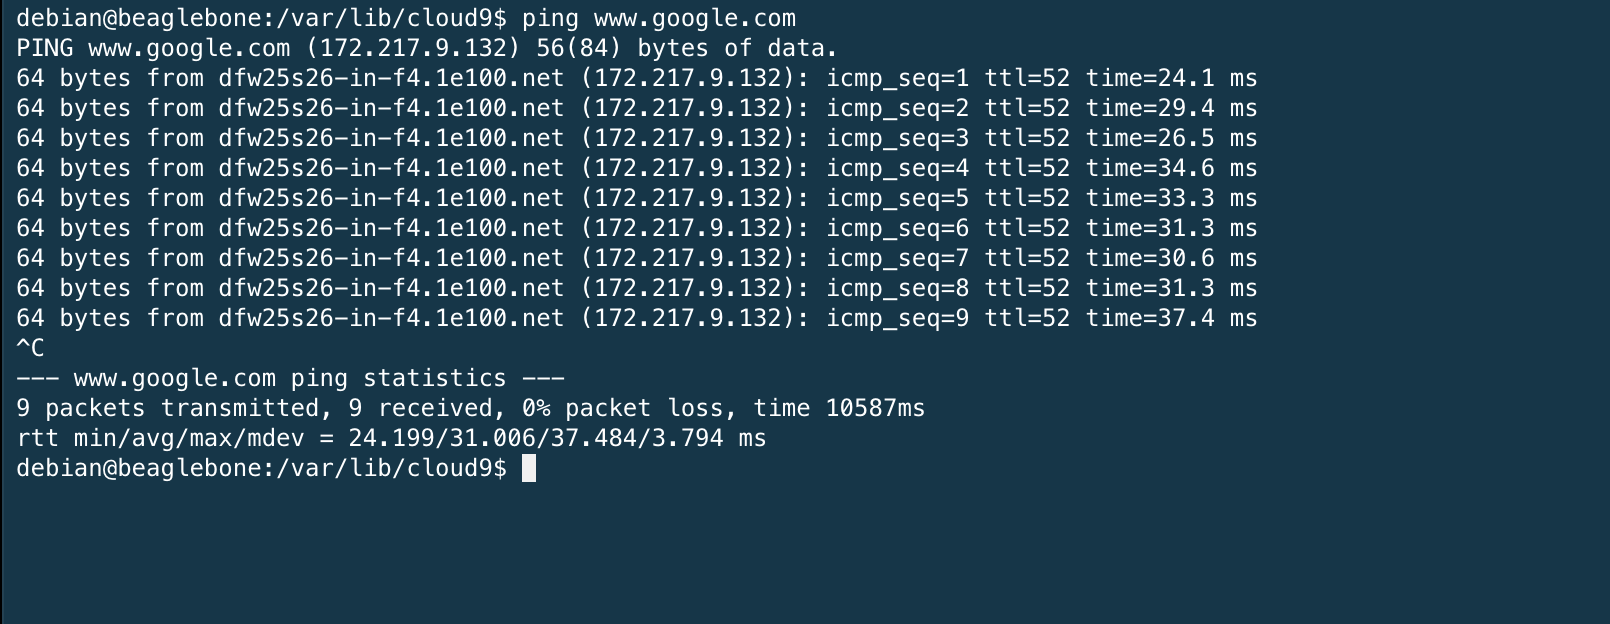
Now, check if you have access to the internet by entering the following command.
ping www.google.com.
You should receive the ping replies as shown below.
Revision History
Want to stay informed about any updates made to this app note? Sign up for our document change update notifications below.
"*" indicates required fields
| Revision Number | Revision Date | Changes | Author |
| 1 | 10/01/2020 | Initial Release | Jennifer Hellar |
